Fed up with your current hosting provider? Whether your website runs too slow, you’re paying too much, or you’re simply unsatisfied with the standard of service provided, you have many options to change your hosting provider.
With more than 330,000 web hosting vendors to choose from, you have more access to packages to support your needs than ever before. At the same time, while it may seem daunting to back up your files and transport them to another hosting service, in practice, it’s easier than it sounds.
In this article, we look at how you can change hosting providers to get the website that’s right for your business.
-
Navigate This Article:
1. Find a New Hosting Provider
The first step when changing hosting providers is to research providers and select a new plan. This means you’ll want to choose a service that offers enough bandwidth to support your users, sufficient space for your website content, high uptime to reduce the chance of disruptions, and responsive customer support.
One of the key decisions you’ll need to make during this stage is what type of hosting you require from your new provider.
There are three main types of hosting to choose from:
- Shared hosting: A service where a single server hosts multiple websites. This is a cheap option due to shared resources and can support up to 30,000 visitors per month.
- Virtual private server (VPS) hosting: A service where you purchase a portion of a virtual private server. This option is recommended if you’re technically savvy, want to pay by the hour, and want to upscale in the future.
- Dedicated hosting: A service where a single server hosts one website. This is a good option if you want greater performance with fast page load times and a dedicated IP address with support for up to 100,000 visitors per month, but it can be quite expensive.
If you need help visualizing each server type, check out this diagram.

Another lesser-known form of hosting for new site owners is cloud hosting. Generally, cloud hosting is popular for businesses and sites that receive fluctuating traffic. But for small portfolio sites and bloggers, it may be overkill. I recommend a shared hosting plan for these types of sites.
2. Back Up Your Current Website Files
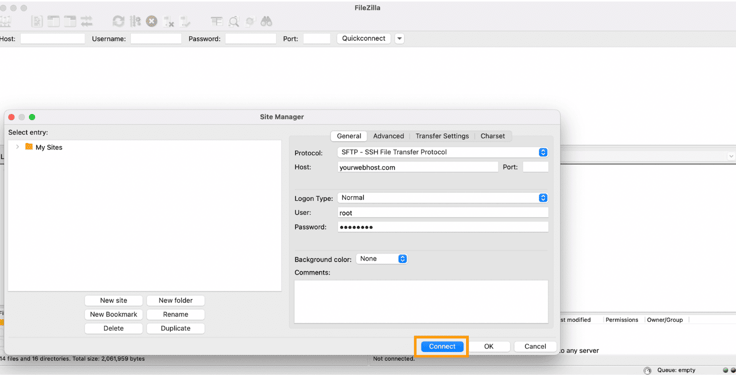
Once you’ve chosen your new plan and hosting provider it’s time to start backing up your current website uploads. You can do this by using a file transfer protocol (FTP) server like FileZilla and configuring your hosting account to enable the tool to access your files.

Backing up your site is essential so you can migrate to your new site without putting key data at risk. Accidents happen, and data can easily be lost in transit.
3. Export Your Database
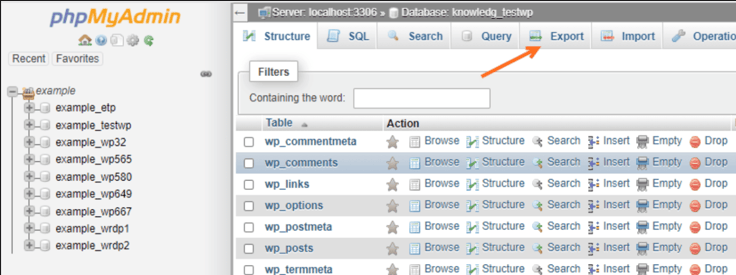
If you have a static website you can skip this step, but if you’re using a dynamic site with a CMS like WordPress, then you’ll need to download the database connected to the site. You can locate the database associated with your site by navigating to the phpMyAdmin option in your hosting account.

Here you’ll be able to save and export a copy of the database you want to migrate. Once again, this will reduce the chance of any data being lost during the transition.
Now that you’ve exported your old database, you can set up a new one with your new hosting service. This will involve creating a name, username, and password for the database. Once this is done, you’ll be able to import your old database directly into your new one.
Next, you’ll need to edit the config.php file. I know this step may seem daunting if you’ve never migrated a website. What is config.php, anyhow? But don’t worry, it’s simpler than it sounds. This is just your configuration file that holds information about your website.
Before you can transfer your files to the new site, you first need to edit them so they can connect and sync to the new database. The exact process varies depending on the type of site you’re using and your hosting provider.
If you’re migrating a WordPress site, then you’ll need to update the database name, username, and password in the wp-config.php file. This code snippet, courtesy of WPBeginner, should help:
// ** MySQL settings - This information comes from your new web hosting provider ** //
/** Name of your WordPress database goes here */
define('DB_NAME', 'database_name_here');

/** MySQL database username */
define('DB_USER', 'username_here');

/** MySQL database password */
define('DB_PASSWORD', 'password_here');

/** MySQL hostname */
define('DB_HOST', 'localhost');

/** Database Charset to use in creating database tables. */
define('DB_CHARSET', 'utf8');

/** The Database Collate type. You probably don't need to change this. */
define('DB_COLLATE', '');
To find this information, log into your new web host’s cPanel account and look for the phpMyAdmin icon under “Databases.”
4. Upload Your Files to the New Website
You’re almost through the hardest part. After configuring config.php for your new database, you can start uploading your files to the new service. You can do this by going to your new web hosting account provider, creating an FTP account, and entering a username and password.

It’s worth noting that this process can take a significant amount of time to complete if you have a large site with many files.
Sometimes things don’t go as smoothly as you’d expect during website transfer, so you need to make sure all the moving parts of your site are still functional (and look good).
With all your data in the new hosting service it’s time to test your website to see that everything is working correctly. Make sure all core functionalities and data are available to end users.
This will keep your old site live, which is critical while you test the capabilities offered by your new site.
5. Switch Your DNS
The DNS is the domain name system where your domain name lives. It’s how the catchy site name you chose gets pointed to the right IP address.

Now that you’ve imported your files and database, you can switch your site DNS to the new site. You can do this by contacting your original hosting provider’s customer support team, who can help complete the transition (if your old host offers help, take it).
Alternatively, you can also change the DNS yourself — the exact steps depend on where the domain is registered.
6. Cancel Your Old Hosting Account
Finally, after setting up a website with a new hosting provider, you can say goodbye to your old hosting account. Most web hosts let you cancel by phone, chat, email, or through your web hosting dashboard. For example, Bluehost lets you cancel through your hosting account.
It’s a good idea to cancel your old hosting service ASAP so that you can avoid unforeseen charges. There’s no sense in paying for a service you aren’t using anymore.
Take the Leap for Better Hosting
If you’re not happy with your current web host, don’t be afraid to make the switch. Migrating a website can seem complicated at first, but by breaking it down step-by-step, you’ll find it’s not so complicated after all.
Following the best practices outlined above will ensure that you can complete the process with minimal headaches (and data loss).


