There is a huge chunk of my brain where I store self-taught knowledge. I have built a considerable knowledge base with guides just like this that describe a process that I can implement.
Admittedly, I’ve often wondered if I can genuinely call it self-taught if another person at the end of a keyboard is teaching me how to do it. Semantics aside, with a little education and execution, anyone can tackle website migration.
Whatever your reason for researching how to move a website from GoDaddy, I offer you kudos for making the effort, and I look forward to helping you on that journey! Let’s take a look at the steps involved in the move, including some options for alternative hosting providers and some frequently asked questions that may emerge along the way.
-
Navigate This Article:
Step 1: Create a New Hosting Account
The first step in moving your website from GoDaddy is figuring out where to move it to. You’re likely moving your site because your old host wasn’t fulfilling a specific need. So, sit down and think about what you’re missing and what you need moving forward.
You can develop a list of what you want and a separate list of what you need. Make sure your next web host checks every box from the list of what you need then narrow down the options by seeing which hosting provider and which hosting plan will offer you most of your wants.
Check out how to choose the right web host >>
Here are a few examples that discuss some of our favorite hosts and what they are best known for.
SiteGround.com
- FREE site transfer or new site setup
- FREE daily backups, CDN, email, and SSL
- 24/7 expert support with no wait on phone or chat
- Recommended by WordPress as a top host
- Ideal for business email hosting
- Get started on SiteGround now.
BEST OVERALL
RATING
★★★★★
Our Review
With an impressive breadth of overall hosting services offered, SiteGround is a leading innovator in the hosting space — from custom software solutions to premier customer support. The company offers the full range of web hosting features, including a free Cloudflare CDN, cPanel with SSH access, and unlimited MySQL databases and bandwidth — not to mention prize-worthy customer support. Go to full review »
| Money Back Guarantee | Disk Space | Domain Name | Setup Time |
|---|---|---|---|
| 30 days | 10 GB SSD – 40 GB SSD | New or Transfer | 6 minutes |
SiteGround is applauded for its customer support because it’s easily accessible, knowledgeable, and capable. Some hosting providers are either available and have the knowledge to make changes, but they always have to escalate your requests to get anything done. Or maybe they’re an amazing team but you can never get a hold of them.
With SiteGround you will have 24/7 access to someone through any of your preferred contact modes, they know what they’re doing and have all the tools to help you. SiteGround even does proactive troubleshooting to catch problems before they affect your site. Now, that’s what I call service!
Bluehost.com
- Up to unlimited website domain and email hosting
- 1-click WordPress installs and software updates
- Support for popular shopping carts with FREE SSL
- Up to $200 in Microsoft and Google Ad credit
- Industry-leading hardware and uptime rates
- Get started on Bluehost now.
BEST OVERALL
RATING
★★★★★
Our Review
Bluehost has long been a favorite of mine in the shared and WordPress hosting spaces. The company adheres to modern standards for hardware, and its customer service resources are now backed by hosting industry titan Newfold Digital. Go to full review »
| Money Back Guarantee | Disk Space | Domain Name | Setup Time |
|---|---|---|---|
| 30 days | 10 GB SSD – 100 GB SSD | FREE (1 year) | 5 minutes |
Bluehost is a long-time HostingAdvice favorite because the company excels in almost every hosting niche from cheap shared hosting plans to dedicated servers. It has a rock-solid reputation for shared hosting plans for beginners, but its expertise doesn’t stop there.
Bluehost is officially recommended by WordPress.org, which speaks to its compatibility and performance for building a WordPress website. It offers a simple and user-friendly process to install WordPress, making it easy for beginners to get started with their WordPress site.
The one-click process to install WordPress saves time and simplifies the setup process. Even skilled web developers will appreciate the ease of access and time savings while they dive into their site setup.
A2Hosting.com
- SSDs and TurboServer for 20x faster pageloads
- Host unlimited websites and FREE site transfer
- Optimized plugins and 1-click installs for WP
- Pre-installed OPcache and Memcached caching
- FREE HackScan with restore options
- Get started on A2 Hosting now.
BEST OVERALL
RATING
★★★★★
Our Review
If speed and performance, partnered with support and security, are at all priorities in your web host shopping, A2 Hosting should be a leading contender. When A2 Hosting first launched in 2003, the company was focused on serving developers; A2 Hosting was among the first providers to offer PHP 5 and to support Ruby on Rails on shared servers. Go to full review »
| Money Back Guarantee | Disk Space | Domain Name | Setup Time |
|---|---|---|---|
| 30 days | 100 GB SSD – Unlimited SSD | New or Transfer | 5 minutes |
This hosting provider’s emphasis on speed and performance is ubiquitous. A2 Hosting’s SwiftServer Platform works with its Turbo Servers, speed-optimized software, SSD storage, global datacenters, advanced caching mechanism, and CDN to provide performance that competes as best in the business.
A2 Hosting is transparent about its speed performance and provides speed test results on its website. Additionally, it offers a “Guru Crew” support team that can help optimize your site for speed.
Hostinger.com
- 24/7/365 ticket and live chat support
- 99.9% network uptime guarantee
- FREE domain, site builder, backups, and SSL certificate
- Unlimited bandwidth, databases, and email accounts
- Speedy SSDs optimize performance
- Get started on Hostinger now.
BEST OVERALL
RATING
★★★★★
Our Review
Behind a mission to make life easier for website developers and their customers, Hostinger provides fast, stable, and streamlined services at a price that is very hard to beat. Founded in 2004, the bootstrapped company hit the 10 million users mark a decade later, achieving ICANN accreditation and localizing services in 39 countries. Go to full review »
| Money Back Guarantee | Disk Space | Domain Name | Setup Time |
|---|---|---|---|
| 30 days | 50 GB SSD – 200 GB SSD | FREE (1 year) | 3 minutes |
Small business owners should consider factors like the type of website they need, the level of customer support required, scalability options, and overall performance when choosing a hosting provider. Hostinger provides excellent features on each of these fronts.
One important feature often sought by small businesses is affordable pricing. Hostinger offers budget-friendly hosting plans, making it an attractive option for those with limited budgets who wish to conserve their hard-earned profits to reinvest in the business.
Hostinger has cost-effective shared hosting plans and often runs promotions to make hosting even more affordable.
Another important feature is the user-friendliness. You want to spend your mental energy and time conceptualizing your business, not figuring out how to move your logo 5 centimeters to the left while developing your site. Let the control panel and website builder shoulder burdens like that so you can focus on what matters most.
IONOS.com
- FREE domain and SSL, plus daily backups
- Drag-and-drop site builder and starter kit
- Gain exposure with $100-worth of ad credits
- Packages cater to businesses & personal use
- FREE custom SEO and marketing tools
- Get started on 1&1 IONOS now.
BEST OVERALL
RATING
★★★★★
Our Review
Born in 1988 — at least a decade before many competitors — 1&1 IONOS has maintained its dedication to making technology easy to understand and use. The company got its start in Europe but has since expanded to serve more than 8 million global customers and host more than 12 million domain names. Go to full review »
| Money Back Guarantee | Disk Space | Domain Name | Setup Time |
|---|---|---|---|
| 30 days | 10 GB – Unlimited | FREE (1 year) | 6 minutes |
Beginners benefit from intuitive features, simplified processes, and extensive knowledge bases. IONOS heard these calls and implemented a range of one-click applications, a user-friendly control panel, and a website builder with drag-and-drop functionality to enable beginners to create websites without coding knowledge.
If you have any trouble, IONOS offers a full scope of customer support through various channels, including phone, email, and live chat.
When learning a new skill, I also appreciate the ability to start small with my hosting plan, in case I totally bomb and decide to outsource instead. While IONOS offers budget and beginner-friendly plans, it also has options to upgrade to more advanced hosting solutions as your skills and website grow.
HostGator.com
- Familiar and easy-to-use cPanel control panel
- FREE drag-and-drop custom website builder
- Unlimited disk space, email, and bandwidth
- Flexible term lengths with no contract required
- 74% off your first three years
- Get started on HostGator now.
BEST OVERALL
RATING
★★★★★
Our Review
HostGator has been around for more than a decade and is well-respected for its large number of servers and consistent reliability. Known mostly as a shared hosting provider, HostGator still supplies decent dedicated and VPS options if you need your site to scale. Go to full review »
| Money Back Guarantee | Disk Space | Domain Name | Setup Time |
|---|---|---|---|
| 30 days | 10 GB SSD – 40 GB SSD | FREE (1 year) | 6 minutes |
HostGator is known for offering scalable hosting solutions. The range of hosting plans, from shared hosting to dedicated servers to WordPress hosting and more, provides an excellent starting point for users to choose what works best for their site.
This variety allows users to start with a basic plan and easily upgrade to more advanced options as their website traffic and needs increase.
Similarly, HostGator’s hosting plans typically come with scalable resources, such as bandwidth and storage. This means that users can adjust their resources based on their website’s demands, ensuring optimal performance as the site grows.
The process to upgrade is seamless and involves minimal impact on the uptime of your site. You don’t have to worry about better options, because HostGator is ready to grow with you.
Once you have selected your new host, you will need to set up an account with that provider before proceeding to the next step.
Step 2: Backup Your Website Files and Database
This step is crucial in case anything goes wrong during the migration process. You can use GoDaddy’s backup tools or a third-party plugin if you’re using a CMS like WordPress.

To backup files on a standard shared hosting site from within your GoDaddy account:
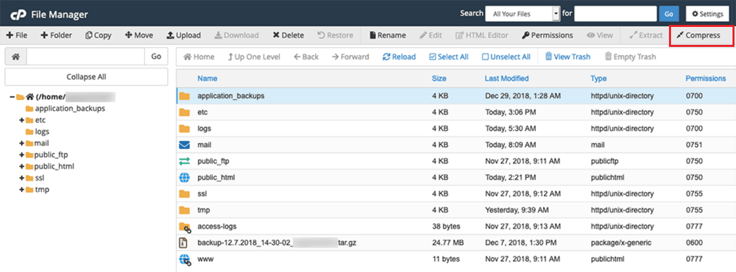
- Go to the cPanel in the hosting dashboard and select “File Manager” under the drop-down menu with three dots
- From there you can “Compress” or “Zip” the necessary files and folders in your root directory and download them onto your local computer for safe keeping
- To backup the database, look in the cPanel for the “Databases” section and click on “phpMyAdmin”
- Then select the database and click the “Export” tab at the top of the page to download the backup file to your computer
Once you’ve backed up your website, you’re ready to transfer your files
Step 3: Transfer Website Files
During this step, you will be moving the content of your site to its new home. There are two methods to complete this step:
- You can use an FTP (File Transfer Protocol) client like FileZilla
- You can use GoDaddy’s file manager to transfer the files
If you decide to manually download the files from GoDaddy and reupload them in your new hosting account, it is important to remain organized and vigilant. For your website to work correctly, the most important requirement of this step is ensuring that you place the files in the correct directory.
Step 4: Migrate the Database
If your website relies on a database (e.g., MySQL), you’ll need to migrate it from the old host to the new host. This is done by exporting the database from GoDaddy and importing it into the new hosting account.

If you’ve exported the database as a backup, you have already accomplished half the steps of this process. Now, you only need to import the database in the new hosting account. All of the best hosting providers will have a knowledge base or customer service representatives to help navigate this process within its system.
Be sure to update the database credentials in your website’s configuration files to reflect the new hosting provider’s settings.
Step 5: Update the Domain
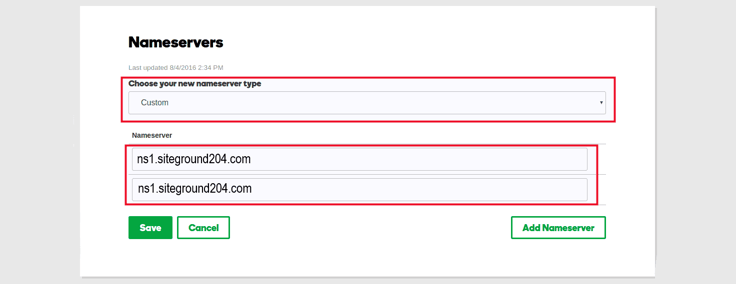
Your domain name is important: It’s like the introduction of your website. So if you’re keeping the same domain, you’ll need to update the DNS settings to point to your new hosting provider’s servers. Once you update the nameserver or DNS records, it may take some time for the changes to propagate across the internet.
Pro tip: This process is called DNS propagation and can take anywhere from a few minutes to 48 hours.

In the interim, some users may see your website hosted on the old server, while others will see the new one. This is normal and will resolve itself as DNS updates are fully propagated.
With GoDaddy, you can keep your domain with its service and simply point it toward the new host. If you’ve decided instead to transfer the domain to a new registrar, you need to complete the domain transfer process before updating the DNS record settings.
Once you’ve completed these steps, you should have a working website with your new hosting provider. Be sure to fully test the site out to make certain that everything works as expected.
Check your website for:
- Broken links
- Missing files
- Unexpected error pages
Once it all looks good, cancel your GoDaddy hosting and enjoy your new service provider.
Can You Get a Refund From GoDaddy?
GoDaddy generally offers a refund policy for its products and services, but the specific terms and conditions may vary depending on the type of product or service you purchased.
For hosting services, GoDaddy offers a refund period during which you may cancel a product at any time. Be advised that a refund will only be issued if you request a refund with GoDaddy’s customer service within the refund time frame specified.
The standard refund terms identify the refund period as within 30 days of the date of the transaction.

Pro tip: Monthly plans can only be refunded if canceled within 48 hours of the transaction.
GoDaddy also has a refund policy for a variety of other products as well. These include:
- Domain registrations and renewals, auctions, and domain backorders
- Ad spending, assisted services, and email account services
- Website building services, logo design, and SEO services
Be sure to look at GoDaddy’s policies for all the services you have purchased to see exactly how much you can recover.
What Happens to My Domain if I Cancel Web Hosting?
If you cancel your GoDaddy web hosting, the fate of your domain name depends on whether you purchased a custom domain separately from the hosting service or as part of a package.
Here are the two common scenarios:
You purchased domain registration separately: If you purchased your domain name separately from your GoDaddy web hosting, your domain will remain unaffected by the cancellation of your hosting service. The domain will still be under your ownership, and you can continue managing it through your GoDaddy account.
In this case, you have the following options:
- You can continue using the domain as-is and point the DNS to a different hosting provider or website.
- If you want to switch domain registrars or consolidate all your services in one place, you can initiate a domain transfer to a new registrar.
You bundled your domain name and hosting plan: GoDaddy often offers a free domain name or bundles it with the hosting plan for the initial term. If you cancel your GoDaddy hosting plan and your domain was part of the bundle, GoDaddy’s bundled refund policy will determine what happens to the domain:
In the event any purchased product includes a free domain name, if you cancel the purchased product, the list price for the domain name will be deducted from the refund amount (the list price is the price of the domain name listed on the GoDaddy website and is not subject to any promotion, discount, or other reduction in price).
To avoid any confusion, make sure to review GoDaddy’s terms and conditions before canceling your hosting service. If you are uncertain about the fate of your domain after canceling hosting, we recommend contacting GoDaddy’s customer support for clarification.
How Do I Transfer My GoDaddy Domain To A New Registrar?
Transferring your GoDaddy domain to another domain registrar is a relatively straightforward process. It is important to note, however, that the backend portion of the domain transfers can take several days to complete.
During this time, your website and email associated with the domain may experience some downtime. It’s crucial to avoid making significant changes to your domain settings during the transfer domain process to ensure a smooth transition.
Without further ado, here’s a step-by-step guide on how to initiate a domain transfer:
Step 1: Unlock the Domain
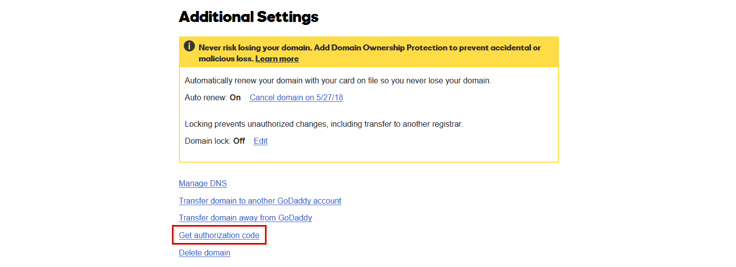
Log in to your GoDaddy account and navigate to the “Domains” section. Find the domain you want to transfer and make sure it is unlocked. If it’s locked, click on the domain and look for the “Domain lock” setting. Turn off the domain lock to allow for the transfer.
Step 2: Obtain the Authorization Code
Still in your GoDaddy account, locate the domain you wish to transfer and click on it. Look for the “Authorization Code” or “Get authorization code” option. Click on it to generate the authorization code for the domain.

Save the code as you’ll need it during the transfer process.
Step 3: Prepare the New Registrar
Before initiating the transfer, identify a new domain registrar and sign up with that new domain provider. Ensure that the current registrar supports domain transfers and that you have completed any registration or verification requirements.
Step 4: Initiate the Transfer at the New Registrar
Log in to your new domain registrar’s account and find the domain transfer option. Start the transfer process by entering the domain name you want to transfer and the domain’s authorization code that you obtained from GoDaddy.
Step 5: Confirm the Transfer at GoDaddy
After initiating the transfer at the new registrar, you should receive an email from GoDaddy requesting confirmation of the transfer. Follow the instructions in the email to confirm the transfer. This is typically done by clicking on a link provided in the email.
Step 6: Verify the Domain in the New Registrar
Once the domain transfer process is complete, check your new domain registrar’s account to verify that the domain is now listed there.
You did it!
Moving from GoDaddy Made Easy
To sum up the transfer process in as few steps as possible, you will first need to download your current setup from GoDaddy then upload it into the new host. After your domain requirements are situated and your materials are transferred, you’ll be up and running.
The concept isn’t complicated, but you will need to understand the nuances between each hosting provider to execute the migration. Thankfully, the alternative hosts listed in the guide have user friendly interfaces, excellent customer service, and useful knowledge bases to help you through the process.
Thinking of changing your mind or plan? See our full GoDaddy review >>
HostingAdvice.com is a free online resource that offers valuable content and comparison services to users. To keep this resource 100% free, we receive compensation from many of the offers listed on the site. Along with key review factors, this compensation may impact how and where products appear across the site (including, for example, the order in which they appear). HostingAdvice.com does not include the entire universe of available offers. Editorial opinions expressed on the site are strictly our own and are not provided, endorsed, or approved by advertisers.
Our site is committed to publishing independent, accurate content guided by strict editorial guidelines. Before articles and reviews are published on our site, they undergo a thorough review process performed by a team of independent editors and subject-matter experts to ensure the content’s accuracy, timeliness, and impartiality. Our editorial team is separate and independent of our site’s advertisers, and the opinions they express on our site are their own. To read more about our team members and their editorial backgrounds, please visit our site’s About page.


