Your first self-hosted WordPress website always feels like a major accomplishment. Breaking free from the fully hosted WordPress.com experience is liberating and unlocks a world of potential for your site.
Self-hosted WordPress hosting relies on software from WordPress.org that is typically configured via a streamlined one-click installation script. What’s more, the best WordPress hosts include upgraded infrastructure and security measures optimized to run and protect the world’s most popular content management system.
Whether you’re setting up your first site or moving from the hosted to self-hosted platform, we’re here to make the creation process as painless as possible, Below, you’ll find tips and tricks for creating a one-of-a-kind self-hosted WordPress site.
Step 1: Choose a WordPress Host
What many people don’t know is that web hosting is fundamental to the success of any website. When selecting the WordPress host that is right for your needs, you should evaluate providers for speed, reliability, security, and price. Self-hosting your WordPress site will give you far greater creative control over everything from code and plugins to themes and user experience.
If you’re a beginner, you might want to look for hosts that offer a robust technical support program and can help you befriend the WordPress backend. You may pay a bit extra if you go for fully managed WordPress services, but the saved time could be worthwhile.
Here are our top recommendations for self-hosted WordPress plans:
1. Bluehost.com
- Recommended by WordPress.org since 2005
- Automatic WordPress updates and initial install
- FREE WordPress themes in the Bluehost Marketplace
- 24/7 support via live chat, phone, and email
- Get exclusive discounts on WordPress plans
- Get started on Bluehost now.
WORDPRESS
RATING
★★★★★
Our Review
Bluehost's WordPress hosting packages are aimed at first-time site owners and personal bloggers. These services come at a premium compared to the standard Bluehost web hosting (basic shared hosting) plans, but the WordPress optimization and platform-specific resources are arguably worth the cost. Go to full review »
| Money Back Guarantee | Disk Space | Domain Name | Setup Time |
|---|---|---|---|
| 30 days | 10 GB SSD - 100 GB SSD | FREE (1 year) | 7 minutes |
2. Hostinger.com
- 1-click WP install, PHP 7+, HTTP/2, and NGINX
- All-in-one security protections from BitNinja
- WordPress optimizations boost performance
- No price markup for WordPress services
- Daily backups and FREE SSL certificate
- Get started on Hostinger now.
WORDPRESS
RATING
★★★★★
Our Review
As much as we love WordPress, one of our biggest pet peeves is when hosting providers exploit the popularity of the world's most-used content management system by offering so-called WordPress hosting that, in reality, is exactly the same as the host's shared server plans. Fortunately, Hostinger's ultra-fast infrastructure and easy access to SSL certificates and backups sets up the company to outperform the vast majority of the violators of our admittedly made-up rule. Go to full review »
| Money Back Guarantee | Disk Space | Domain Name | Setup Time |
|---|---|---|---|
| 30 days | 100 GB SSD - 200 GB NVMe | FREE (1 year) | 4 minutes |
3. SiteGround.com
- Officially endorsed by WordPress.org
- FREE migration plugin or automated installation
- Pre-installed Git, 3 caching levels, and FREE CDN
- FREE WP setup wizard, staging, and auto-updates
- Fast, 24/7 support via custom chat system
- Get started on SiteGround now.
WORDPRESS
RATING
★★★★★
Our Review
Want a hassle-free, WordPress-optimized hosting service. SiteGround has thought of everything you need to get your site up and running. Go to full review »
| Money Back Guarantee | Disk Space | Domain Name | Setup Time |
|---|---|---|---|
| 30 days | 10 GB SSD - 40 GB SSD | New or Transfer | 6 minutes |
4. DreamHost.com
- WordPress hosting for up to unlimited sites
- FREE WordPress website migration
- Fully managed hosting with DreamPress plan
- NEW WordPress website builder tool
- 1 of 3 providers endorsed by WordPress.org
- Get started on DreamHost now.
WORDPRESS
RATING
★★★★★
Our Review
One of only three hosting providers recommended by the WordPress Core team, DreamHost has actively contributed to the WordPress community for more than a decade. The company's platform is optimized for the incredibly popular content management system, and plans include easy setup, automated updates and backups, unlimited bandwidth, and 24/7 specialized support. Go to full review »
| Money Back Guarantee | Disk Space | Domain Name | Setup Time |
|---|---|---|---|
| 97 days | Unlimited | FREE (1 year) | 4 minutes |
5. InMotionHosting.com
- Up to 12x faster WordPress hosting
- FREE SSL certificate and SSD storage
- Automatic WordPress plugin, theme, and core updates
- Features a FREE drag-and-drop WP page editor
- Premium themes and plugin subscriptions
- Get started on InMotion now.
WORDPRESS
RATING
★★★★★
Our Review
InMotion Hosting, long known for affordable and high-performance shared hosting options, entered the WordPress space with a solid option built upon the company's reputation for great support and reliability. Build on an all-SSD infrastructure, InMotion's inherently quick speeds make the infrastructure a perfect fit for delivering rapid WordPress page loads. Go to full review »
| Money Back Guarantee | Disk Space | Domain Name | Setup Time |
|---|---|---|---|
| 90 days | 100 GB - Unlimited SSD | FREE (1 year) | 5 minutes |
See other top-rated WordPress hosts »
WordPress-specific hosting is among the fastest-growing segments of the hosting industry — but not all providers offer the same attention and optimizations. In addition to the hosts listed above, providers such as Doteasy enable customers to choose just how much computing power they think they need to perfectly balance price and performance.

Doteasy has provided high-quality and affordable web hosting for nearly two decades.
Doteasy streamlines the WordPress experience for beginners by pre-installing the content management system during the signup process. Customers can choose to configure Doteasy hosting services with or without solid-state drives, and the plans come with a free domain registration — some packages will even cover the first renewal period, as well.
Step 2: Choose a Domain Name
Once you’ve selected your hosting service, it’s time for the fun part – creating your domain name! Before you pick the first idea that pops into your head, consider the following tips:
- Do your research. There are billions of sites already in existence. So unfortunately, your ideal domain may not be available right now. Pay close attention to anything that might be copyrighted or legal property of a company. Your [purr]fect domain name is not worth a potential lawsuit!
- Keep it short and easy to spell. For example, “PurrfectPets.com” could confuse potential site visitors with its play-on-words spelling – maybe “MeowMates.com” would be a better option here. Do your best to exclude numerals, hyphens, dashes, or any other symbol that might be confusing. Simplicity is your best friend.
- Make sure your domain name is consistent with the brand you’re trying to build. In most cases, your domain name will be the first visitor touch point, so you want to ensure it’s as closely related to your brand, site name, or business as possible. If MeowMates.com was not in fact intended to be an animal- or cat- related site, I would be better off picking a name that more accurately reflected the site content.
- Don’t forget about SEO! Keywords in your domain name can help your search results ranking, but don’t overdo it with keyword stuffing – “MeowMatesCatFoodSuppliesAdoption.com” would not be a more successful name, even though it is (over)loaded with relevant keywords.
- Still stuck? Try a domain generator. There are a bunch of great ones out there that can help get your creative juices flowing.
Most of the hosts we recommend include a free domain registration for at least a year when you sign up for an annual plan. Take advantage of these offers while they’re available!
Step 3: Download and Install WordPress
So, you’ve purchased your catchy domain name – now you’re ready to make things official! One of the best things about WordPress is its intuitiveness. You don’t have to be a code wizard to get a site up and running, and the download/installation process only takes about five to eight minutes. Once WordPress is up, you can begin publishing content immediately!
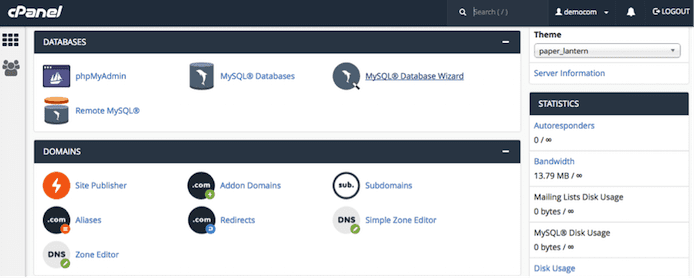
First, log into your selected hosting service platform and go to cPanel. While the layout of cPanel will vary from host to host, the steps to install WordPress will be largely the same.
Next, scroll down to the section labeled “Databases.” Select MySQL® Database Wizard. You’re going to set up a database where WordPress will store all of your site data.

Most WordPress-friendly hosts will include cPanel, a management panel from which you can install WordPress.
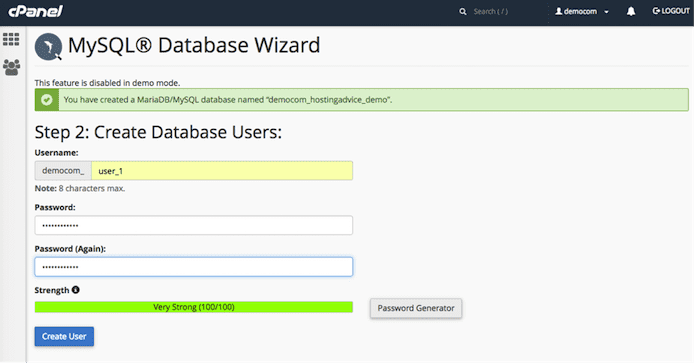
Next, create a database by entering the database name. Hit “Next Step.”

You’ll want to create a database for your new WordPress site.
Enter the username and password for the database user you wish to create. Click “Create User.”

Make sure you choose a strong password for your new database login credentials.
Next, you will see the privileges options for the user. Select the options according to what the user will need. If you’re creating an administrative account, you will want to select all privileges. Now we need to give WordPress the details of our database, so it has a destination for our site data.
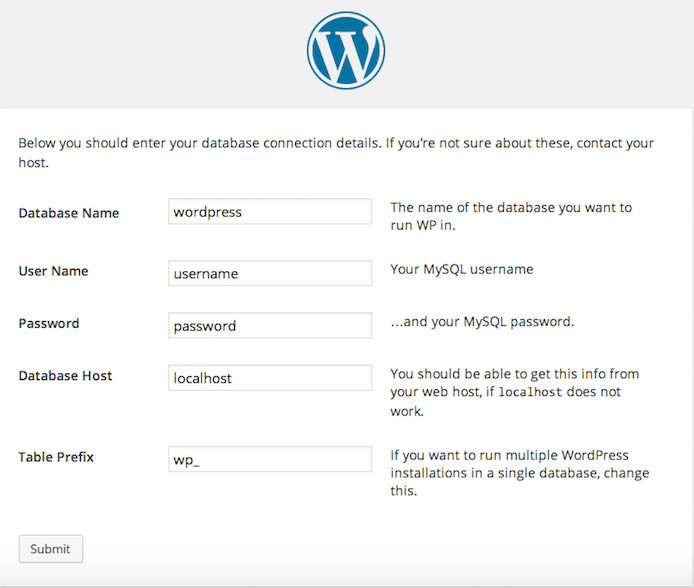
You can download WordPress here. When you open the download, you’ll be prompted to enter the database name, username, and password you just created. Enter the Database Host, which is information you should have from your web host. Finally, you can keep the Table Prefix as the default wp_ for now. Click “Submit.”

Enter your database connection details as instructed.
Only one step left! You need to execute the installation script. Enter either of the following URLs in your web browser:
- http://yourdomain.com/wp-admin/install.php
- http://yourdomain.com/blog/wp-admin/install.php
Make sure you replace “yourdomain.com” with your actual domain. You’ll be directed to the WordPress install page: “Welcome to the famous five-minute WordPress installation process!”
Voila! You just installed WordPress. Now you’re ready to put the finishing touches on your site.
Step 4: Select a Theme or Design from Scratch
This is where your site will really start to come alive. When it comes to your site’s design, you have two options: Using a pre-packaged theme, or creating a custom design with HTML and CSS.
Depending on how comfortable you are with backend code, a theme may be the more enticing option, as it will require minimal technical maintenance on your end. That said, if you want full control over your site’s look and feel (and you have a solid understanding of HTML/CSS), a custom-coded design might best fit your needs.
Best Themes for WordPress
There are thousands of theme options from which to choose, and many are designed for specific purposes. Looking to run an eCommerce site? There is a theme for that. Are you more interested in a creative look, perhaps for showcasing a personal portfolio? There is a theme for that as well.
The best thing about themes is that they’re constantly getting updated. We recommend checking out the WordPress Theme Directory to browse the best selection.
Some of our favorite themes of the moment include:
1. Ruthin — A clean and modern way to showcase your blog or portfolio

Distinctive Themes created the uniquely styled Ruthin theme, which features a navigation menu on the left side of the page.
2. Writers – Great for portfolio and photography sites

Aptly named theme Writers gives bloggers a leg up on SEO-friendly online content writing.
3. Shopkeeper – A go-to for eCommerce and product marketing sites

ShopKeeper by envatomarket is great for organizing and promoting your online store’s merchandise.
4. Travel Tour – Perfect for travel and booking sites

Showcase gorgeous destinations and experiences with TravelTour, an excellent theme for booking sites.
If I were selecting a theme for MeowMates.com, I would be looking for something that offered the ability to browse components, search and filter for specific keywords, easily find contact information, and submit secure information forms.
Install a Theme via the Directory, a .ZIP Upload, or FTP
You can download and install your theme with a variety of methods. For an in-depth look at Directory, .ZIP Upload, and FTP theme installations, check out our step-by-step instructions here.
Download via the Official Directory – This is the quickest and easiest way to install a theme. If you’re using a native WordPress theme, it will only take two to three clicks to get it up and running.
Manual Upload via .ZIP – If you’re using a theme from a third-party website, you may have to do a manual upload. You’ll simply upload the theme’s .ZIP file to WordPress, and with a few clicks, the installation will be complete.
Manual Upload via FTP – (S)FTP is an alternate way to manually upload a theme. Depending on your web hosting service, you may have to use this option. The upload process itself is nearly identical to the .ZIP upload process.
Step 5: Generate Content and Publish!
Congratulations! You’ve successfully set up your own WordPress site. Now what?
We’ll give you a hint: Publish, publish, PUBLISH! Start sharing the amazing content you’ve generated for your site, whether it’s blog posts, photography portfolios, business specials, or branded marketing collateral. Make sure your content is SEO-friendly, tagged appropriately, and organized logically. It wouldn’t hurt to do a little research on content strategy best practices, either.
At the end of the day, you want to ensure your site visitors can find the information they’re looking for as seamlessly as possible. When it’s well organized and easily accessible, great content results in great success.
Self-Hosting a WordPress Site Doesn’t Mean You’re Alone
As it turns out, the self-hosted WordPress “learning curve” is really more of a gentle slope – once you learn the basics, the rest really isn’t that difficult — especially if you find a web host that is well equipped to help you along your maiden WP voyage.
Look for hosting providers that offer high-speed hardware, ample security measures, automatic updates, and lots of WordPress-oriented tutorials and support channels to help you solve any problems that may arise.
I hope that no matter where your WordPress journey takes you, you create the perfect site for your needs. And your host will be with you every step of the way!
HostingAdvice.com is a free online resource that offers valuable content and comparison services to users. To keep this resource 100% free, we receive compensation from many of the offers listed on the site. Along with key review factors, this compensation may impact how and where products appear across the site (including, for example, the order in which they appear). HostingAdvice.com does not include the entire universe of available offers. Editorial opinions expressed on the site are strictly our own and are not provided, endorsed, or approved by advertisers.
Our site is committed to publishing independent, accurate content guided by strict editorial guidelines. Before articles and reviews are published on our site, they undergo a thorough review process performed by a team of independent editors and subject-matter experts to ensure the content’s accuracy, timeliness, and impartiality. Our editorial team is separate and independent of our site’s advertisers, and the opinions they express on our site are their own. To read more about our team members and their editorial backgrounds, please visit our site’s About page.


