Here’s my unpopular opinion: Website building is a grossly oversimplified task. A quick Google search for “how to build a website” will unearth dozens of posts all praising the drag-and-drop, what-you-see-is-what-you-get (WYSIWYG) platforms of the world. Authors will claim “it’s as easy as a point and click of the mouse” — and POOF, you have a website.
But if it were really that simple, why would that searched query warrant so much popularity? Why wouldn’t everybody we know already have a personal portfolio online plus a site for their side hustle that passively brings in thousands of dollars in additional income each month?
Circling back to my unpopular opinion: Website builders, including Squarespace, Wix, and WordPress.com, take the technically daunting task of creating a website from scratch and simplify it, yes — but it’s not always 100% pain-free. There will be learning curves and aspects of the interface that don’t make sense right off the bat, and plenty of opportunities for frustration. And I want to walk through those moments — getting everyone safely to the other side — in this post.
Let’s take Squarespace as my first example. I signed up for a Squarespace account, took advantage of the 14-day free trial, and got overwhelmed by the number of themes available before eventually choosing one. I added content, and I ultimately published a website just for the sake of documenting the experience. In this Squarespace tutorial, I’ll go over every inch of the process, from what frustrated me to what was truly as easy as the click of a mouse.
Step 1: Choose a Squarespace Plan and Create an Account
As I mentioned, I capitalized on the 14-day free trial Squarespace offers, but my website will be lost if I don’t choose a paid plan before the trial’s expiration. Fortunately, the company sent me an email immediately upon sign-up, pointing me toward the paid plan options. I recommend determining whether the Squarespace plan pricing falls within your budget prior to taking the builder for a test drive.
Squarespace offers four plans:
- Personal
- Business
- Basic Commerce
- Advanced Commerce
The Personal and Business plan options are geared toward noncommerce sites and include the ability to sell online with third-party integrations. The Basic Commerce and Advanced Commerce plans are focused on selling online and include built-in eCommerce tools such as inventory management, shipping and tax integrations, and the ability to offer coupons for first-time customers. As one would expect, the plans geared toward online store owners (Commerce Advanced and Commerce Basic) are priced slightly higher than the noncommerce plans.
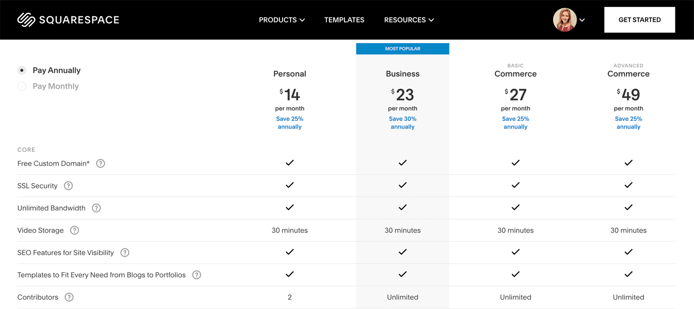
For the sake of this example, I’ve chosen to create a noncommerce Squarespace website under the Personal plan. Click “Get Started,” and you’ll be prompted to create an account.
Rather than asking for basic contact, payment, and personal information, Squarespace gathers information on your website’s purpose and account needs. The process feels a bit more like filling out an online dating profile than signing up for a technical service, but it’s easy and certainly sets an expectation of personalization for the service provided.
Pro tip: Advanced users can head over to the Squarespace Developer Platform. I’d recommend this option to a Squarespace web designer or developer who’s launching a site that will eventually be handed off to a client to maintain.
Step 2: Choose a Domain Name and Squarespace Template
After you create an account, you’ll be prompted to choose a domain name. If you enter by way of the free trial, however, the domain name customization feature is tucked away. Edit your website’s domain name by choosing “Domains” in the list of Settings menu options on the left side of your screen.
You can use Squarespace to register a new custom domain, which may cost extra, or you can use a domain that you already own. I’m publishing a website purely for the educational purposes of this post, so I’m sticking with a subdomain of Squarespace.com.
My soon-to-be-published Squarespace website is www.ZumbasLair.Squarespace.com.
In my example above, “Squarespace.com” is the primary domain, and I’ve appended “ZumbasLair” as a subdomain.
Next, you’ll be prompted to choose a website template from the available Squarespace themes. Every template was created by a professional Squarespace designer, and it shows. Each Squarespace web designer brings something unique to the table, so the design aesthetics are pretty diversified.
That said, it’s easy to get overwhelmed by the number of template options available. There are themes for small business or online store owners, photographers, bloggers, and virtually every use case. Some themes have one layout to choose from, while others have a handful of layout options. You can filter themes by industry and select whether you want a site template with a sidebar or a template built for video, among other customization options.
My advice is to go with your gut and choose a template you love well enough, knowing it doesn’t have to be your forever theme. You can always select a different template down the road.
I’m creating a portfolio site for my cat, so I’ve chosen the Malone template. Hover over the theme’s image and select the option to demo or get started with your preferred template. Perfectionism is a big part of what makes website building so daunting and time-consuming.
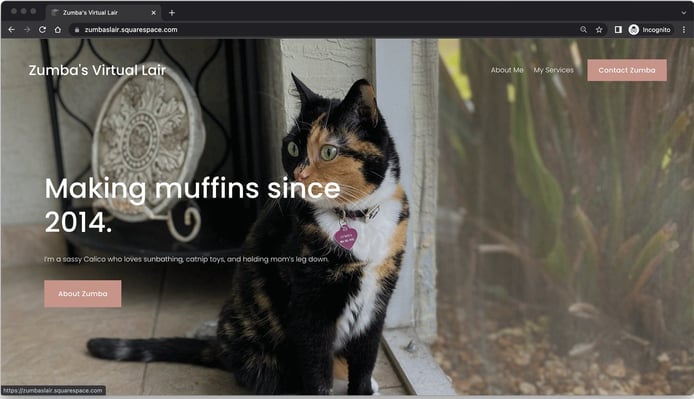
Next, your site needs a name. Note: The site title is the name visitors to your homepage see and appears in the site’s header and often in the tab of popular web browsers. The title differs from a site’s domain name, which does not include spaces and ends with a .com, .net, or similar extension. I went with the name for my cat’s online abode, Zumba’s Lair, and I left the tagline blank for now.
You can also upload a logo for your website, but don’t panic if you don’t have that prepared at this stage. Personally, I save this step for later in the website design process. Let’s continue!
Squarespace will ask if you want to start a blog on your website. This is another step I’d recommend saving for later. You can’t start organizing the cabinets and closets before the walls of the home are up, if you catch my drift.
Depending on your chosen template, Squarespace may ask you to choose from several site styles. You can choose a prebuilt style, or you can start from a blank canvas. If you go with the blank canvas, you can click and drag content blocks around the page to create your layout. For this example, I’m going to choose the prebuilt style since I don’t want to spend too much time building out my layout just yet.
Squarespace may also ask you:
- Do you want to import content from a different website or from a social media platform?
- Do you want to connect your social media accounts to your website?
These are totally optional steps, and the decision you make today does not have to be permanent. Personally, I’d save these for later.
Without further ado, it’s time to start customizing your template and adding content.
Step 3: Customize Your Website
The Squarespace website builder features 100% drag-and-drop functionality and control. You can add content blocks for text, images, forms, maps, audio, video, and other site features. You can add a video background, a parallax image, a slideshow, or a popup window — and each of those elements can be fully customized.
There are several ways to edit a page or section of your Squarespace website:
- Click the Edit button in the top-right corner and then click the block you want to edit.
- Click in the middle of the block and then press the backspace key on your keyboard to delete the block.
- Drag and drop a new block into the position you want to edit.
I was pleasantly surprised by the intuitiveness of the editing interface. While previewing the website, which contained photos and content from the theme demo, I hovered over elements I wanted to personalize. When a pencil icon appeared, I clicked to edit the block’s contents. Each editor modal contained tabs to edit the content, the style, and/or the design.
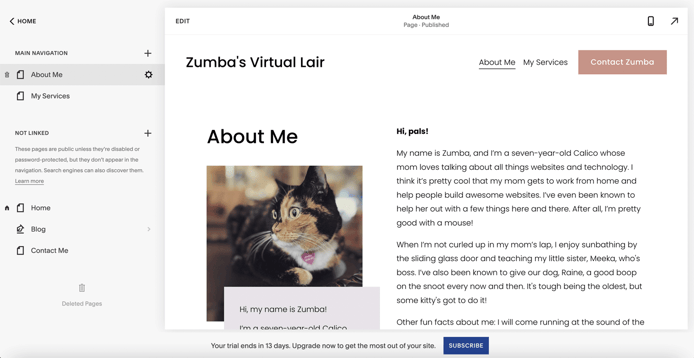
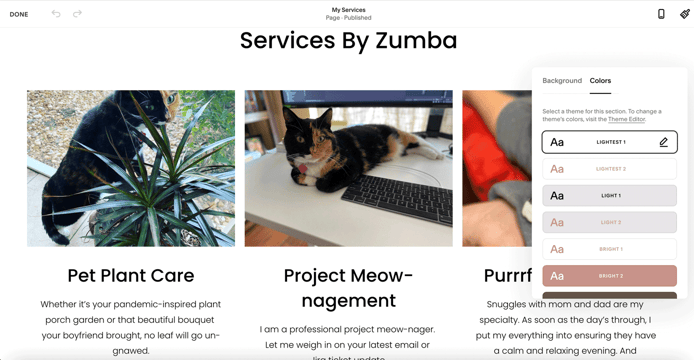
If I wanted to add or remove a design element from my Squarespace website, the process was just as straightforward. To add elements, I hovered my mouse over the blank space and clicked the plus sign icon that appeared. To remove an element — whether it be an image, a block of text, or even a spacer — I hovered, clicked, and found either a trash can icon or the option to “Delete element.”
The web content editing experience was similar to those of Google Docs, Microsoft Word, or drafting an email. A text style bar revealed options to change the text font, size, styling, and justification, or to add or edit a link.
Having zero experience with this platform, I had customized my homepage in fewer than 15 minutes. That included the time it took to quickly AirDrop photos of my pets to myself so I could upload them for Zumba’s version of a “Meet the Team” section.
One hiccup I ran into was learning how to add, remove, or edit links in the main navigation menu of my new site. I expected this to be editable by hovering and clicking on the header, which is not the case. Learn from my experience.
Navigation menus are edited in the left-hand menu of Squarespace: Click “Pages” and then drag pages out of the Main Navigation section and into the Not Linked section to remove them from your website’s header menu. Click the plus sign icon to add new pages, or click the gear icon and choose the option to “Delete page” for any default pages you don’t need.
Pro tip: If you get stuck, do not hesitate to reach out to the Squarespace customer support team. I didn’t have the pleasure of working with them personally, but I have a feeling any question I posed would be answered quickly and comprehensively, based on the product documentation alone.
For this tutorial, I chose to create a five-page Squarespace website:
- Homepage (the main “cover page” of your site)
- About page
- Services page
- Contact page
- Blog page (but left the default blog post pages filled with lorem ipsum placeholder text and images)
And it took about two hours from start to finish, including content creation and connecting my pet’s social media account for full effect. Frankly, it took longer to write this post documenting the experience than it did to draft and publish the beautiful website itself.
My Squarespace website looks great on both desktop and mobile — and I didn’t even do any customizing to make the mobile piece happen. That was a big site builder win, in my opinion.
Step 4: Publish Your Squarespace Website
At this point, you’ve added your content and customized your Squarespace website. But your site is still a work in progress — not live yet. To make your website live, you need to publish it and, in the case of Squarespace, choose a plan and input payment details if you haven’t already.
If you’re still on the free trial, Squarespace makes a Subscribe button readily available at the bottom of the screen. At this point, hopefully, you’re happy with your website and deemed it worth the monthly subscription fee.
Sadly, it didn’t make sense for me to pay for a subscription just to post a tutorial, so I know my newly created Squarespace website will be short-lived. Fortunately, Zumba’s Lair will live on in the screenshots I’ve included throughout this article.
Once you’ve published your website, you’re free to take advantage of Squarespace SEO and marketing tools. In the left-hand menu, check out the Marketing option for search engine optimization (SEO) features and to connect those social media accounts we skipped earlier. Rather than familiarizing yourself with Google Search Console and Google Analytics, you can head over to the Analytics section of the Squarespace menu. Track your website visitors, identify the most engaging posts, and find opportunities to increase brand awareness with advanced features, such as the Member Area, that I did not have a chance to try out for this post.
Pro tip: Download the Squarespace mobile app (for iOS or Android) to track your site availability, visitor stats, and other performance metrics while on the go. Although I haven’t used it personally, the Squarespace app is a pretty nifty feature you won’t necessarily find with a typical web hosting provider.
My Takeaway on Creating a Website with Squarespace
I remember Squarespace when it first launched — with arguably the most attractive template designs but a somewhat clunky user interface and a price tag that was hard to justify. To be honest, it was the early-on experiences with WYSIWYG site builders that formed my unpopular opinion cited above.
But I was pleasantly surprised by my latest Squarespace website builder experience. The template library has only grown, and the customization capabilities are pretty darn intuitive.
While the monthly price point is higher than what you could get with another web host with a complimentary drag-and-drop website builder, the Squarespace user experience is much more welcoming to first-time site owners.
Assuming you plan on making money off your Squarespace site (shoutout to small business owners or those looking to build an online store), I believe the monthly fee is worth the investment. Essentially, your domain registration, hosting, web design, and content management system can be handled under one account — and you, as the consumer, don’t even have to know the difference between those services I just rattled off.
With more than 3.7 million Squarespace users to date, the online site-building platform is a force to be reckoned with in the industry, and I wholeheartedly understand why. Consider me a fan!


