
Website owners need an administrative dashboard to access files and hosting settings. That’s where cPanel comes in. The cPanel dashboard is a browser-based control panel that improves the user experience of hosting a website. The Linux-based cPanel is a commercial product that hosting companies and developers can purchase. However, web hosts usually license cPanel and provide it to customers for free with a hosting subscription.
The graphical interface from cPanel allows users to organize website files, manage email accounts, and attach domains to a website. You can also integrate with third-party software and coding languages to build websites on your hosting server. For instance, most hosting providers offer one-click installation buttons for WordPress and support for coding languages like PHP, Perl, and JavaScript. The cPanel dashboard supports database management tools (like MySQL) and a variety of other applications to power your website.
As for security features, cPanel includes IP address blocking, SSL/TLS, and password protection for directories. Overall, cPanel plays a strong role in web hosting since it allows website owners an easier way to manage backend hosting tasks and delivers a beginner-friendly interface in the often complex realm of web hosting.
-
Navigate This Article:
Understanding cPanel
The best way to understand cPanel is to start with its history and then move on to its key features and functionalities. It’s also important to look at cPanel’s benefits and common misconceptions.
History and Evolution of cPanel
The history of cPanel began when a developer named John Nick Koston sought to build a control panel for a now non-existent hosting company. Its evolution after that shows how much the control panel has changed and how it affects the hosting world today.
- 1996: Koston created cPanel for Speed Hosting, a now-defunct company. It was a user-friendly control panel for hosting users.
- 1997: Although never released as open-source software, the developer spread the popularity of cPanel by licensing it, selling it outright, and even giving it to other hosting companies. The hosting community embraced cPanel as a more user-friendly — and feature-rich — dashboard than previous attempts.
- 2002: The fifth version of cPanel was released. This added options to work with email addresses and provided an entirely new graphical interface.
- 2008: The eleventh version of cPanel came out. It was a significant update due to its built-in file manager, improvements in the domain management system, and another revamp of the user interface. Users also experienced boosts in stability and performance.
- 2013: The cPanel developers revealed perhaps the most important modern change to the control panel, seeing as how it came out with its now signature tiered structure. This presents unique levels of access control for end-users, resellers of hosting, and administrators.
- 2019: The most recent event worth discussing is WebPros’s acquisition of cPanel. Luckily, the cPanel development operation still runs as a separate entity from WebPros (a software company for web hosting), so it has control of branding and the product line.
As such an influential tool in the hosting world, the community hopes that cPanel continues to innovate and remain somewhat independent from commercial forces. As of now, the acquisition by WebPros hasn’t changed much, except for cPanel’s pricing model.
Other than that, cPanel development continues to improve features for its user interface, email deliverability, databasing, and support for new operating systems.
Key Features and Functionalities
The cPanel developers release minor and major updates several times each year. There’s no set timeline, but more so of an “as-needed” structure for updating with security patches, bug fixes, and feature improvements. The feature set of cPanel continues to evolve, but here are the notable features currently included with cPanel:
- User-friendly dashboard: The dashboard for cPanel presents an organized way to manage site files, email accounts, domain names, databases, and software integrations. The dashboard has easy-to-understand sections and useful instructions through the interface to allow non-technical users a chance to manage their web hosting. In short, cPanel takes complex web hosting elements and makes them far more user-friendly.
- File management: The cPanel dashboard offers intuitive, immediate access to website files without the need for FTP (file transfer protocol). You still have the option to use FTP, but cPanel provides a more visual file management experience for editing, deleting, and uploading files. It’s also great for managing directories and setting file permissions.
- Email management: Site owners can use cPanel to quickly create, edit, and delete email addresses associated with the website’s domain name. Other email features include mailing lists, autoresponders, webmail, email forwarding, and mobile email access.
- Database management: To manage your site databases, cPanel offers support for PostgreSQL and MySQL. Both connections let users manage, edit, and create databases, while also providing access to a tool called phpMyAdmin — an essential element for backing up, securing, and managing any database.
- Security features: From SSL/TLS to IP address blocking, cPanel packs several security features into its toolbox. Some security items run automatically, while others give site owners full control over which features get implemented. The cPanel dashboard includes options like password protection for directories, along with hotlink management (blocking others from stealing bandwidth) and leech protection (detection of breeches in password-protected areas of your site).
- Software and application installations: The Softaculous platform — which comes standard on most versions of cPanel — allows users to integrate with a wide range of software and applications. Most notably, a web hosting user can install content management systems like WordPress, Drupal, or Joomla with the click of a button.
- Backup and restoration options: The cPanel dashboard includes built-in backups and restoration tools to either back up the entirety of your website or specific portions. The restoration feature lets you revert back to a previous version of your website should anything go wrong. With backups, cPanel has options to store them remotely or locally.
All these features come together to create a popular, user-friendly experience for hosting companies, resellers, and hosting users. That leads to a wide range of benefits that make cPanel the useful tool it is today.
Benefits of Using cPanel
The user-friendliness of cPanel already provides benefits to an often technical hosting experience. Several other benefits, including time savings, centralized site management, and regular updates, make cPanel an essential hosting tool for developers and website owners.
- Time savings and efficiency: The dashboard from cPanel saves users time in many ways. You can install complex platforms like WordPress and PrestaShop with one click, while also completing multiple tasks — like email and database management — from one dashboard.
- Centralized website management: The centralization of website hosting, email management, and database management eliminates switching between multiple windows and accounts. It also provides potential cost savings since all those tools come from one provider.
- Customization options: No cPanel dashboard is exactly alike, and that’s all thanks to the customization settings provided in the control panel. Users have options to move around modules, add custom branding/themes, and tailor the entire environment to their needs.
- Regular updates and support: The cPanel developers release new updates to the system several times each year. These updates include security patches, interface improvements, and new features. The cPanel team also provides a robust customer support area with forums, a blog, technical documentation, and a form for submitting a custom question or request.
The benefits of cPanel far outweigh its downsides, and even some of those commonly discussed downsides are actually misconceptions. Read about those misconceptions below.
Common Misconceptions
Just like any software, cPanel has its downsides, but it’s important to understand that some of the more commonly mentioned downsides are actually myths. One myth, for example, claims that cPanel is only for advanced developers or those with technical knowledge. Yet, cPanel became popular in the first place because of its user-friendly nature.
In fact, beginners often only have to spend a few minutes getting used to the dashboard to figure out how to use it effectively for email management, domain management, and software installations.
Another myth, which may have come about because so many people only use cPanel for one website, is that the cPanel control panel only supports a single website. That’s completely untrue; cPanel can actually support multiple websites, databases, and domains at one time.
The final misconception is that cPanel has a high cost. Although it’s an ongoing cost for hosting providers to license cPanel, users of cPanel pay nothing extra since it’s included in most hosting plans.
Getting Started with cPanel
If it’s your first time using cPanel, or you simply need a refresher, this guide walks you through how to access cPanel, navigate around, and configure preferences and settings to your liking. After reading the tips and steps below, you’ll have a firm grasp of its interface and confidence moving forward.
How to Access cPanel
To access cPanel, your hosting provider must first offer the control panel and its corresponding features. If it doesn’t, there’s a strong chance your host uses a custom dashboard, which is fine, but you can skip this section. For those that use cPanel, most hosts simply require you to log into the hosting provider’s customer portal. That leads you directly to the cPanel, or you may have to click a cPanel button to proceed.
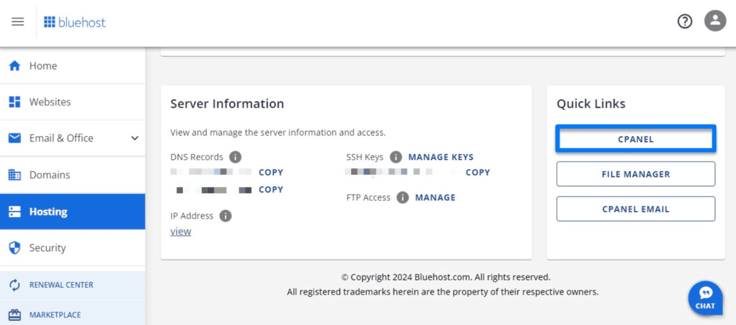
Using Bluehost, for instance, you would log into the Bluehost hosting dashboard to start, then click on the Hosting tab in the main menu. There, you can click on the cPanel button under Quick Links.
A2 Hosting offers two ways to access cPanel: through the A2 Hosting customer portal or directly (by going to http://cpanel.example.com — where you’d put your domain name in place of the “example.com” part).
The recommended method, however, involves navigating to cPanel through the customer portal.
Once logged into the A2 Hosting customer portal, go to Services > My Services. Under the My Products & Services section, locate your hosting plan, then click Manage.
On the next page, under Actions, click Login to cPanel to open cPanel.
Regardless of the hosting provider, cPanel should open for you to use. You may, however, have to log into cPanel separately. You typically just type in the username and password used to access your host’s customer portal to gain access to cPanel.
Once logged in, you’ll see the entire cPanel dashboard with features for email management, database editing, and website file creation. Keep in mind, though, that most hosting providers customize the interface to fit the needs of their platform and customer base. So, a cPanel from Bluehost may look different from a cPanel from A2 Hosting or Hostinger.
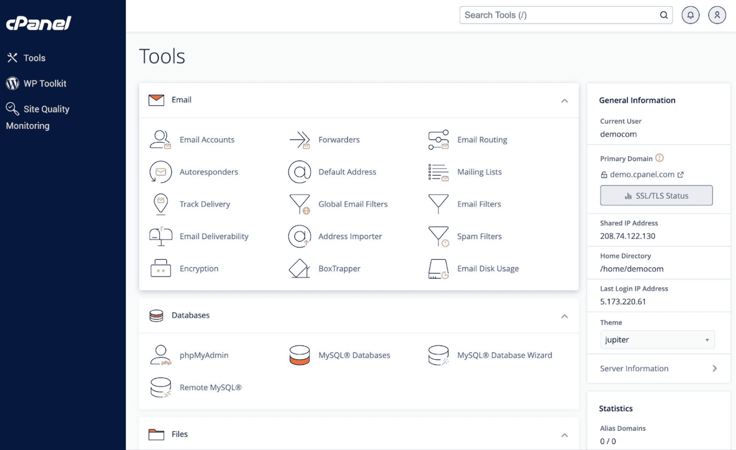
The process of setting up cPanel with most hosting providers takes minutes. For servers without cPanel installed, you’re able to request that installation from the host or use a root connection via SSH to install cPanel — it’s best to find someone who understands Linux commands for a custom installation.
However, the vast majority of users can rest easy knowing that most reputable hosting providers already have cPanel installed. You simply log into the host’s customer dashboard to open cPanel with the click of a button.
Navigating the cPanel Dashboard
To familiarize yourself with the cPanel dashboard, it’s best to scroll through the homepage and click on the various links based on which features you intend to use. The cPanel interface has a main menu on the left, a Tools section with several modules, and a General Information box with Statistics below that.
All of these sections are customizable, and you’ll spend most of your time using the Tools section. The General Information box has broad information about your site and cPanel account, like the IP address, home directory, and current user.
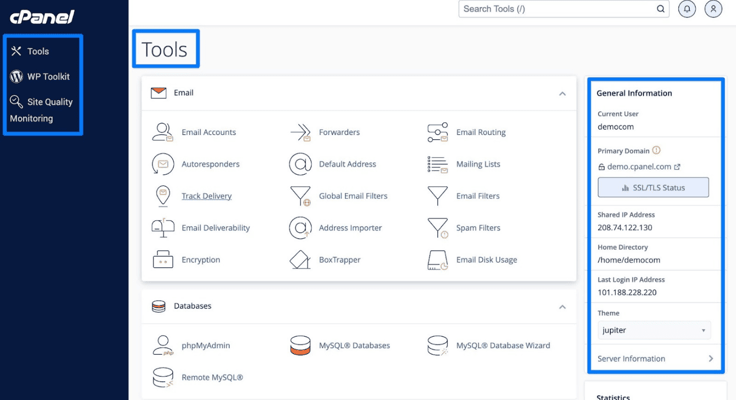
Under Tools, you’ll see the core cPanel features separated into modules, some of which include:
- Email: This section lets you make email accounts, forward accounts, handle encryption, set email filters, and more.
- Databases: Here, you can find everything for database management. Options include MySQL and phpMyAdmin links.
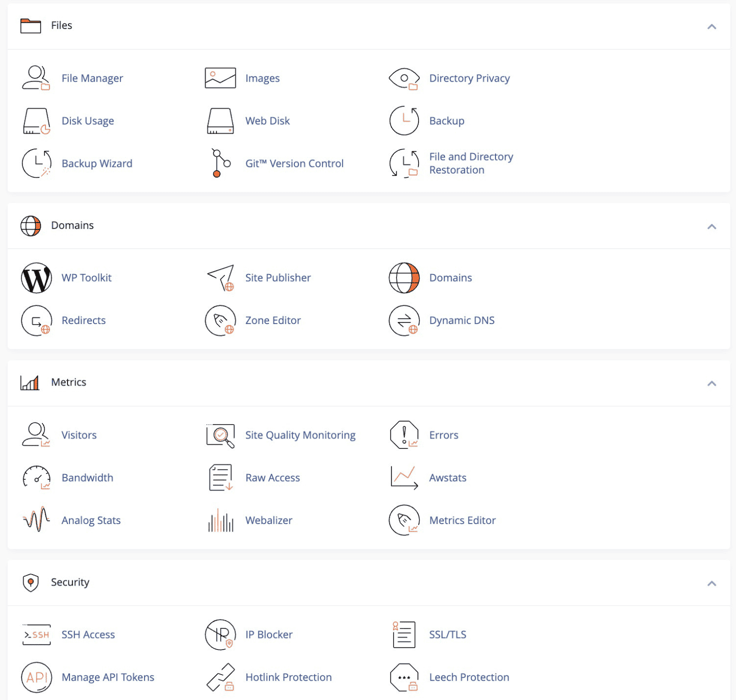
- Files: Use this module for access to all website files. Features include backups, a file manager, and directory privacy rules.
- Domains: Manage your domains with a WP Toolkit or use the cPanel Site Publisher, dynamic DNS, or domain management sections.
- Metrics: This gives links to all analytics and statistics. Learn about your website’s visitors, errors, bandwidth, and more.
- Security: Set up things like SSH access, IP blocking, and leech protection. Other security features include SSL/TLS management and hotlink protection.
- Software: Here’s where you can install software on your server to power or support your website. You’ll find options for Perl modules, RubyGems, website optimization, and MultiPHP management.
- Advanced: Use this section to handle more advanced hosting tasks like cron jobs and terminal usage. You can also access error pages and DNS tracking.
- Applications: In addition to software, you may find an area to install and manage applications. This is usually where the WordPress or other CMS installation buttons reside.
- Preferences: Use this area to handle passwords and security, languages, contact information, and user management.
As always, some hosts may have different versions of what you see in the default cPanel configuration. It’s also possible to edit the interface yourself.
How to Customize cPanel Settings
Customizing the settings in cPanel depends on what you’d like to achieve with your hosting account. To add or edit an email, turn to the Email module. To install WordPress, go to the Software, Applications, or Softaculous sections. To manage directory privacy or access the file manager, use the Files section.
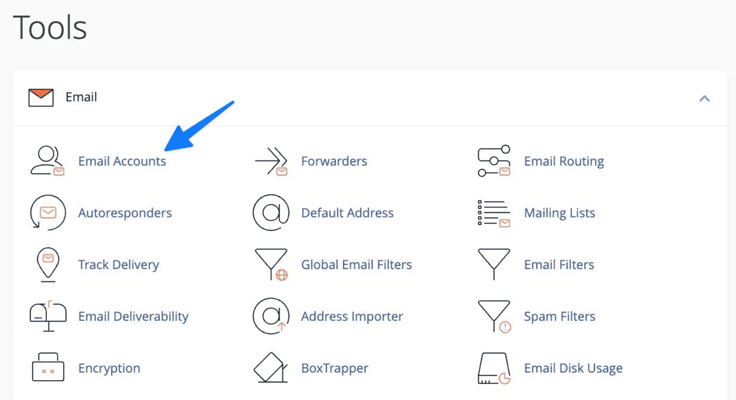
As an example, you may want to add a new email account that’s associated with your site’s domain name. To do so, click the Email Accounts link in the Email section. This is how you’ll access any cPanel feature: locate the feature and click on its link.
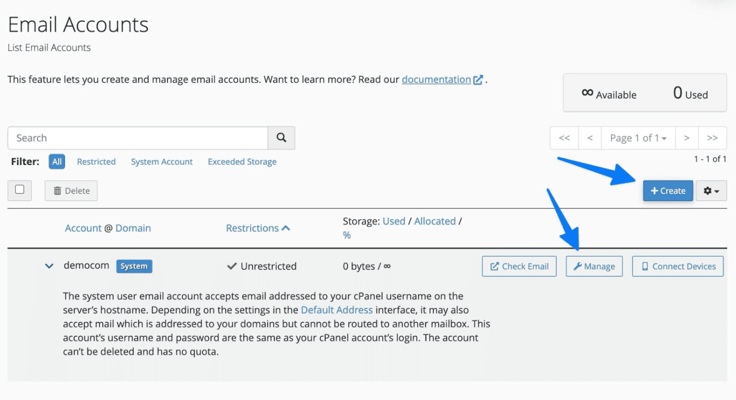
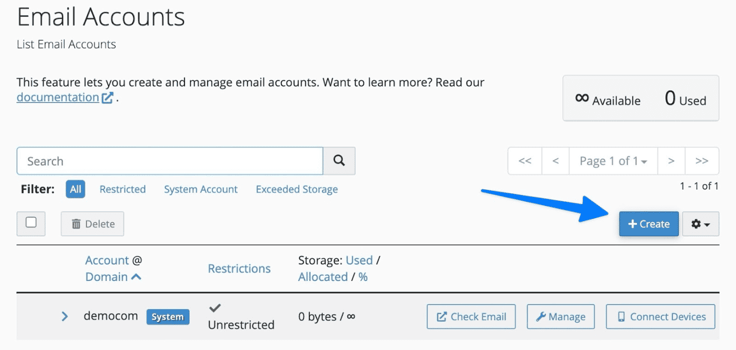
On the Email Accounts page, you can either click Manage to edit settings for a current email address, or you have the option to click Create to make a completely new address.
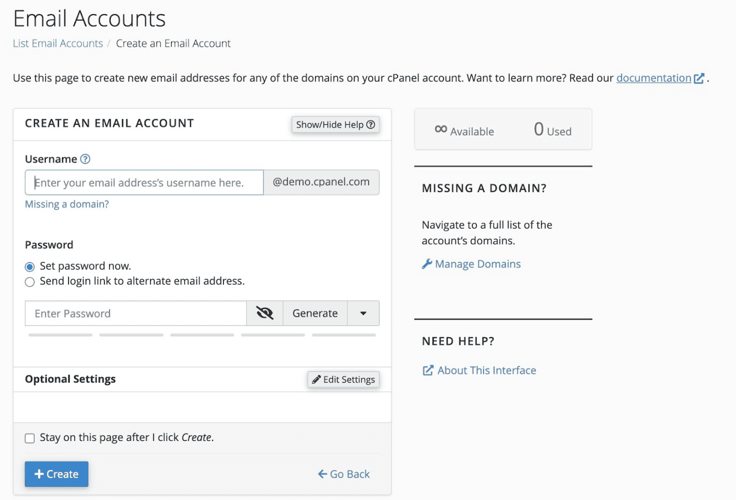
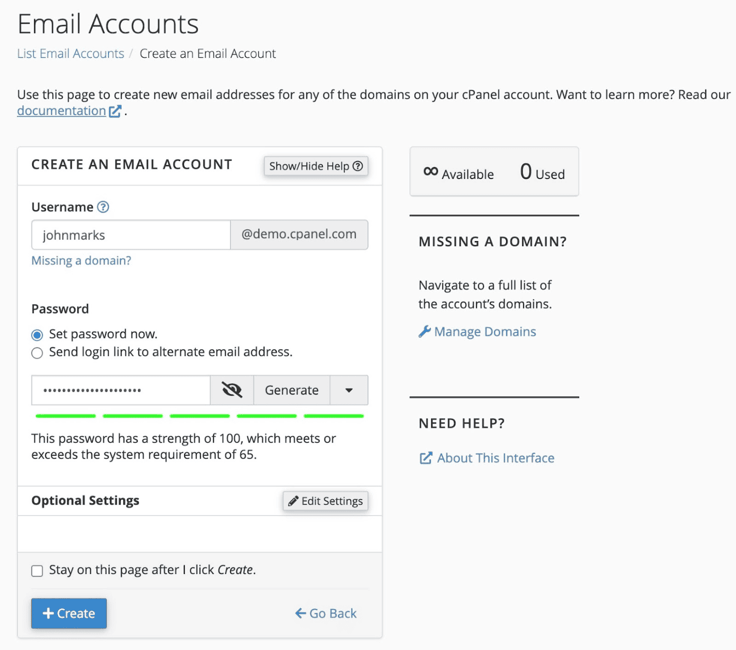
If you create a new email, it offers fields for adding a username before your domain name, and there’s a password field. Once you’re done, click the Create button to activate the email address.
Other settings to configure within cPanel include domains, WordPress login information, and security elements you want running for your site (like automatic backups).
How to Configure Preferences
The Preferences module in cPanel is at the bottom of the Tools section. Here, you’ll see these links: Password & Security, Change Language, Contact Information, and User Manager.

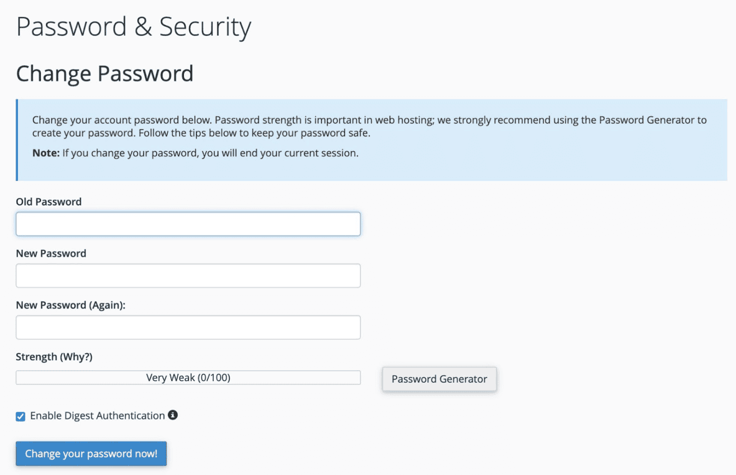
The Password & Security section lets you adjust your hosting and cPanel password to make it as strong as possible. The page provides a meter that evaluates the strength of your password, and there’s a password generator.
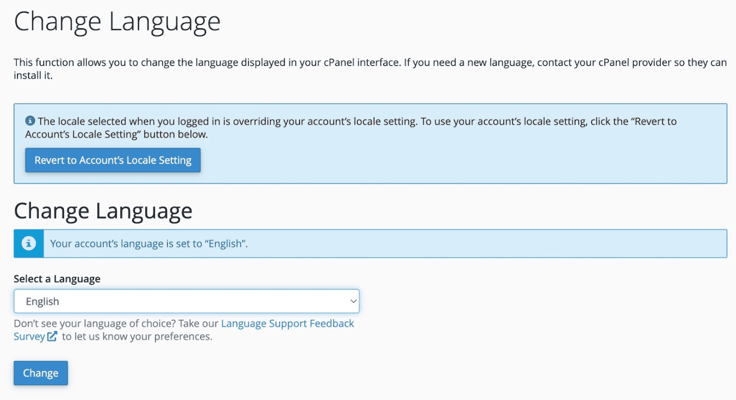
Use the Change Language link to modify the language used within the cPanel dashboard. You can always come back to revert to the local language setting.
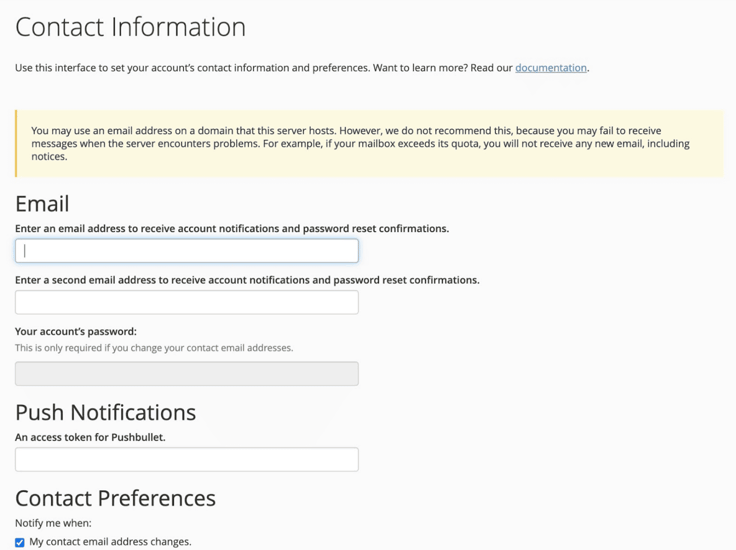
You should definitely walk through the Contact Information settings to receive important emails and push notifications. The page helps you configure contact settings and AutoSSL notifications, too.
The last preferences to configure fall under the User Manager section. This area has tools for creating, editing, and deleting users. It also provides user permission features to restrict some users from accessing admin features.
Managing Files and Directories
It’s important to get comfortable managing website files in cPanel. You might, for example, want to add images in bulk to your website or even delete old theme or plugin files. Beyond that, the File Manager enables you to open any site file for more advanced website customizations.
File Manager: Navigating and Managing Files
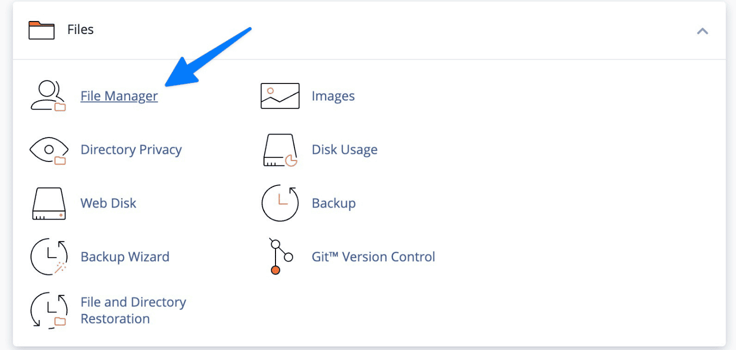
Begin by going to the File Manager link in the Files module.
The Settings button inside the File Manager reveals customizations for your home directory, web root, document root, and public FTP root.
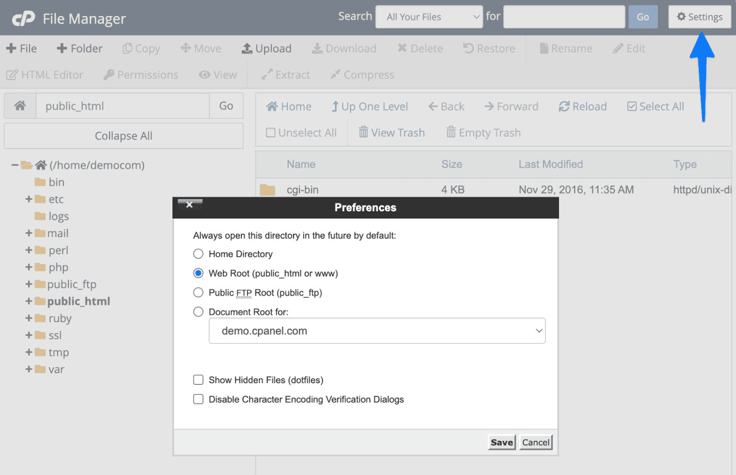
Changing these preferences doesn’t adjust the directories themselves, but it prompts the File Manager to open a specific directory first in the future. Once you’re done customizing those preferences (including the options to show hidden files and disable character encoding), move on to how to update and download files.
Uploading and Downloading Files
Stay in the File Manager to upload and download files. There are many reasons to upload a file, such as quickly adding a third-party plugin or theme, bulk uploading images, or restoring a file that rendered your website inaccessible.
It’s also great for adding custom code or installing an entire content management system like WordPress. Downloading files helps with copying your website to use it for testing on another server or for simple security purposes.
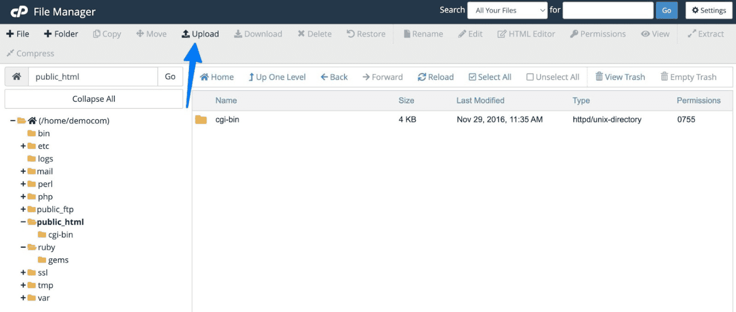
To upload a file, open the chosen directory and click the Upload button. That gives you the option to choose a file from your computer and add it to the directory.
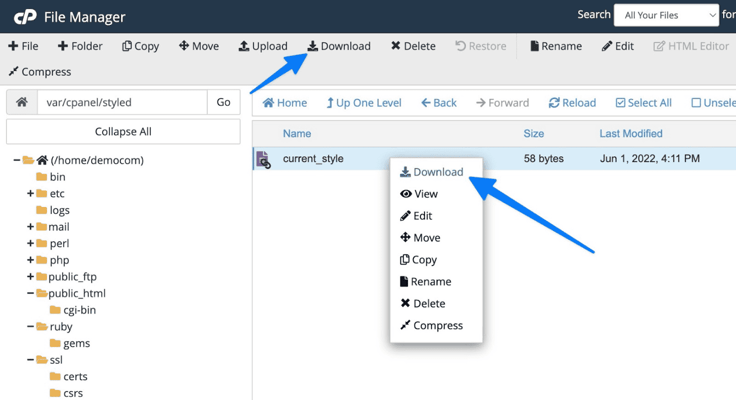
For downloads, open the desired file, select the file so it’s highlighted, and either right-click it to show the Download button or use the Download button at the top of the dashboard. You then see a prompt to choose where you’d like to save the file on your computer.
Other buttons in the File Manager allow you to edit files, move them around, and delete them. In the next section,, you’ll learn how to create, edit, and delete files and directories.
Creating, Editing, and Deleting Files and Directories
Staying in the File Manager, you can open any file or directory to edit or delete it. For instance, highlighting a file — and either right-clicking or using the top menu — enables you to click Delete or Edit.
Once deleted, the file no longer exists in the File Manager. Editing a file opens an in-browser file editor for making quick code changes. Alternatively, you can download any file, edit it in the text editor of your choice, then reupload using the File Manager.
The process of creating a file in cPanel also happens in the File Manager. The only requirement is to open the directory where you’d like to place the file. After that, click the Upload button. That opens your computer’s file manager to choose a file and upload it to the cPanel.
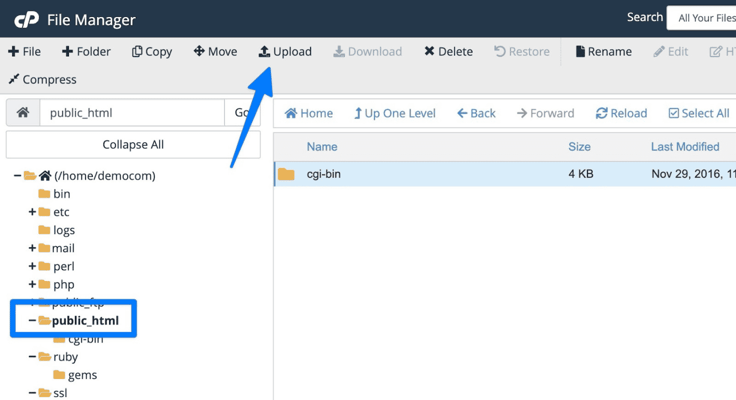
As a result, you’ll see the new file in the File Manager. You can then move it to another folder, edit its contents, or complete other tasks like renaming.
Setting File Permissions
File permissions control how other tools and users can read, write, or execute files. The “read” permission lets users access and read the file, while the “write” permission allows for editing and deleting.
The “execute” permission tells users that they can run the file as a program. Respectively, those permissions go from most secure to least secure. Yet, many executable files are required for your website to work.
To set file permissions in cPanel, open the File Manager and choose the directory or file you’d like to edit. Either right-click the selected file/directory (then choose the Change Permissions item) or click Permissions in the main menu.
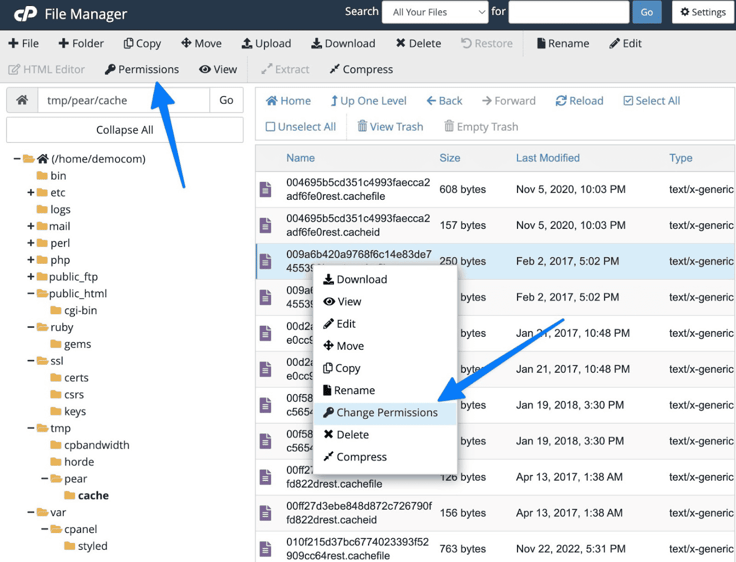
The Change Permissions page offers checkmarks for three levels of permissions: User, Group, and World.
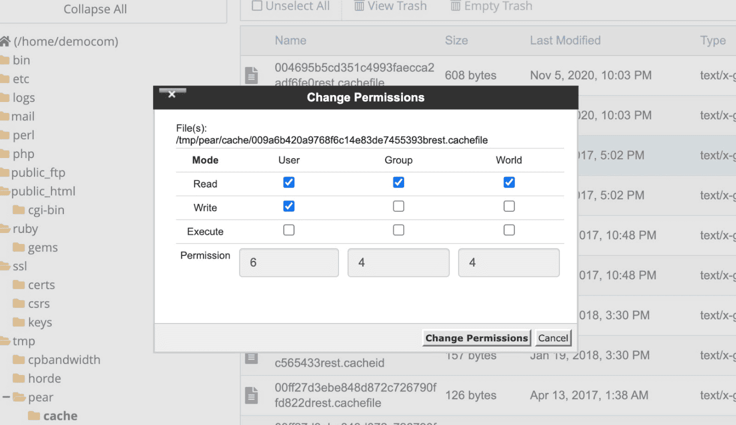
File permissions have varying levels and access options. Before adjusting permissions on any files, read about what the permission types and levels mean.
Email Management With cPanel
One of the first tasks completed by website owners is generating email addresses with their domain name. Custom emails show professionalism, and the cPanel even provides a free Webmail inbox for managing incoming messages. This section explains how to create and manage emails, and it details how to set up other elements like autoresponders and spam settings.
Creating and Managing Email Accounts
To create and manage email accounts in cPanel, click the Email Accounts link under Email.
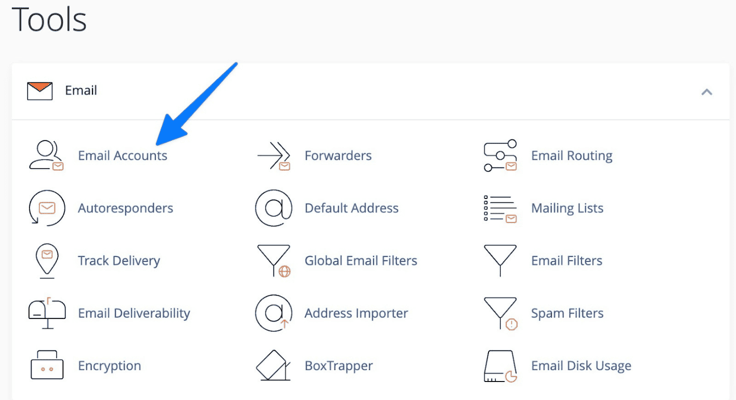
Click the Create button to make a new email account.
Fill in a username that goes in front of your custom domain name. Make a strong password, too. Click the Create button to complete the process.
Every email account you create gets listed under the main Email Accounts page. To manage any of those accounts, click the Manage button next to the desired email.

The email management area presents ways to edit the email, change its restrictions, and view its storage usage. There are also options to delete or pause the email address.
Configuring Email Forwarding and Autoresponders
Back in the main cPanel dashboard, return to the Tools section and look under Email. Here, you’ll find links for Forwarders and Autoresponders. Choose the Forwarders link to begin.
Email forwarding sends a copy of an incoming email to another address. As an example, you may want a coworker to see all the same emails that arrive in your inbox. The forwarding section provides options to either forward from one email address or to forward all emails sent to a single domain. Click the Add Forwarder or Add Domain Forwarder button depending on your needs.
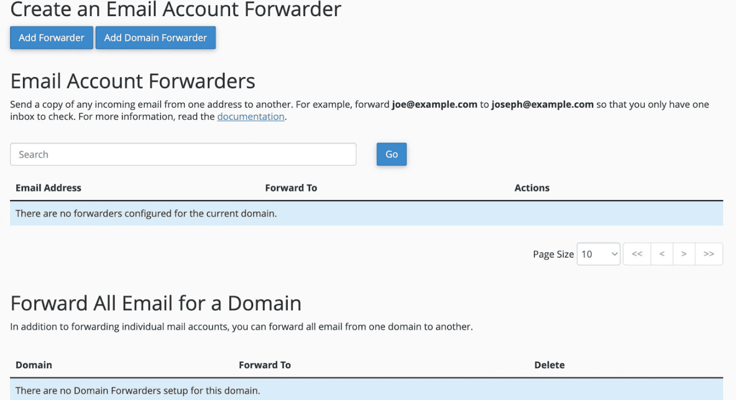
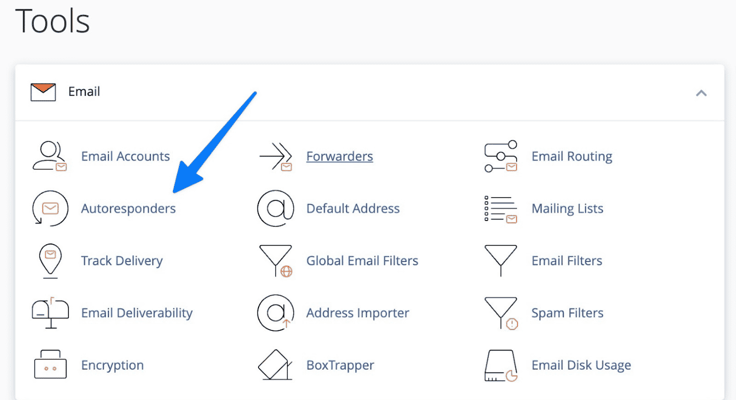
To configure autoresponders — like for messages that say “I’m on vacation for the next two weeks” — click on the link for Autoresponders.
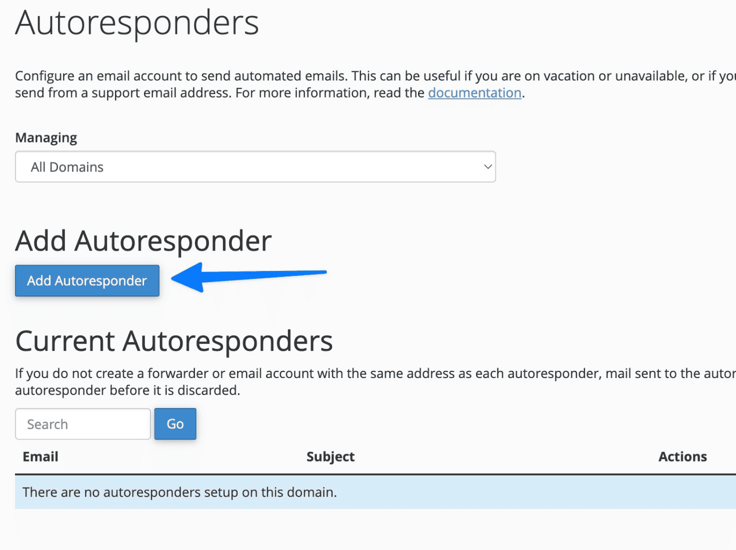
Click on the Add Autoresponder button.
On the creation page, type in the desired email address, and use the other fields to compose your message and email subject line.
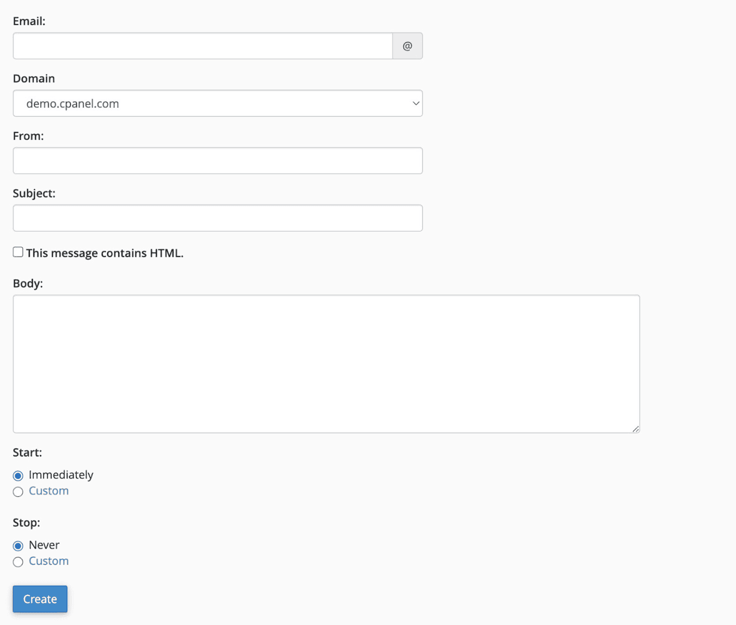
You can also set a start and stop date for the autoresponder. We recommend testing a message to your email address to ensure the autoresponder works (before leaving on vacation).
Accessing Webmail
There are two ways to access Webmail (the default cPanel inbox for receiving and sending emails). The first requires you to type in one of the two URLS into your browser:
- https://example-IP-address:2096: Replace “example-IP-address” with the Shared IP Address listed in the cPanel dashboard.
- https://example.com:2096: Replace “example.com” with your own domain name.
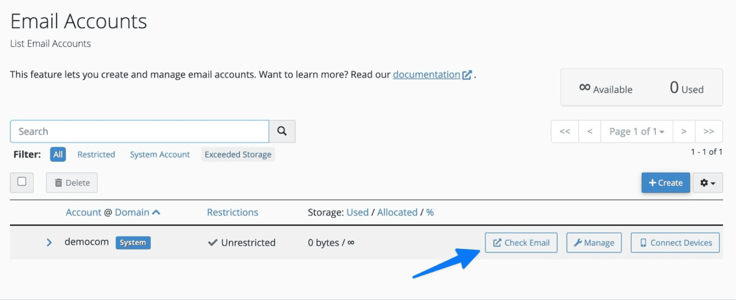
For a more user-friendly route to Webmail, click the Email Accounts link in cPanel.

Find the desired email account and click the Check Email button next to it.
After that, type in your login credentials to access Webmail.
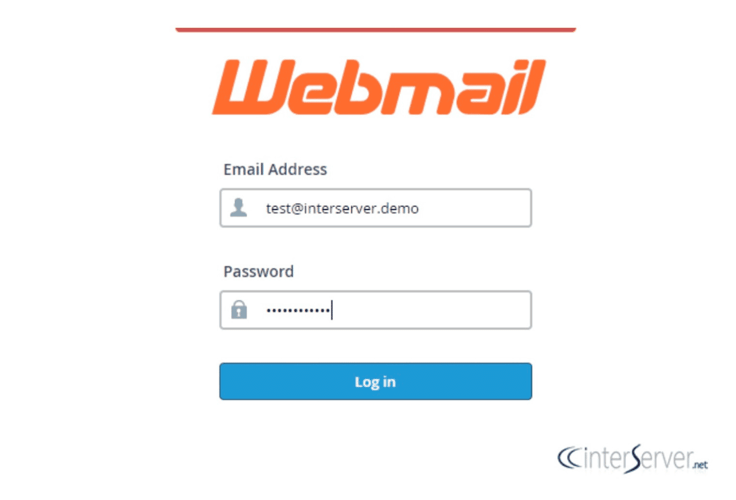
Your Webmail inbox — often customized by the hosting provider — should appear. Webmail looks like most standard email inboxes with features to create, send, and manage email messages.
Managing Email Filters and Spam Settings
The email filters in cPanel come in global and address-specific forms. Global filters target all addresses on the domain, while regular email filters work for one email address. They both work similarly, so you can click Email Filters to understand both.
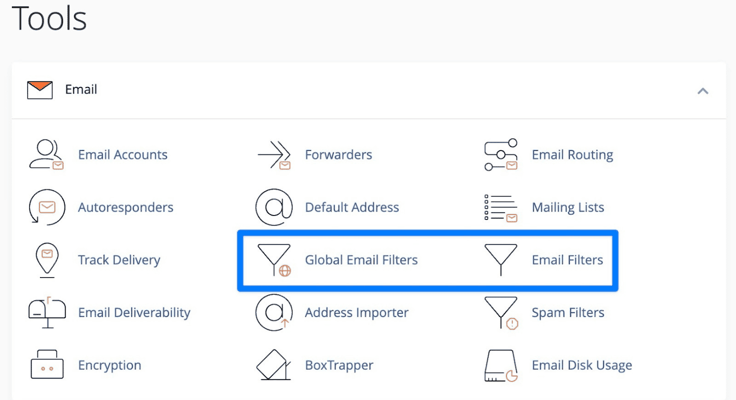
Each email account appears on this page. Click Manage Filters for the appropriate email account. On the following page, click Create A New Filter.
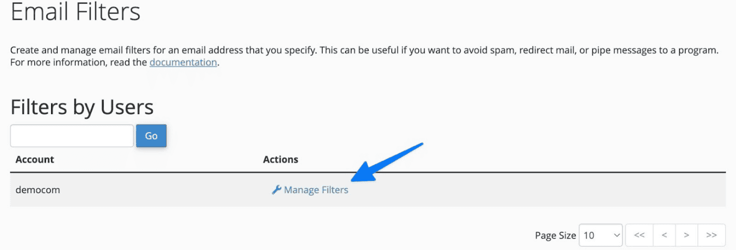
Filtering helps with organizing incoming emails automatically. Therefore, you should make a Filter Name that’s memorable and purposeful for that particular filter. You may, for example, want filters to separate business and personal emails, or to put all of one client’s emails into a folder. Under Actions, click the Create button.
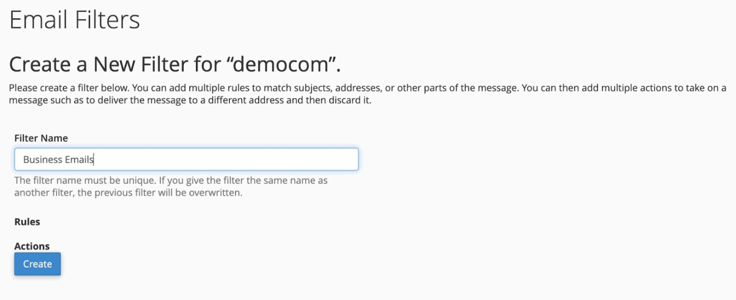
For active hosting accounts, you have the option to add rules to your filters, like for reorganizing emails based on subject lines, senders, or keywords in the message. When you’re done configuring the rules, click the Create button. This activates the filter.
Next up, you’ll want to set up spam settings to block emails with malicious intent. For that, choose the Spam Filters link in cPanel.
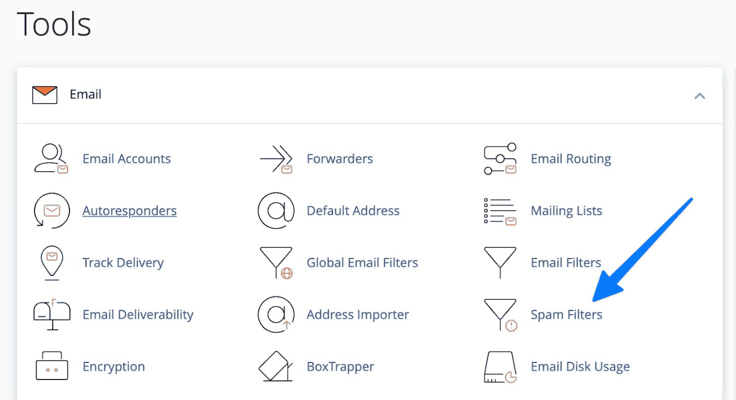
Many hosting companies provide unique spam blockers and filtering systems, so you should walk through the Spam Filters area to understand what’s available. A common spam blocker is called SpamAssassin, which helps identify spam emails and separate them into another folder or delete them.
Database Management
The cPanel interface provides features to manage your website’s database — the tool that holds valuable information like customer usernames, passwords, and whatever other information you collect.
Databases also store product information, media elements, and the content you add to your website. With cPanel, you can create new databases, manage them, and handle everything from database backups to permissions.
How to Create and Manage MySQL Databases
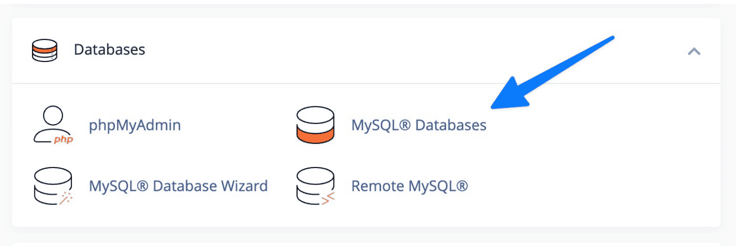
To create and manage a MySQL database, click on the MySQL Databases link in the Databases module of cPanel.
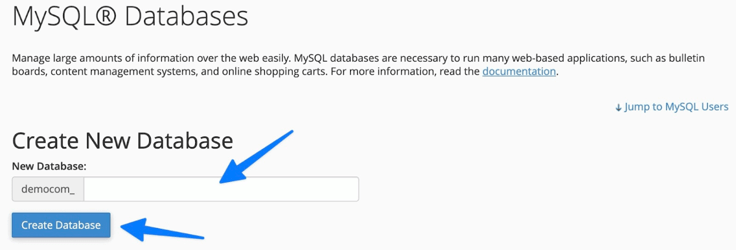
Adding a database is simple; just add a unique name and click Create Database.
Each database gets listed on the same page. That’s where database management comes into play. Users can check a database, repair a database, or search for a database to understand its status and contents.
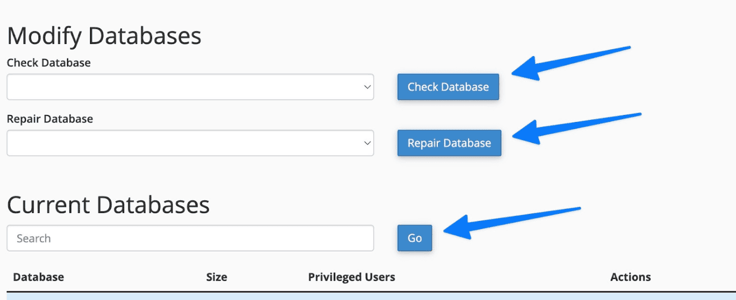
If you’d rather not create a database from scratch, it’s best to import one. Move on to the next section to learn how to import and export.
Importing and Exporting Database Backups
You may import or export a database for many reasons. One purpose of the import/export function in cPanel is to migrate a website to another hosting provider. Imports and exports are also helpful in creating and restoring backups of the database. You must open phpMyAdmin to import and export databases.
Here’s how to export a database:
- In cPanel, click on the phpMyAdmin link under Databases.
- Select the database you’d like to export.
- In the main menu at the top, click Export.
The importing process is similar, but you must have an existing database to make the import:
- In cPanel, click on the phpMyAdmin link.
- Select the database you’d like to use (often an empty database for imports).
- In the main menu at the top, click Import.
To complete the import, find the file you’d like to use on your computer. With the database imported, you should see new data in the previously empty database.
Managing Database Users and Permissions
All databases in cPanel should have users to manage them. It’s also important to set permissions to indicate which users can access and edit the databases. To add a user to a database, click on MySQL Databases in the Databases module.
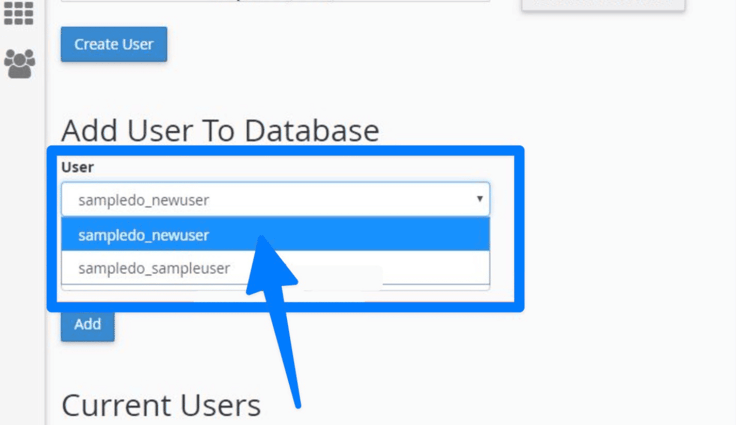
You should already have users added to your cPanel. Go to the section Add User To Database. Open the User dropdown menu to select the user you’d like to add to a database.
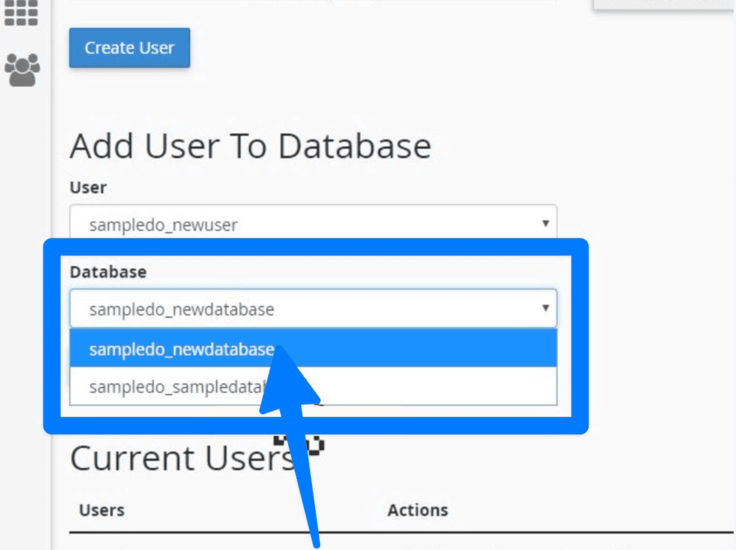
In the Database drop-down menu, select the desired database.
Click the Add button to complete adding the user to a database.
The next page provides options to set the user permissions for the new user. Check the boxes for how you’d like the user to control the database. For instance, you might allow the user to create tables, manage references, or trigger events to happen.
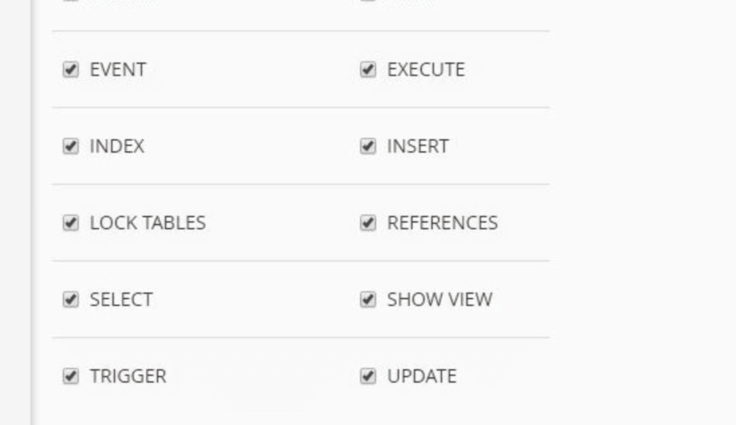
Click the Make Changes button to save all permissions.
Security Features in cPanel
All security features on cPanel are located under the Security module on the main Tools dashboard. In that section, you’ll find options for everything from IP blocking to two-factor authentication, which we’ll cover here.
SSL Certificate Installation and Management
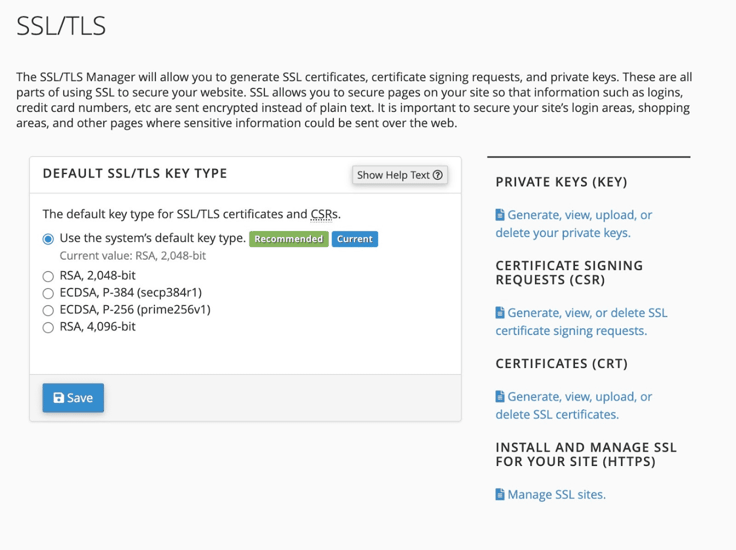
Perhaps the most important security measure for protecting sensitive data submitted on your website is SSL encryption. This requires you to install an SSL certificate. Click the SSL/TLS link in the Security module to proceed.
Select your desired SSL type and click Save.
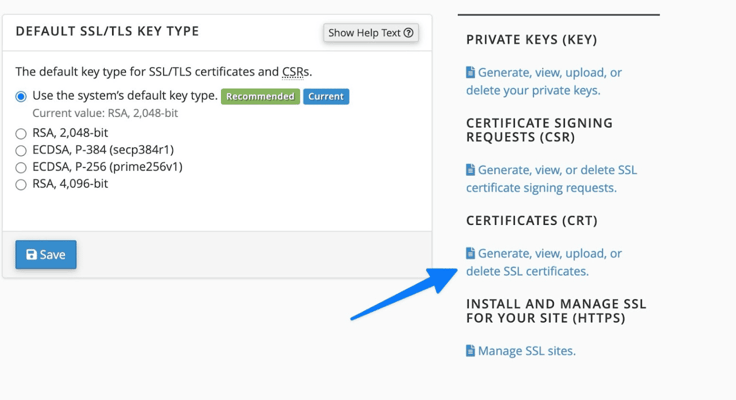
Click the link to generate, view, upload, or delete SSL certificates.
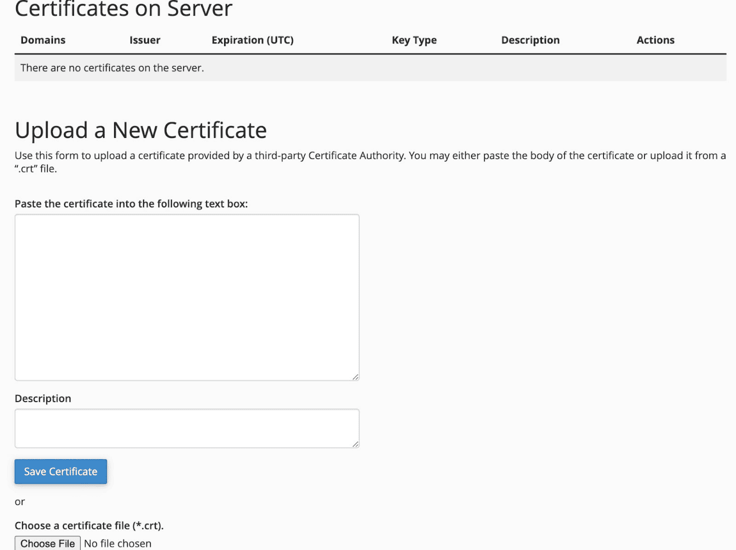
This brings you to a page where you can either paste the certificate into a text box or upload the certificate’s file. Save the certificate to finish the process.
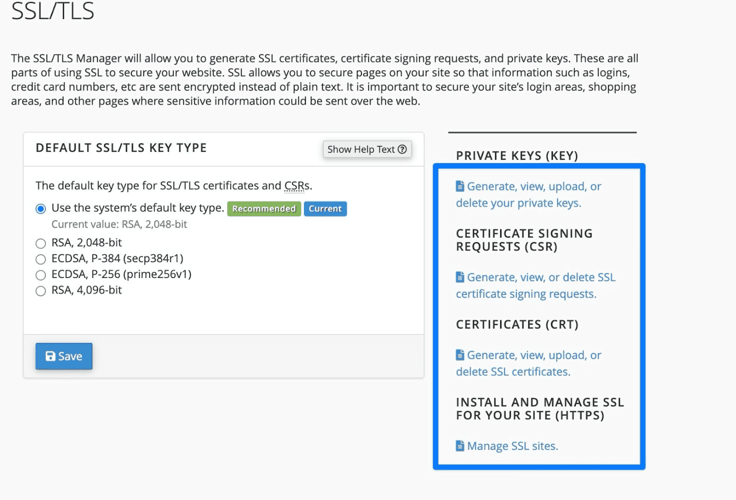
As you save SSL certificates, the same page provides a list of your certificates to select and manage. You can also go back to the previous SSL/TLS page to manage private keys, certificate signing requests, SSL certificates, and SSL sites.
Keep in mind that most reputable hosting companies provide SSL certificates. So, you should first contact your hosting provider to see if the SSL certificate has been installed. If not, they may give you the file to upload in cPanel, or they might have a one-click SSL installation button on the hosting dashboard.
IP Address Blocking and Access Control
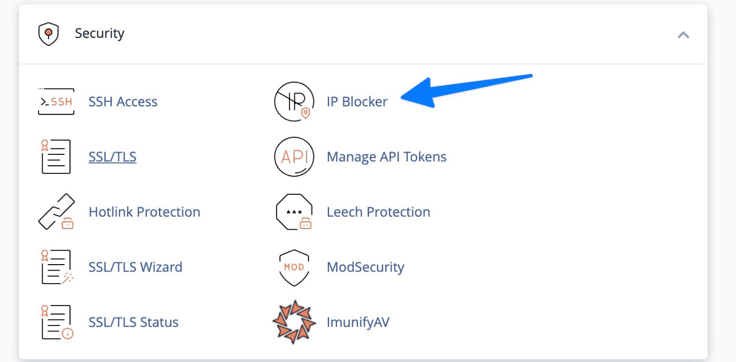
IP address blocking filters out specific IPs from accessing your website, usually those that have a reputation for malicious activity — like fraud on an eCommerce website or spam comments on a blog. To get started with the feature, click on the IP Blocker link in the Security module.
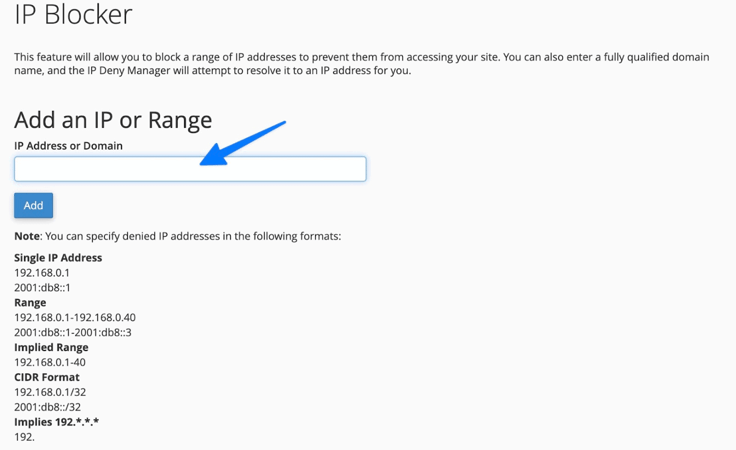
Simply type in the IP address or domain of the user or site you’d like to block. Click Add to activate the block and see it in your list of blocked IPs.
Access control gets handled in two ways: managing who can access SSH keys and selecting who can access your site altogether. For adjusting user access controls, use the User Manager tool under Preferences.

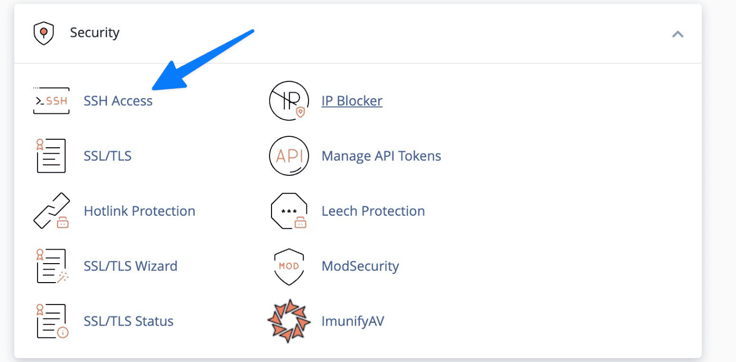
Click on the SSH Access link (under Security) to choose who can control and see SSH keys. Click Manage SSH Key after that.
This page allows you to generate both public and private keys and authorize their use when connected to the account.
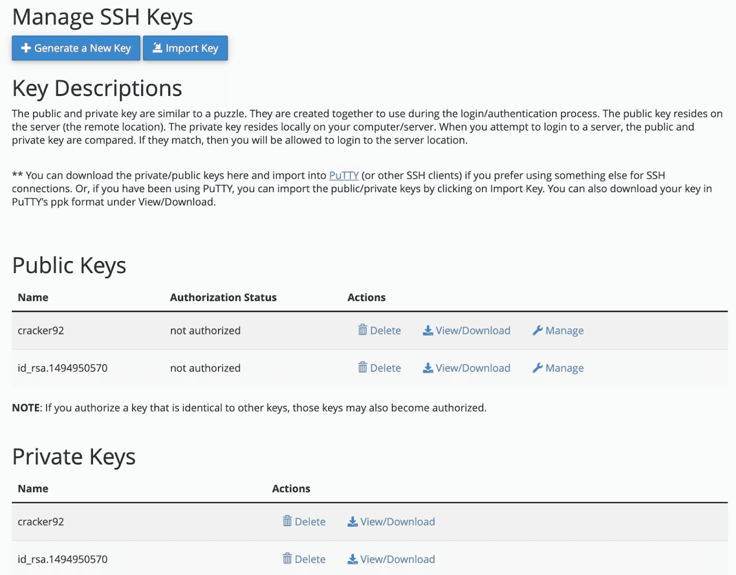
SSH keys establish a secure connection between your device and the server, so they’re essential to managing any website safely. Your host should have already generated a private and public key. SSH keys always come in pairs: public and private. For the most secure setup, the public key gets uploaded to cPanel’s server while the private key gets saved on your local computer.
Two-Factor Authentication
Two-factor authentication protects your cPanel and hosting account from brute force attacks. These are the most common types of cyberattacks where bad actors try to guess your username and password with automated tools.
Two-factor authentication requires the user to confirm the login a second time, often by clicking through an authentication email or typing in an authentication code sent to a phone. Therefore, the process requires two keys to get in: the password and the second verification method.
To set up two-factor authentication on cPanel, your hosting provider must have this feature active; it’s an optional tool for providers. If available, you’ll find the Two-Factor Authentication link under Security.

After that, it all depends on which authentication app you plan on using. Options include Google Authenticator, Duo Mobile, and Microsoft Authenticator. Click Set Up Two Factor Authentication in cPanel, then walk through the specific steps for your authenticator of choice.
Security Scans and Notifications
Several security scan features exist on cPanel. One is ImunifyAV, which scans for malware, implements a firewall, and acts as a complete server security system. Your hosting provider may also install optional plugins to protect your cPanel, the server, and your entire website.
The variety of security scan tools makes it difficult to discuss the process for setting up these scans, but you should know that, regardless of the security scan tool implemented by your provider, you should always find them in the Security module in cPanel.
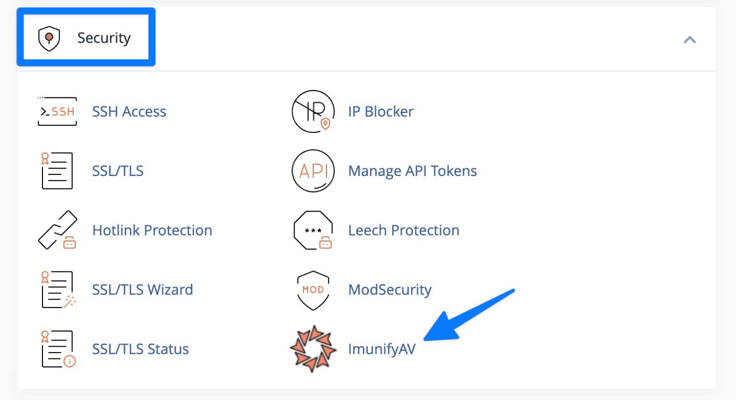
Opening a tool like ImunifyAV — or any scanner for that matter — usually provides a configuration process and a way to receive notifications when a threat occurs. You can find another notifications feature on all cPanel dashboards by clicking on the Contact Information link (under Preferences).
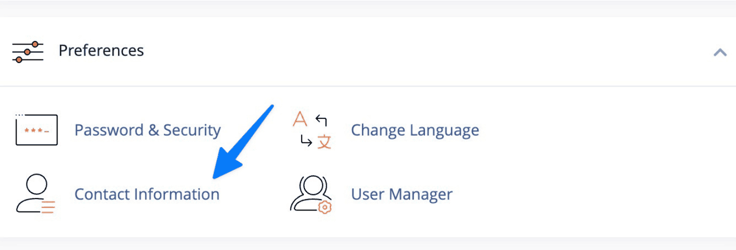
That reveals options to receive basic security notifications, like when someone logs into your account or when an external account links to your account for authentication.
Installing Software and Applications
Every cPanel dashboard provides simple solutions for installing software and applications. One tool, called Softaculous, offers one-click installations for hundreds of apps, scripts, and software. These apps include content management systems (like WordPress) and web applications for projects like eCommerce sites and forums.
Introduction to Softaculous
Softaculous, an automated installation tool fully integrated with cPanel, provides quick installation functionality for more than 400 applications, scripts, and software. This means the user can log into their cPanel and install everything from content management systems to eCommerce platforms on their servers.
Other options include social networking scripts, community forums, and wikis. Softaculous removes the need for complicated installation procedures (like FTP) and opens up rapid website launching for beginners and advanced users alike.
Installing Popular CMS Platforms
Softaculous allows for the quick installation of commonly used content management systems like WordPress, Drupal, and Joomla. As long as your host has Softaculous activated, you’ll find a separate module for it in the Tools section of cPanel.
Each CMS has its own icon and link. Simply click on the CMS you’d like to install and walk through the steps. For instance, WordPress has a setup process where you create a username, password, and site name. After clicking Install, you will get a link to your WordPress backend.
Installing Other Web Applications
More than 400 applications and script installations are available through Softaculous. You install all of them through the same process as CMS installation: go to the Softaculous section in cPanel, then select the application you’d like to install. Softaculous has apps for eCommerce platforms, customer support systems, social networking, online learning tools, and more.
Although the list is extensive, here are other web apps with integrations through cPanel’s Softaculous:
- PrestaShop (eCommerce platform)
- Magento (eCommerce platform)
- OpenCart (eCommerce platform)
- phpBB (Forum)
- SMF (Forum)
- Typo3 (CMS)
- Concrete5 (CMS)
- MediaWiki (Wiki)
- Roundcube (Email system)
- Coppermine (Image gallery)
- Moodle (Educational platform)
- Dolphin (Social networking)
- osTicket (Customer support)
- Feng Office (Project management)
The versatile combination of Softaculous and cPanel elevates the user experience of any hosting environment. Not only can users handle traditionally complex hosting tasks in a simple manner, but they can install robust systems like WordPress and Magento with the click of a button.
Backup and Restoration
Configuring manual and automated backups serves as an essential security measure for any website. Many hosts have proprietary backup solutions, while others rely on cPanel’s built-in site backup tool. In this section, you’ll learn how to create those backups, schedule them for the future, and restore them if something happens to your site.
How to Create Full or Partial Backups of Your Website
Full and partial backups allow you to either save the entirety of your website or to choose specific parts of your website to save, like the database or email filters. The cPanel interface actually comes with two methods — both of which are very similar — to create backups: The main Backup tool and the Backup Wizard. Your host will most likely only have one activated, but they both show up in the Security section of cPanel.
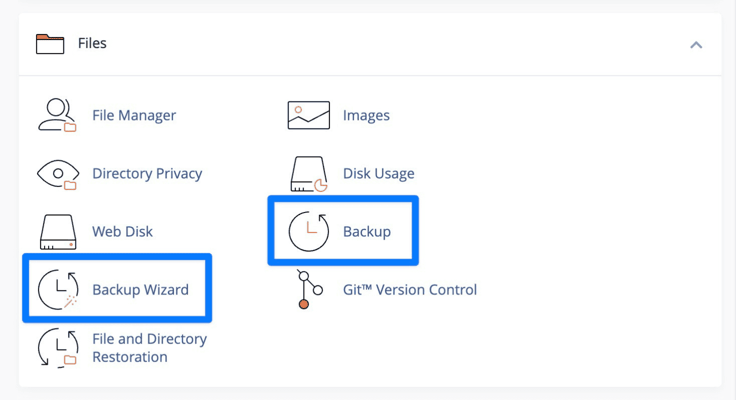
For this tutorial, we’ll only focus on the Backup option. To begin, click the Backup link. The tool offers a quick button to Download a Full Account Backup.
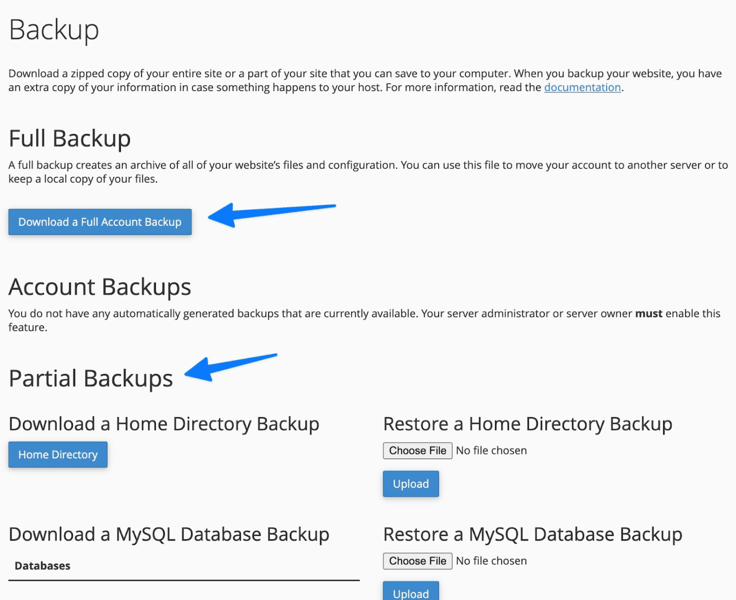
This saves all website and configuration files to your computer. Alternatively, you might choose to only backup one portion of your website. Those partial backups are available on this page, too. For instance, you can download a home directory, MySQL database, or email backup.
Scheduled Backup Options
The previous section only talked about manual backups and restores. To automate the process, your hosting provider must have automatic backups activated. Hosting companies often advertise automated backups before you purchase a plan.
To manage automated backups, click the Backups link in the Security module. Under Account Backups, you’ll find settings to pick dates and times to run full or partial backups and where to save them.

As you can see, we used an example of a hosting provider without the automated backup feature. If this happens, contact the host to see if they can turn it on for you or if they might consider adding the feature in the future.
How to Restore Backups in cPanel
You can restore backups from the Backups feature as well. To the right, you’ll see Upload buttons for home directory files, database backups, email forwarder files, and email filters. Simply upload the previously saved files from your computer to restore their states to a previous version.
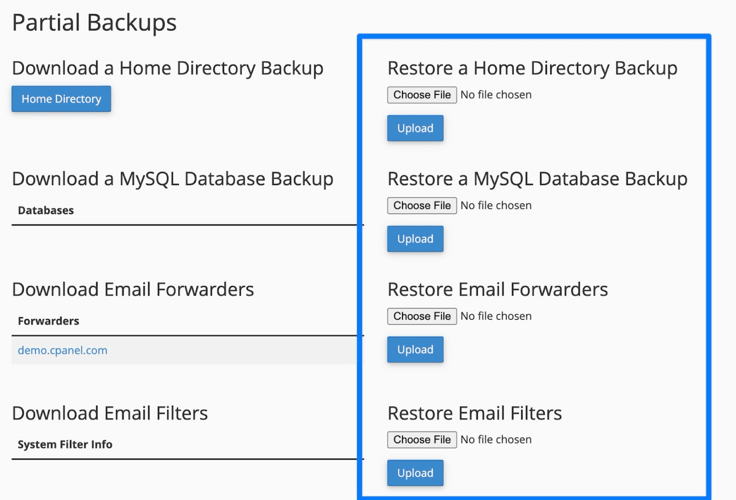
Another restoration solution is available from the File & Directory Restoration link (in the Security module in cPanel). This offers more granular control over restorations since you can choose to restore specific paths, files, and directories.
Advanced Features and Tools
The Advanced module in cPanel offers more complicated features for technically skilled users. You get features for cron jobs, DNS tracking, indexes, and more.
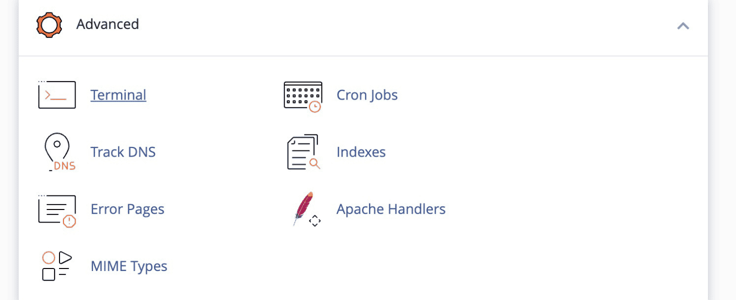
This is also the area where you can use the terminal and check error pages. Examine the overview of these features below to understand how they work and if there’s any reason for you to use these advanced tools.
Cron Jobs: Scheduling Automated Tasks
Cron jobs let users schedule automated tasks at specific intervals. Technically, you can use cron jobs to automate any type of script or process. For instance, some developers create personal automation on their computers for productivity tracking or to launch applications.
Then, they schedule those scripts to trigger with a cron job on a hosting account or local server. In the context of web hosting, site owners might configure a scheduled cron job to back up site data, update content on the website, or send out notifications to customers.
Metrics and Analytics: Website Statistics and Logs
The Metrics module in cPanel is the hub for processing data and understanding analytics that may boost everything from site visitors to performance. You receive site quality monitoring, error logs, and bandwidth reports, all of which contribute to your overall understanding of your site’s health.
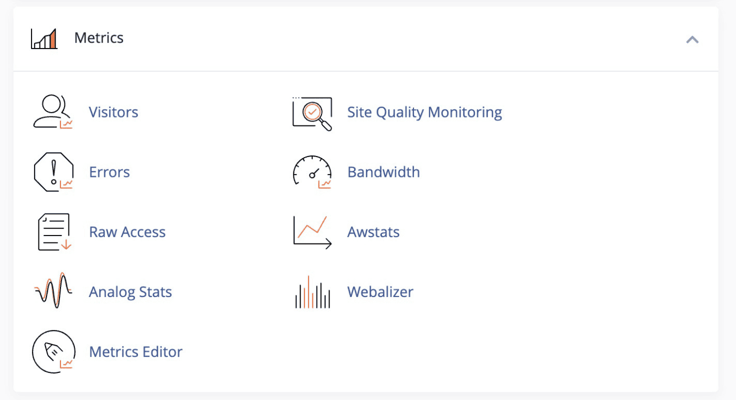
The Webalizer and Awstats options deliver detailed statistics focused primarily on your website. For instance, these tools have data on page views, where users reside, and the sites that refer traffic to yours.
Domain Management: Add-On domains, Subdomains, and Redirects
The Domains section of cPanel boasts many powerful tools for managing domains and the sites you connect to with those domains. Most notably, the Redirects feature helps send visitors from one page on a website to another automatically. This assists with broken links or pages that could hurt SEO rankings.
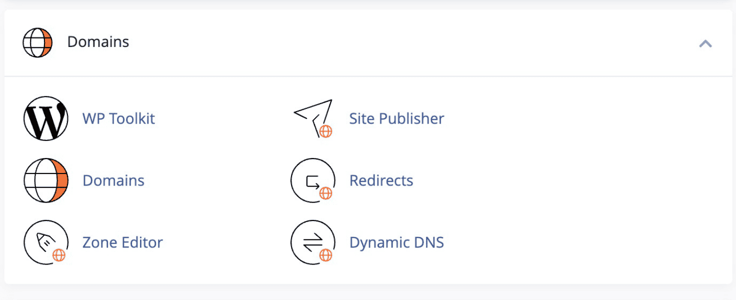
The Domains link leads to an area where you can configure what are called add-on domains. In short, it allows you to put several domains on one cPanel account without any additional configuration. This area also supports the management of subdomains (the subsections of your website with URLs like blog.example.com or support.example.com).
Advanced DNS Management
Advanced DNS management is handled under two features: Dynamic DNS (located within the Domains module) and Track DNS (situated in the Advanced module). Seeing as how this is the section for advanced features, we’ll focus on the Track DNS option.
Overall, Track DNS diagnoses DNS information and the IP address for a domain that you specify. This helps with domain lookups, trace routes, and network troubleshooting. The idea is to figure out where a connection fails on your network by examining domains, IPs, and how they communicate with each other.
cPanel Optimization and Performance
There’s not one specific feature on cPanel that guides you through how to effectively optimize your website and control panel. However, we have several tips to improve performance, handle resource monitoring, and troubleshoot common performance issues.
Tips for Optimizing cPanel Performance
The first step in optimizing cPanel performance involves updating your cPanel software on a regular basis. This provides the most recent performance enhancements along with bug fixes and security patches.

In addition, cPanels users should consider using a CDN service like Cloudflare. CDNs, or content delivery networks, improve page load speeds by delivering content to visitors through a distributed network of computers (so the user gets content from a server closer to them — hence the faster delivery speeds).
In addition to all that, you should regularly clean your disk space, get rid of unnecessary files, optimize databases, and monitor the disk space for any issues. Some hosts provide additional optimization features as well, enabling you to streamline the process of performance optimization for your server and website.
Resource Usage Monitoring and Management
Similar to performance optimization, the key to resource usage management is efficient monitoring practices.

The cPanel dashboard already has a feature called Resource Usage. It’s located in the Metrics module and provides information on the level of server resources used by your hosting account.
There’s also the Optimize Website tool, which reduces bandwidth by compressing certain content elements in your site files.
Other than that, make it a practice to monitor your resource usage regularly. If a file or other part of your website hogs resources, find a new solution or disable it completely.
Troubleshooting Common Performance Issues
If you notice a problem with your site’s performance, you can turn to cPanel to troubleshoot.

From poor load times to errors, high resource usage, and damaged databases, cPanel has ways to identify each problem.
To troubleshoot, begin by checking the Error Log (located in the Metrics module). The Error Log offers clues to what’s wrong, like error codes you can search online or messages telling you which parts of your site cause the poor performance.
Another way to troubleshoot is to disable individual elements of your website — plugins, themes, and files — to pinpoint which ones cause the performance issues.
cPanel Add-ons and Integrations
Similar to how Softaculous helps you install various applications and software on your server, cPanel also has several add-ons and plugins to improve the interface. These add-ons usually get offered to hosting providers, which is why a dashboard from one host may look completely different from another.
If you’re missing a desired feature, contact your host to see if they might consider installing an add-on for that feature in the future.
cPanel Add-Ons and Plugins
Add-ons and plugins improve the functionality and interface of cPanel. Some add-ons come from the cPanel developers, but the vast majority of them are from third-party developers.
Categories of cPanel add-ons include SEO tools, performance optimizers, backup tools, and security upgrades.
Popular Third-Party Integrations
Although hundreds of third-party add-ons and plugins exist for cPanel, there are a few notable ones to discuss. Attracta SEO Tools offers a large collection of SEO features, while the JetBackup add-on enables a streamlined solution for automated backups.
Another favorite is called ConfigServer Security and Firewall, which strengthens your server’s security with a robust firewall.
Enhancing cPanel With Custom Scripts and Extensions
Beyond prebuilt add-ons and plugins, hosting providers and users can create custom scripts and extensions for cPanel. This allows for custom tailoring of the interface, specifically for businesses with unique needs.
Using scripts should always come with a warning, though: You need advanced programming and server management skills to implement custom scripts on cPanel. With those skills, however, you can add anything from task automation to custom dashboard designs.
cPanel: An Essential Tool for Website Owners
If you haven’t used cPanel before, we encourage you to explore the popular control panel for a greater understanding of how the interface works for web hosting.
For those familiar with cPanel, use this article to broaden your knowledge of the dashboard. This way, you can take advantage of cPanel’s powerful features, like blocking pesky IPs, strengthening the security of your server, and boosting your website’s performance.
We cannot understate the importance of cPanel for web hosting management. Since its introduction, cPanel has revolutionized how web hosting works and introduced simplified methods for beginners to easily control their hosting accounts.
In addition, it presents ways for advanced users to take advantage of everything from automation tools to custom scripts. With cPanel, it’s a winning proposition for everyone.


