


Writer: Sead Fadilpasic


Editor: Britain Simons


Reviewer: Ashley Fricker

When running a website, there are very few things of paramount importance on the internet. First on that list should be having an SSL certificate. It encrypts the connection between a user’s browser and your server, so that hackers lurking on the network can’t decipher sensitive data, like passwords and credit card numbers, in case they intercept them.
Now get this: if you use Let’s Encrypt, a nonprofit Certificate Authority, you can get an SSL certificate for $0 that renews automatically every 90 days. I took an in-depth look at how to set up Let’s Encrypt on Hostinger so you can get all the good stuff in about 15 minutes. We’ll cover preparation, verifying installation, troubleshooting common certificate issues, and a few other important steps.
-
Navigate This Article:
Step 1: Prepare Your Website for SSL
Before you enable the Let’s Encrypt certificate, it’s wise to check off a list of things for an error-free and stress-free setup.
For this guide, I used Hostinger, one of my favorite web hosts:
Hostinger.com

Monthly Starting Price $2.69
- Best overall value: Nothing at this price comes close feature-for-feature.
- AI builds your site in minutes — no technical skills needed
- Up to 3 websites with free SSL
- Weekly backups and managed WordPress
- 2 business mailboxes free for 1 year
- Get started on Hostinger now.


Sead Fadilpasic
| Money Back Guarantee | Disk Space | Domain Name | Setup Time |
|---|---|---|---|
| 30 days | 20 GB SSD – 100 GB NVMe | FREE (1 year) | 3 minutes |
We’re going to check a few things, so log in to the Hostinger dashboard. You can use the search function or “Ask AI” to quickly find whatever you need.
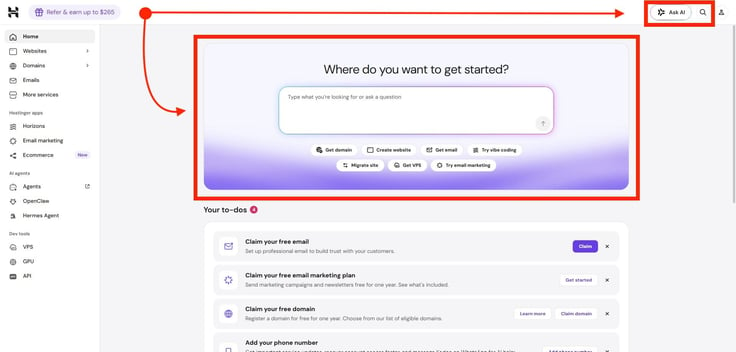
Check these before you jump into Let’s Encrypt setup:
- Verify your domain points to Hostinger: Both user traffic and LE’s verification checks should route to the specific server where your website files live. If the domain is pointing to some other web host, the SSL installation will fail because the certificate will attempt to bind to a server that doesn’t control your website. Navigate to your DNS records > check the “A record” and “CNAME” records. Alternatively, simply use a free DNS Checker tool and type in your website.
- Confirm that your site is live: I know this sounds redundant, but check it nonetheless. Your website must be online. Even if it’s published, we don’t want server errors to pop up, the validation process to immediately time out, or your request to be rejected. Open your site from a different browser.
- Make sure the domain has finished DNS propagation: This is just in case you updated nameservers or IP addresses in the last 24-48 hours. It takes time for those changes to update across global networks, so if you attempt an SSL setup mid-propagation, it will result in a failed validation because Let’s Encrypt won’t be able to locate your new host.
- Check that the domain is eligible for an SSL certificate: Nobody said you’re automatically good for it. Your domain extension needs to be supported, and the domain itself mustn’t be flagged on any spam or security blacklists. As long as you don’t see any warnings on your Hostinger dashboard, this shouldn’t be an issue.
- Check that your website is eligible, too: Lifetime SSL certificates that Hostinger includes for free with every plan can only be managed on websites created with PHP/HTML, WordPress, or other file-based CMS. Also, if you build your website with the Hostinger AI Builder, manual installation and management of SSL options won’t be available.
Unfortunately, Hostinger doesn’t get and manage Let’s Encrypt certificates for you. Good thing you have this guide!
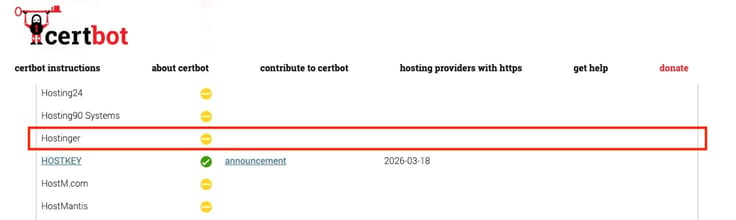
However unnecessary these steps may seem to you, keep in mind that SSL validation depends entirely on the domain resolving correctly to your server before the certificate can be issued. Certificate Authorities like Let’s Encrypt use automated systems to ping your domain and verify ownership, so any underlying network or routing error will block the issuance straight away.
Step 2: Access the SSL Management Page
With the prep work all nice and done, your next order of business is to go back to your Hostinger dashboard.
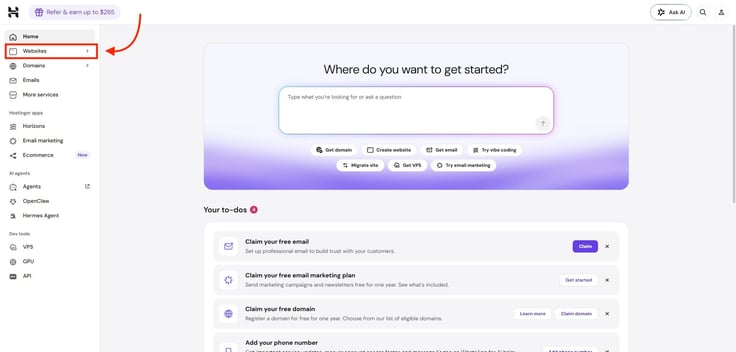
Click on the Websites tab located in the left nav menu, then click on the Dashboard button next to the website you want to configure.
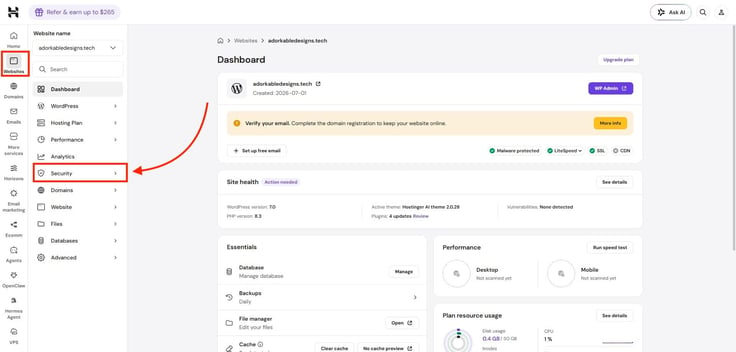
Now that you’re “inside” your website’s dashboard, take a left once again and click on the Security dropdown menu, then select SSL.
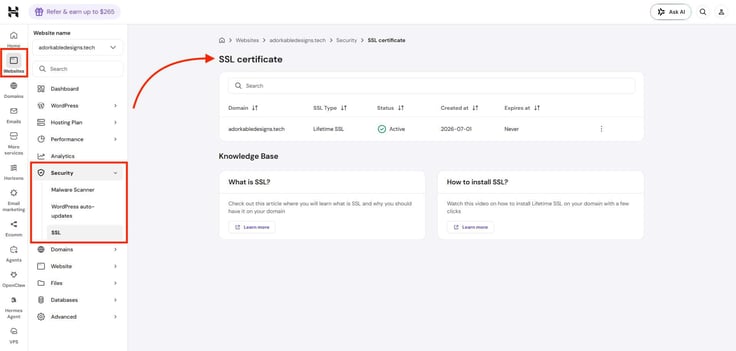
As you can see, Hostinger’s hPanel keeps things neat, though the layout and/or the location of the feature may vary just a teensy bit depending on the type of hosting you use.
Step 3: Enable the Let’s Encrypt SSL Certificate
Another thing you can see in the screenshot above is the green checkmark. That’s just one of the great things I love about Hostinger. It automatically enables SSL. As soon as you add a website, create a subdomain, or park a domain, and the DNS has propagated, the free lifetime SSL kicks in.
The web host uses a domain-validated certificate compliant with the Payment Card Industry Data Security Standard (PCI DSS), which means it’s a standard SSL that will protect your website.
Wait, if I get a free “lifetime SSL,” then why choose Let’s Encrypt?
Truthfully, you may be able to stop here and thank your lucky stars for choosing Hostinger. Just know that free SSL won’t follow you if you ever change hosting and migrate your site.
But for the sake of argument, let’s say that my site already has an old SSL certificate active. It may be a paid service or not be as reliable for auto-renewal.
In that case, Let’s Encrypt is a free, reliable service for an SSL certificate.
If you’re not sure which service or provider you previously used to acquire your SSL certificate, it’s simple to remove and replace with Let’s Encrypt. Click the three dots (menu) for the specific domain and select “Uninstall” for a clean slate.
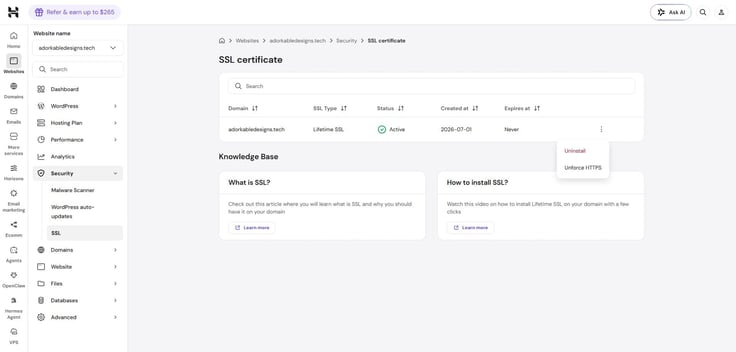
As a result, a purple ‘Install SSL’ button will appear, but don’t click on it. Doing so will only automatically reinstall lifetime SSL, and you’ll be back where you started.
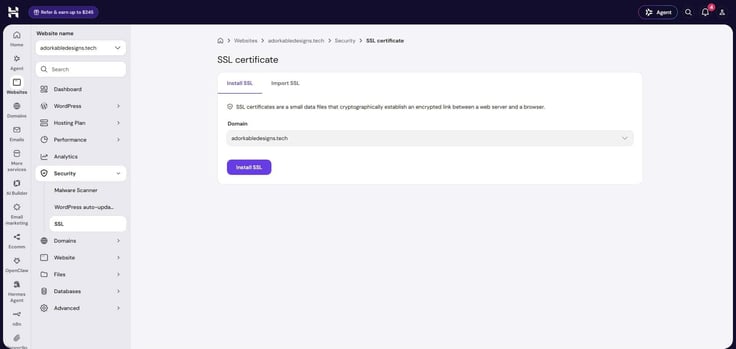
Instead, click the Import SSL tab, where you’ll have to fill in the details for your SSL.
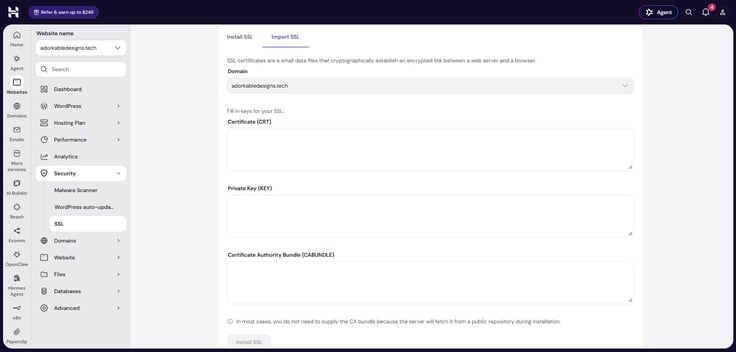
Things get a bit more complicated from here. Let’s Encrypt is an automated certificate authority, so it doesn’t provide static .zip files of certificates that you can open in a text editor and copy into these fields.
The problem is, it heavily relies on the Certbot ACME client to get the SSL certificates sorted out. But, shared hosting at Hostinger doesn’t support running Certbot directly via the command line. This is likely because Certbot is designed for VPSs and dedicated servers where you have root shell access, which isn’t the case with shared hosting.
Alas, if you have a VPS, Certbot will automate the process of obtaining and renewing free Let’s Encrypt SSL certificates via command-line inputs. You can also use a VPS control panel, as some have automated SSL features.
Back to our problem at hand. There are other options for ACME client software if Certbot doesn’t get the job done, as it didn’t.
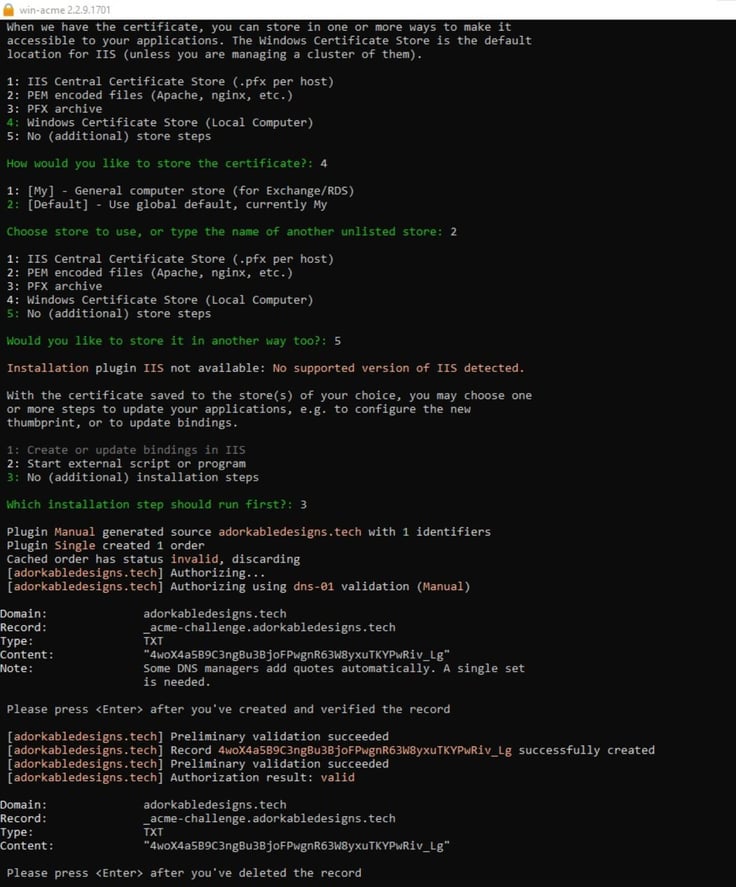
So, I chose a different app called win-acme. This too is an open-source command-line tool, but it’s refreshingly simple to use. I’ve documented the entire process, so you’ll quickly see I’m not trying to pull a fast one.
After you download the latest version from the official website, make sure you run it as an administrator, or some key options won’t appear. The client will connect to Let’s Encrypt’s server, so that part is already covered.
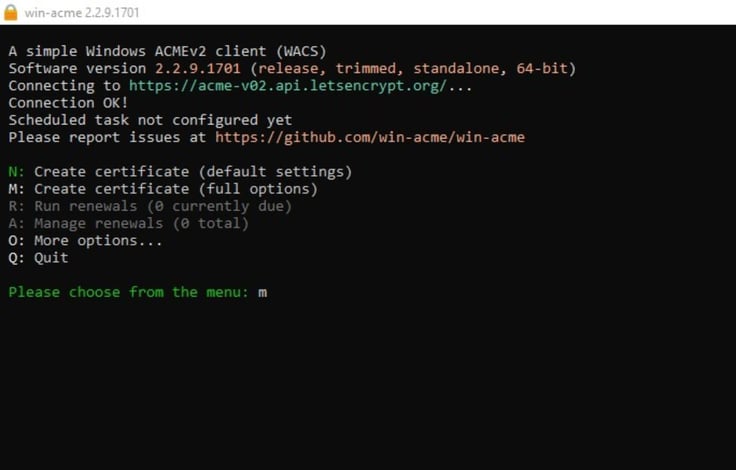
That’s the simplicity I was talking about. Most of the time, you’ll have to choose one of the options presented. Here, you want the full breadth of settings at your disposal, so go with the “Create certificate (full options)”.
The green letters and numbers that indicate options represent win-acme’s recommended option, but we’ll have to disagree with it at times (like now with “M”).
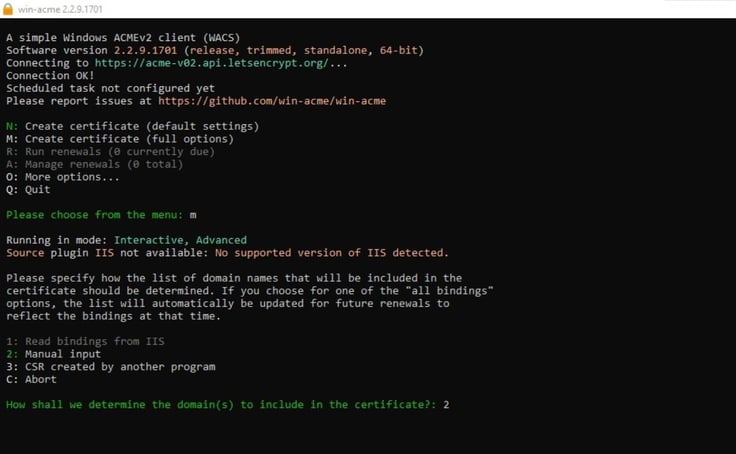
You’ll have to manually input your domain and press Enter to accept the default name for the newly generated plugin (don’t ask what that is since I’m not 100% certain).
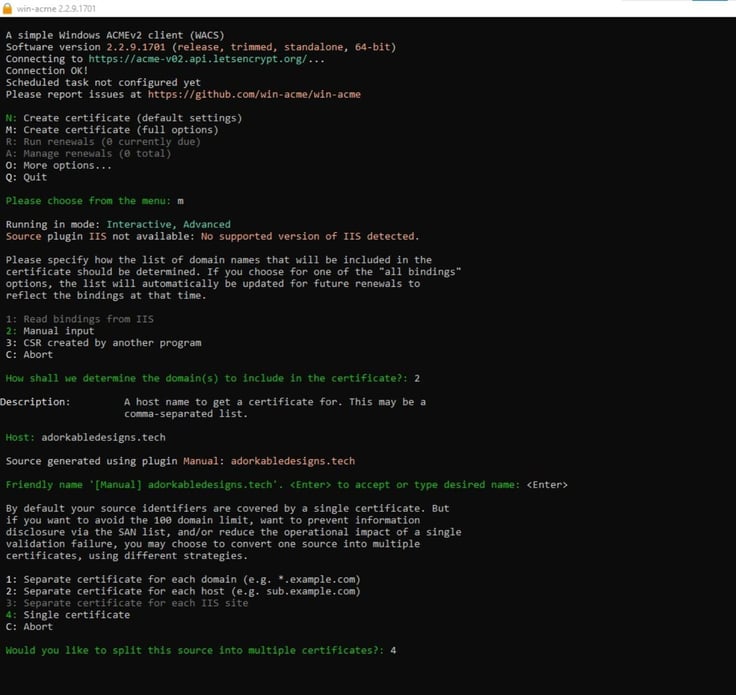
Next, you’ll have the option to separate the certificate for each domain and host, or opt for the single one that covers everything. The latter is the most sensible choice.
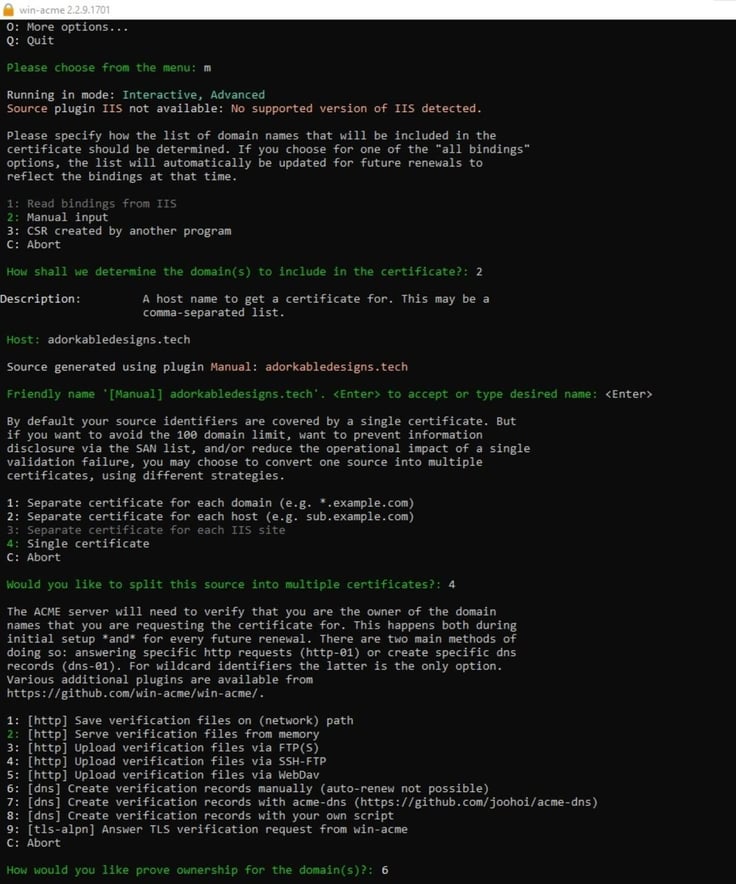
You’ll have to roll up your sleeves a bit here. The client’s server will need to verify that you own the domain; otherwise, anyone could tinker with it. There are several approaches to this task, and not all worked for me. So, we’ll go with the one that did, which is creating verification records manually.
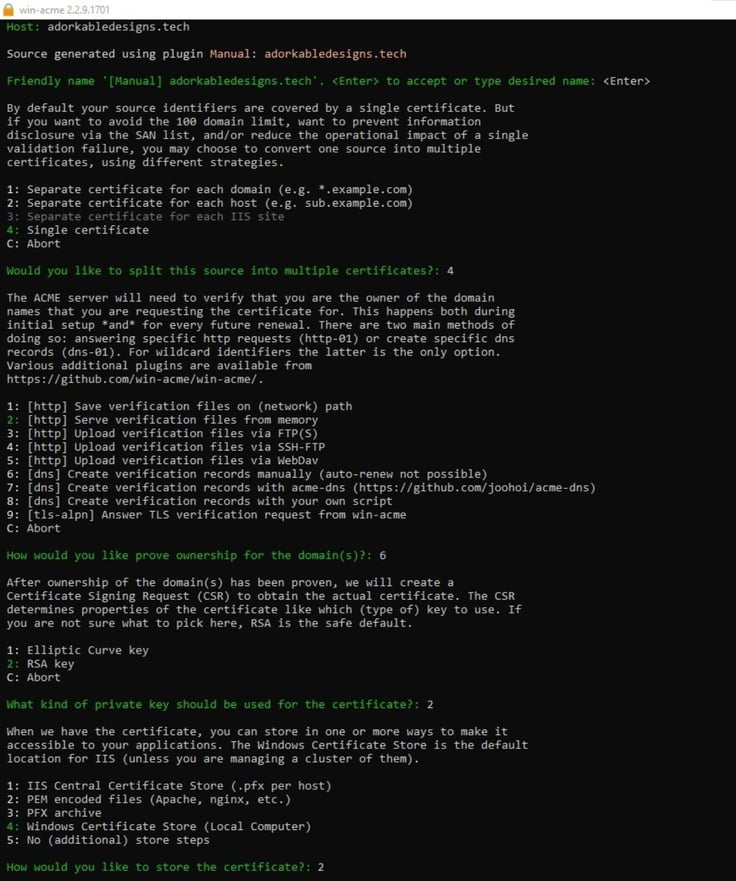
Feel free to select the default RSA private key, then PEM-encoded files for storage, since that option doesn’t require a conversion of the files you’ll need to import into hPanel’s fields.
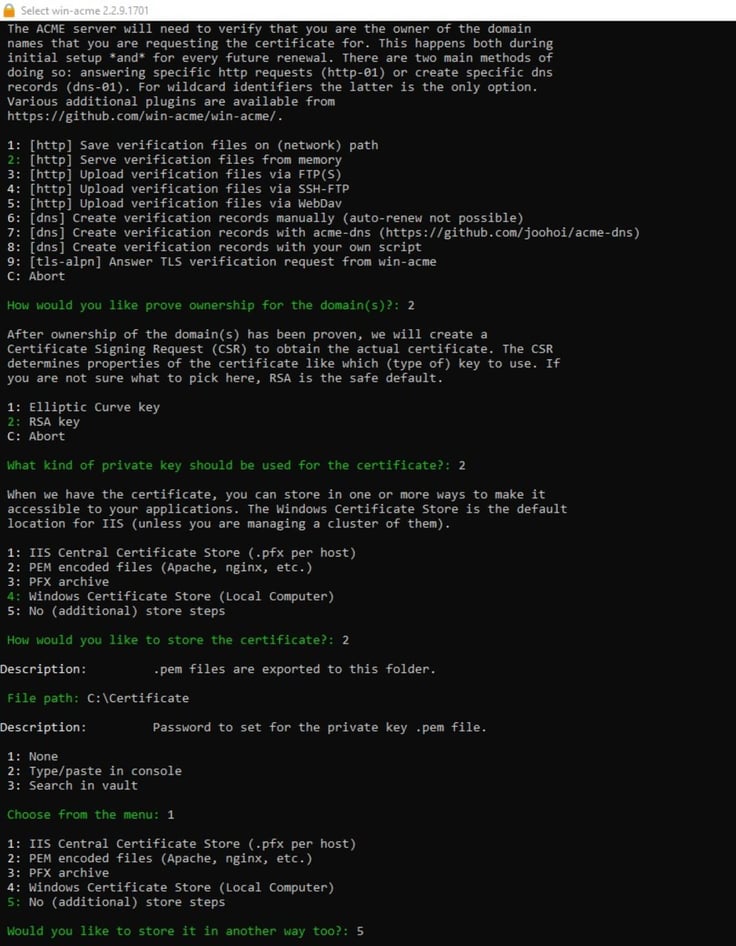
Set the file path where the PEM files will be exported. Optionally, you can set a password for the private key file and choose another storage method as a backup. You can live without those two for now.
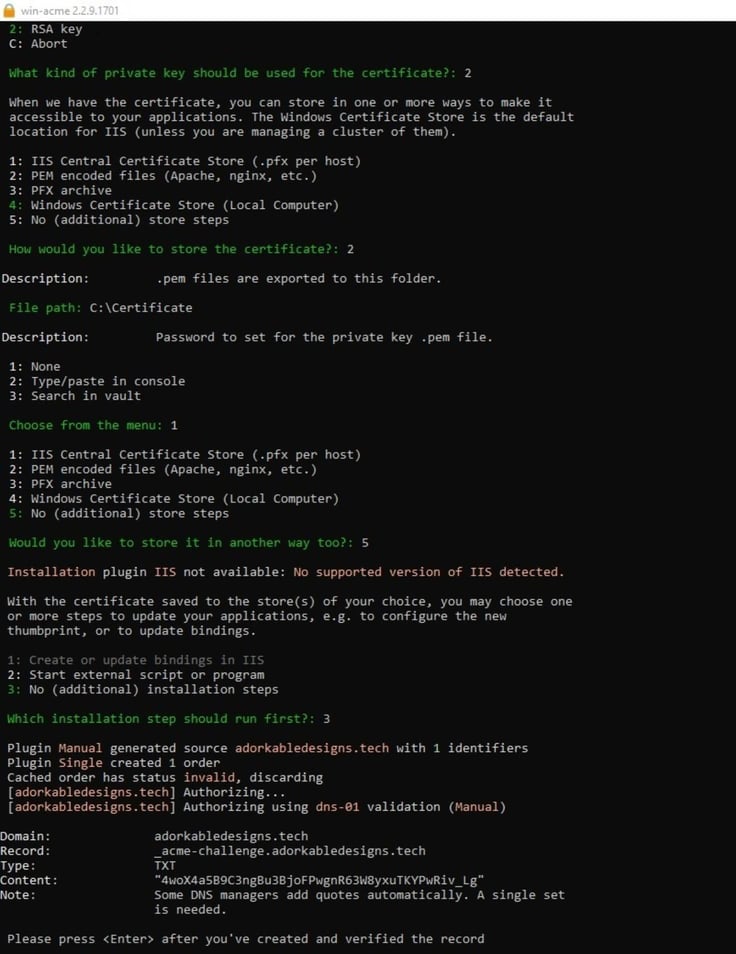
With no additional installation steps needed, the program will create the parameters for the verification record. Leave it be momentarily and switch to hPanel. Go to Domains on the left nav sidebar and click DNS.
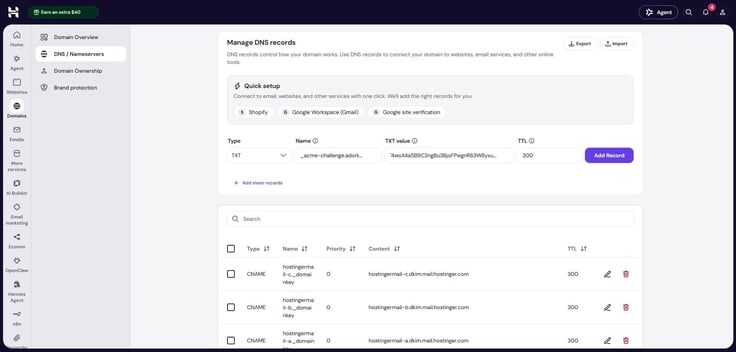
This will open the DNS Zone Editor. Scroll down a bit to the Manage DNS records section and input TXT as the type of the record, then copy/paste the name (record) and TXT value (content) from win-acme.
I’ve set the TTL (Time-to-Live) to 300 so that the other servers can cache my DNS record for only 5 minutes. It’s just easier to test that way. Anyway, as you press Add Record, a message will pop up saying that the DNS record was created successfully, and you’ll see it in the list (below).
Now, head back to win-acme and press Enter. The client will perform a swift validation and ask you to delete the newly created record.
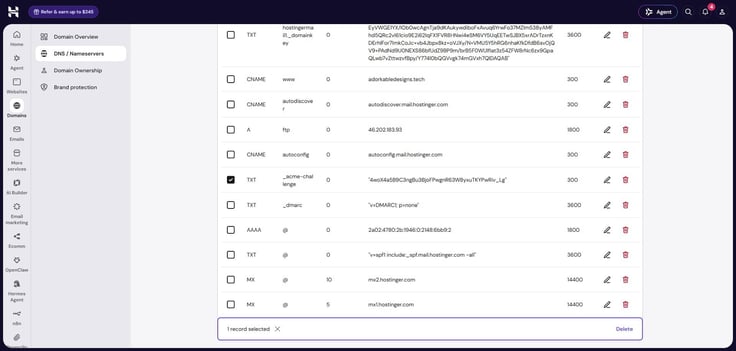
So, hop to hPanel once more and locate the record in the DNS records list. Tick the box next to it, and an option to delete it will appear at the bottom.
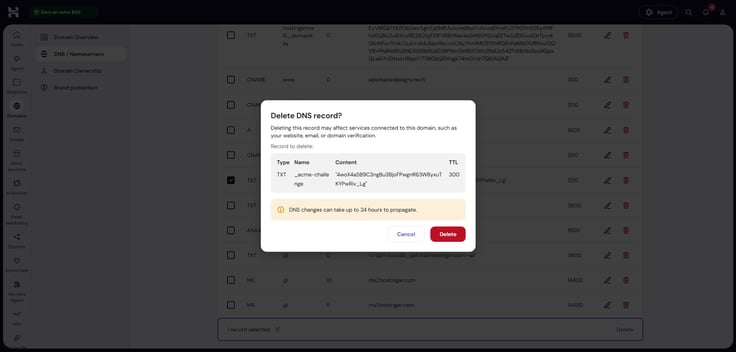
After you click on it, hPanel, diligent as it is, will double-check that you’re not making a mistake. Click on the red Delete button to erase the record.
Return to win-acme and hit Enter. The program will then delete the record and create the SSL certificate.
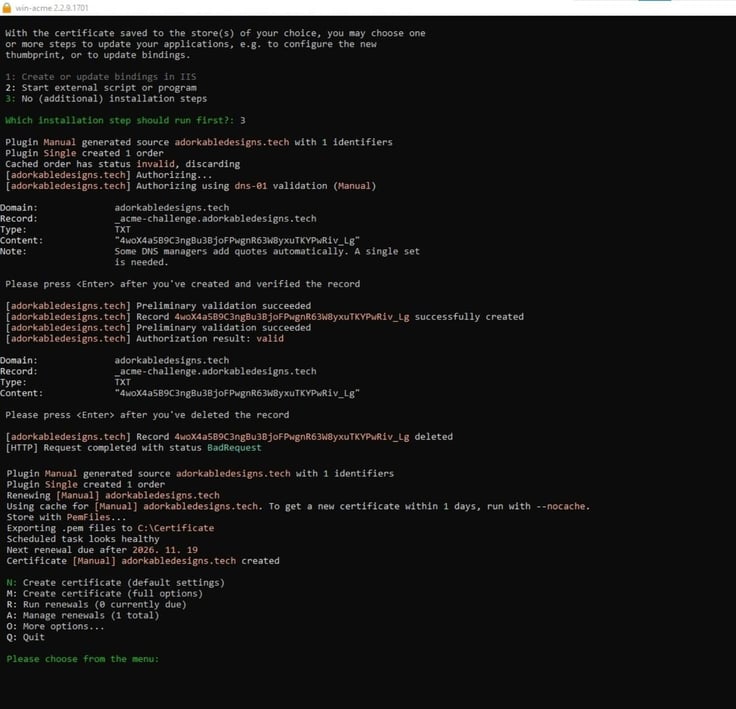
At this point, our work with win-acme is done. You now need to open the folder where the certificate was extracted. There should be four files, but we’re only interested in those that end in -crt and -key, since we’ll need those for hPanel. Open each with Notepad and copy the content.
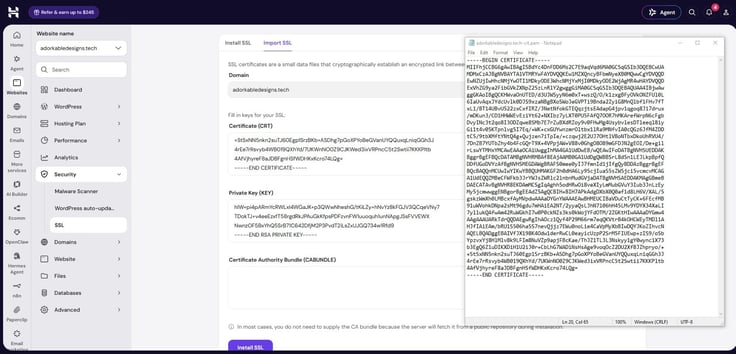
Make your way to the Import SSL tab for the final stretch of how to set up Let’s Encrypt on Hostinger. Paste the -crt file’s content into the Certificate (CRT) field, and -key file’s content into the Private Key (KEY) field. Hostinger’s server will fetch the CA bundle, which means all that’s left to do is to press the purple Install SSL button.
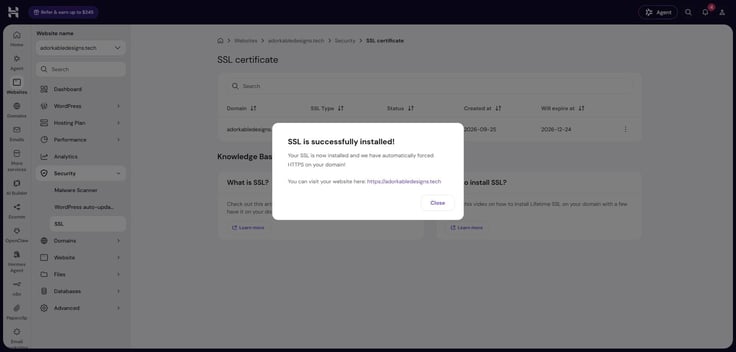
Voila! You got yourself a brand new SSL certificate from Let’s Encrypt.
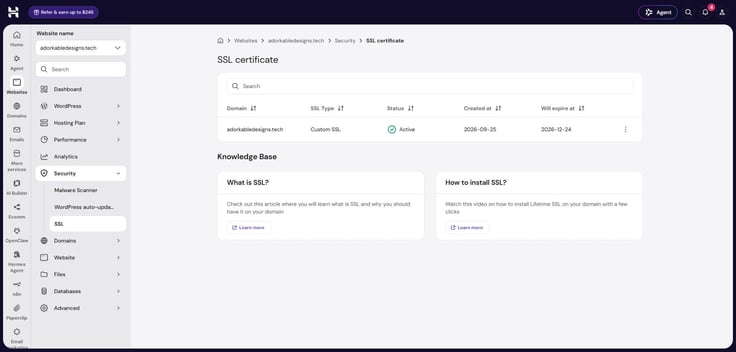
Don’t worry that it says “Custom SSL” because Hostinger doesn’t name the specific certificate authority.
And that’s all the SSL wisdom here. Also, if you purchase a domain directly from Hostinger, it will use the provider’s nameservers by default, which means one less thing to check and worry about.
Step 4: Check for Redirect Settings
After installing an SSL certificate to secure your domain, HTTPS is forced by default. That means all visitors go to the secure, encrypted version of your site, even if they type http:// for whatever reason (who does that, anyway?).
Conflicting Redirect Rules
Sometimes, the default force (not the Jedi kind) can result in a redirect error. In such a scenario, your server is likely getting conflicting instructions. There are a few frequent culprits for this error, starting with conflicting redirect rules. Typically due to manual rules tucked inside your .htaccess file or active settings inside your Hostinger hPanel, trapping the browser in an endless loop.
First steps to remedy a redirect error:
- Log into your File Manager
- Temporarily rename your .htaccess file (to disable it)
- Test the site in an incognito window
If the error disappears like motivation on a Monday morning, slowly bring your redirect rules back one by one to find the troublemaker (or ask your friendly neighbor developer for a hand). Don’t forget to check the Redirects section in hPanel to ensure there are no overlapping rules there, too.
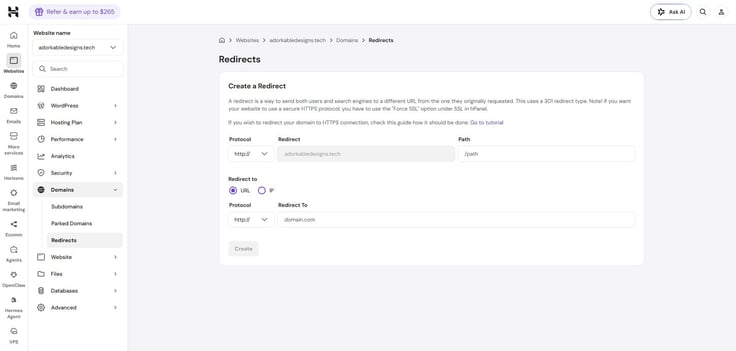
Outdated Database URLs
At numero dos are outdated WordPress database URLs. If the core settings are still looking for an old http:// address while your server is forcing a secure https:// connection, WordPress will loop and loop and loop and… well, you get the idea.
So, here’s how I fix it:
- In hPanel, go to Databases in the left sidebar
- Select phpMyAdmin
- Click on the purple Enter phpMyAdmin button.
- You’re looking specifically for the “wp_options” table. Take a peek at the values for the siteurl and home columns. They should start with https, but if they don’t…
- Update them from http to https. Remember, “s” means secure.
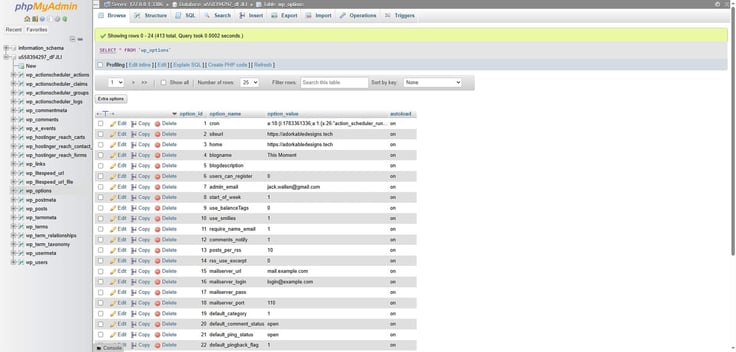
Mismatched Cloudflare
I realize not everyone uses Cloudflare, but in case you do, this should help with mismatched Cloudflare settings. A wrong or outdated configuration here can cause the network and your web host to get into a shouting match over who is supposed to handle encryption. You’ll have to do some tinkering in Cloudflare.
To fix this issue, head on to the SSL/TLS tab and do two things:
- Verify your encryption mode is set correctly to “Full” or “Full (strict)”
- Go to the Edge Certificates section to verify that Universal SSL is toggled on
Step 5: Verify the SSL Certificate
Once the installation is finished, it’s time to awaken your inner Benoit Blanc or Sherlock Holmes and make certain everything is shipshape.
Your first order of business is to visit your website using HTTPS. Fire up your browser of choice and manually type your full web address starting with https://. Ideally, you should do this in an Incognito or Private window to avoid old cached data. You can clear website data and cookies, but it may require you to log back in.
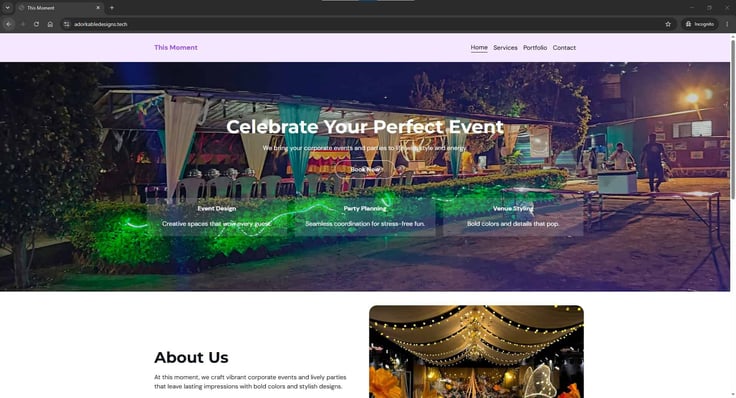
The manual part, aka typing it in, is mentioned for a good reason, since it practically forces the browser to attempt a direct connection to your server as opposed to relying on standard HTTP or automated history shortcuts.
Another easy check for an encrypted HTTPS connection is to confirm that the browser displays the secure padlock.
Some browsers, such as Edge and Firefox, display the icon right next to your domain name. Others, like Chrome and Brave, have a lock icon instead, which resembles two sliders. For Safari on desktop, click “Safari” in the top bar and “Connection Security Details…” to be sure.
Clicking on the padlock or security details shows whether the website’s connection is safe, the site’s settings, cookies and site data, and other things, depending on the site in question.
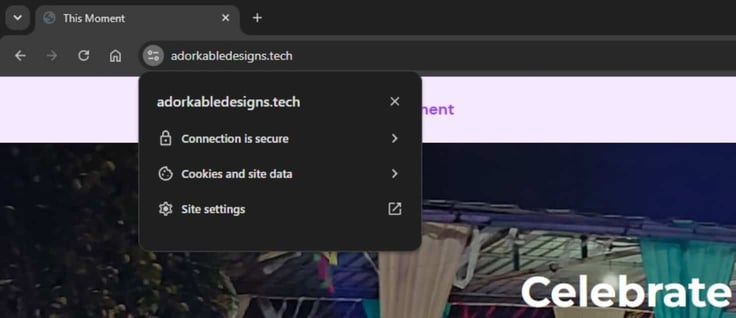
To review certificate details in Chrome and other browsers, select the “Connection is secure” option, and then “Certificate is valid” (allow for similar wording depending on your browser).
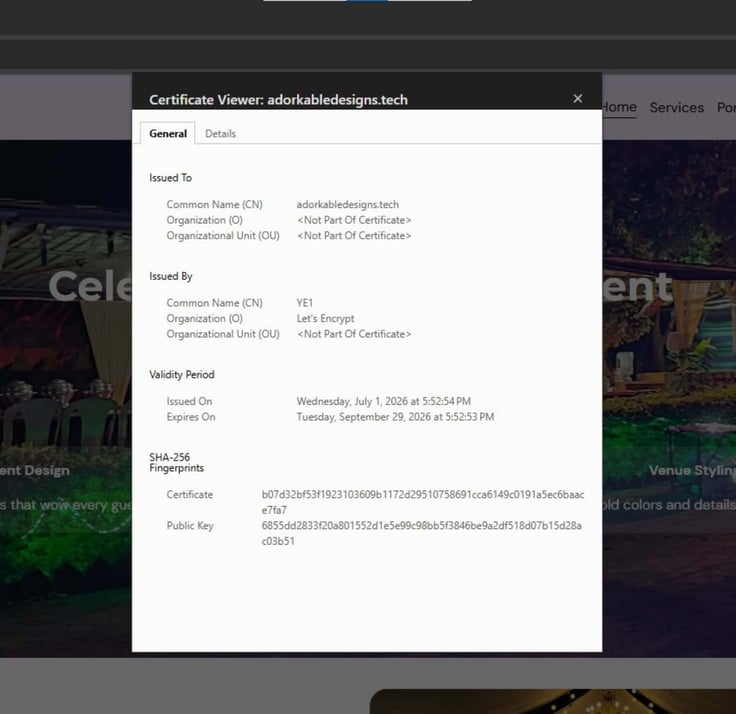
A window will pop up with two tabs: General and Details. You can take a quick look around to confirm that the expiration date is in the future. Also be sure that the issuer name matches your certificate authority or hosting provider (like Let’s Encrypt or Hostinger, in this case).
Finally, test multiple pages instead of just the homepage and call it a day. Yes, even other pages on your site can be outdated and not get the encryption memo. Although it’s rarely a problem today unless you have a decade-old site. Still, click around your site to check if the certificate works on deeper pages. Sometimes it may not due to legacy code.
Doing so also uncovers redirect issues and mixed content. Speaking of…
Step 6: Fix Mixed Content Issues
Mixed content happens when the initial HTML is loaded over a secure HTTPS connection, but other elements (images, videos, scripts, stylesheets) are loaded over an insecure HTTP connection.
The fixes are rather straightforward:
Identify mixed content warnings
For this troubleshooting, you’ll have to use the Inspect tool. If you have Chrome, Edge, or Firefox, you’re good to proceed. If you have Safari, you’ll have to enable developer settings. To enable it, go to Safari > Settings > Advanced, and check the box for “Show features for web developers”
Now we can check for mixed content:
- Open your website in your go-to browser
- Right-click anywhere on the page
- Select “Inspect”
- Then head over to the Console tab. You will see bright yellow or red warning messages indicating which elements are loading via insecure http:// links.
You can also run your URL through a free online scanner like Why No Padlock?. Great, now you found them, so let’s update them.
Update insecure URLs
Change the legacy http:// asset links to secure https:// links by opening up your source code or theme files and manually adding that crucial ‘s’. Instead of digging into that, there’s a simple solution: a plugin.
In case you’re using WordPress, there are a few plugins like Better Search Replace and Search & Replace Everything by WPCode that can scan your entire database and swap out old URLs for secure ones. Don’t you love automation to save time and energy?
Clear website and browser caches
If you haven’t already, now’s the time. We’re doing this on your hosting backend cPanel or dashboard, not to be confused with your current browser cache, history, and cookies. Remember, if you don’t clear these out, your visitors will keep seeing the old, broken HTTP parts. Both secure (encrypted) and unencrypted versions can exist at the same time.
To clear the cache on your site’s backend:
- Log into your website’s admin dashboard
- Locate your caching plugin’s menu (often found right in the top toolbar)
- Click the button that says ‘Purge All’ or ‘Clear Cache’
- You should also clear your CDN cache (like Cloudflare) if you use one
- Last, perform a hard refresh on your own browser (Ctrl + F5 or Cmd + Shift + R)
That leaves us with an important step that you shouldn’t skip.
Retest Affected Pages
Open the problematic pages in an Incognito/private browsing window to get fresh results. If you see a locked padlock symbol next to your URL and in the browser console, your site is clear of warnings.
Mixed content is a fairly common problem when transitioning to an SSL certificate, so don’t fret if you don’t have a padlock icon. It’s nothing you can’t handle.
Troubleshoot: SSL Installation Issues
Even when you follow every step perfectly, an SSL installation sometimes won’t play ball. Typically, it’s one of the following:
- SSL certificate won’t issue: During setup, this is almost always caused by delayed DNS propagation, a result of the CA’s automated system still reading your old server records. You can use any DNS checker to, well, check that your A records point to your current host across the globe.
- Domain still loads over HTTP: Browsers tend to default to the standard HTTP version unless told otherwise. The fix is to implement a permanent 301 redirect, either via a security plugin or by toggling the option on your web hosting dashboard.
- Browser security warnings: The big red triangle with an exclamation mark, accompanied by an intimidating “Your connection is not private” message, generally means the SSL certificate was issued only for the main domain, not its subdomains. Simply re-run the generation process through your host so that everything is included in the certificate coverage.
- Certificate not showing after activation: The problem is likely caching-related, where your web server, your CDN, or your own browser is serving up a pre-SSL snapshot of your website. Take your cache-clearing broom and go through plugins and the CDN. After the sweep, do a quick test in a new Incognito or private window.
Along with mixed content issues (which I covered separately), these four are the common installation headaches you’ll likely encounter. The good news is once you tackle these issues, you shouldn’t have to worry for a while. With the correct settings and plugins, an SSL certificate is automatically applied.
Your Hostinger Website Is Now Protected with SSL
A Let’s Encrypt SSL certificate (and a free one at that) secures your traffic by creating an encrypted tunnel that shields sensitive visitor data from prying eyes. At the same time, it replaces scary browser warnings with the trusted HTTPS padlock icon, instantly proving to your visitors that your site is the real deal and safe to browse. Bounce rate is a real concern for lost users.
However, that won’t mean squat if you don’t verify the certificate status from time to time. Errors can pop up, especially with yearly renewals. Come to think of it, you should explore Hostinger’s security features, as the hosting provider routinely buffs up its defenses with more useful stuff. After all, you’re paying for it, so you might as well get the most bang for your buck.