

Writer: Dave McQuilling


Editor: Britain Simons


Reviewer: Cristian Lopez

Sometimes you just need to switch providers. You do it with your cellphone plans and your internet (ISP). Why not switch your hosting provider? Maybe your website is getting more traffic and has outgrown your current provider? Maybe another provider is offering a far better deal, features, unlimited bandwidth, ease of scaling, or perks.
We love HostGator for its free SSL, malware detection, Cloudflare CDN, 24/7 chat, scalability, and one-click WordPress for just $3.75/mo, on the “Hatchling Plan”. In our full review, HostingAdvice’s expert contributor Christian de Looper praised HostGator’s speed, transparent plan selection, and competitive pricing.
Switching hosting providers is not as daunting as it may seem. In fact, a lot of “cheap” hosting promo offers exist, with services knowing that many users will feel locked in to subscription price hikes and upsells to avoid the hassle of switching hosts. However, you can easily switch to one with a cheap renewal price, too.
Shifting providers isn’t that difficult and can be done without any downtime. No-downtime site migration is essential for your user experience and bottom line. Downtime for eCommerce sites means lost sales. For agency services, bounce rates cost you potential clients. Luckily, we have a step-by-step “no downtime” migration method.
-
Navigate This Article:
Step 1: Prepare Your Existing WordPress Site for Migration
If you’re moving to a new house, packing everything and giving the place a bit of a clean-up are obvious first steps. Moving your WordPress site to a new host is no different. We want everything as clean and organized as possible to reduce the risk of errors occurring later on.
So, let’s start with a bit of housekeeping. Remove any WordPress themes or plugins that are redundant, unnecessary, or outdated. Ones you intend to use further down the line can be reinstalled once the site is migrated. If need be, make a list or take screenshots of your current plugin setup.
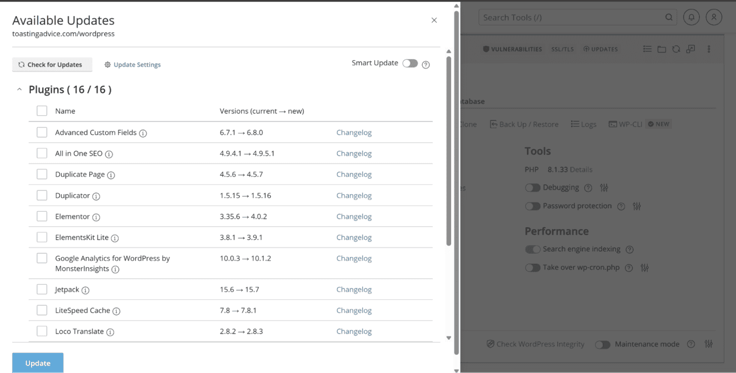
What’s left should then be updated. This is easy to do with cPanel, clicking the updates button in the bottom corner of the panel’s “WP Toolkit” shows all available updates and allows you to install them all in one go.
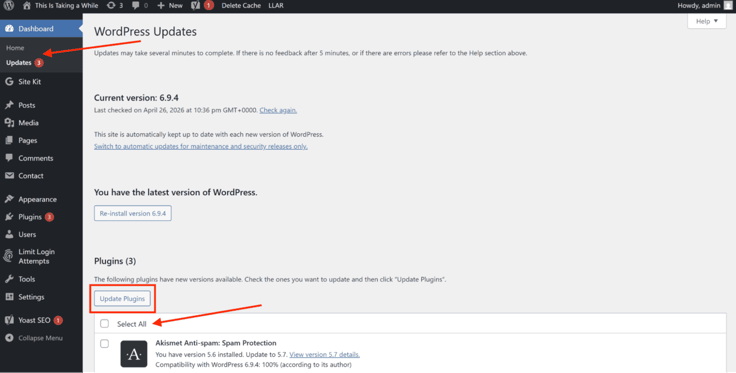
Finally, you should clear your cache and optimize your site’s database. This involves going into whatever caching plugin you’re using and hitting the “purge all cache” button. Once that’s done, deactivate the caching plugin so it doesn’t start caching stuff again until the migration is complete. Do remember to reactivate it once we’re all done, though.
You should also run a plugin like WP-Optimize or Advanced Database Cleaner to tidy everything up on the database end. With everything functioning correctly, you should take a moment to back up your site database and files at this stage. We’ll cover this more in “Step 3,” so don’t worry.
When all of this is done, you should have a safe backup and slimmed-down, fully optimized site ready to transfer. However, you should give it a quick test to make sure nothing broke during the above step. Problems are easier to fix when you know which step caused them. Navigate through pages, clear your cache, and check submission forms.
Step 2: Set Up Your HostGator Hosting Account and Environment
You can’t move your site unless there’s somewhere to move it to. This may seem a little obvious, but you need to simply pick a HostGator plan and sign up. The plan you pick depends on your needs. You should have an idea based on your SSD storage usage and monthly visitors.
So make sure to look at what you’re getting for the money and choose the best one for your exact circumstances.
HostGator.com

Monthly Starting Price $3.75
- Free domain name, SSL certificate, and CDN included
- Unmetered bandwidth — no limits on traffic or storage
- 1-click WordPress install and easy cPanel control panel
- 30-day money-back guarantee, no long-term contracts
- Get 66% OFF by buying 36 months upfront
- Get started on HostGator now.


Lynn Cadet

| Money Back Guarantee | Disk Space | Domain Name | Setup Time |
|---|---|---|---|
| 30 days | 10 GB SSD – 100 GB SSD | FREE (1 year) | 4 minutes |
From there, things are pretty simple. HostGator’s backend is integrated with WordPress to an extent, and you should start on the “websites” tab in the left-side menu. Ignore the “add site” button there and click “Hosting” on the sidebar instead. Then click the “Manage” button next to your hosting package, and use the “Add Site” option that comes up on the next screen.
An option to “Transfer an existing WordPress” is available, and may streamline things. But it could also result in downtime, and wasn’t working when I was researching/testing this walkthrough anyway. Instead, we’re going to choose the “install WordPress” option as this will add all of the basic files we need.
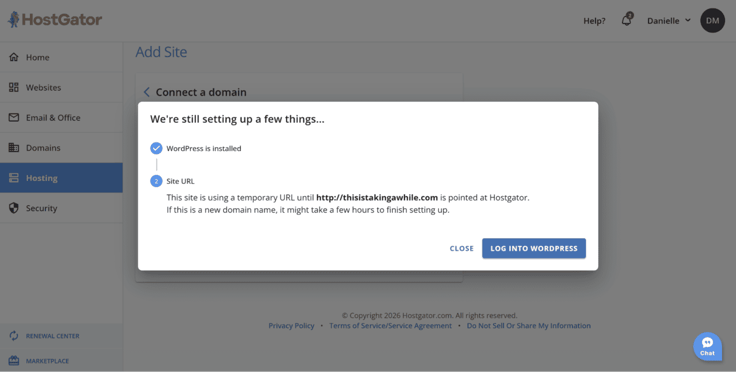
Once that’s installed, the site should show up in the “websites” section, and the “settings” button next to it should give us access to things like file manager and other tools we’ll need for the transfer.
We can and should “add” the domain during the setup process. But we aren’t going to point the domain to HostGator yet. Doing so will result in downtime as we haven’t finished transferring the site over yet.
Step 3: Create a Full Backup of Your WordPress Site
I feel like I say this in every article, and I should, as backups are a lifesaver. Hopefully you’ll never have to use one, but if you ever do need it, a backup is an absolute lifesaver. If your site migration fails midway, or something was copied incorrectly, or anything else happens, a backup allows you to roll the site back to right before you started whatever task you are doing.
This can mean starting again, but losing an hour or two’s work (and going through a bit of a learning experience in the process) is far better than losing your entire website. Back your site up before you attempt to migrate it, back your site up regularly anyway, back those backups up, and store them externally.
No one has ever said, “I wish I didn’t have that extra backup of my website/work/literally anything else you’ve put effort into.” As for how to back things up, there are a few approaches you can take. You can even take multiple approaches if you want to be extra cautious.
Your most basic option is a manual backup. This involves going into your file manager and copying key files and/or folders. If you want to be comprehensive, you can copy everything, but a lot of the stuff in there is just standard WordPress files or whatever else your site is built on.
For a complete manual backup, download all files in the site’s document root, typically public_html, including wp-content, wp-config.php, .htaccess, and index.php. You must also export the WordPress database separately as an .sql file. The file manager in cPanel has a search function that can help you locate key files (some database layouts can be slightly different).
If you want to do things automatically, cPanel also has a backup wizard that can be found by clicking “Backup Manager” (in the same section as File Manager) and then Backup Wizard. This is cPanel’s built-in backup tool.
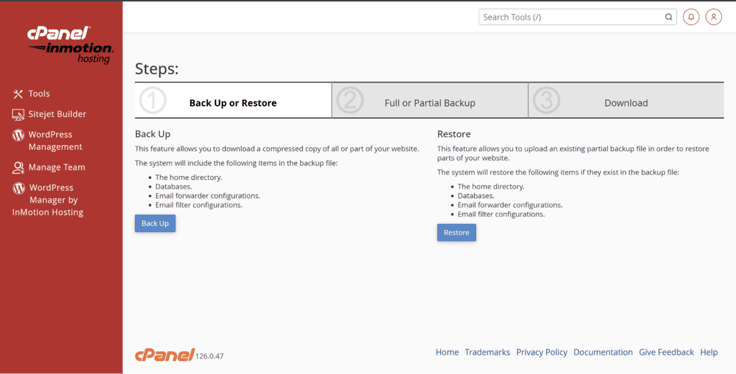
If Backuply is installed on your WordPress site, you can use it to create a downloadable backup of your database and directories.
However, if you want to use a different plugin to back up your site, many others exist, including UpdraftPlus and Duplicator. The latter plugins are installed directly to WordPress, so they are a great option for those not using cPanel. All of these are pretty easy to use and will guide you through the steps while doing most of the work themselves.
Step 4: Upload Your Website Files to HostGator
Open File Manager, navigate to the public_html folder, and upload your website files. If you created a manual .zip or .tar.gz archive, select it in File Manager and use the “Extract” option. Make sure the WordPress files are placed directly in public_html rather than inside an extra nested folder.
If you created the backup with a WordPress migration or backup plugin, follow that plugin’s restoration process instead of extracting its backup file manually.
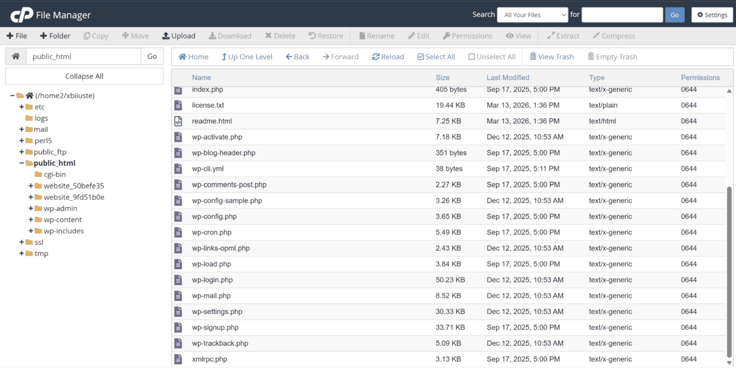
Open the file manager through your previous hosting service’s cPanel, and then do a quick side-by-side comparison, making sure no files are missing. If the two match, we should be good to proceed. It’s worth taking the time to double-check things during this step, as an incorrect folder placement here can cause issues down the line.
If you end up nesting the “public_html” folder in another folder, for example, your site isn’t going to load. Similarly, any files in the wrong spots are likely to cause errors. It’s best to spot and fix these now, instead of embarking on a more complex bug hunt later on.
Step 5: Import Your WordPress Database on HostGator
So now it’s time to set up the database. This is our most complex step yet, but it really isn’t that bad when you break it down. The first thing we need to do is create a new SQL database, which we can do by clicking the “Advanced” tab of the HostGator dashboard and then selecting “Databases.”
Once we’re in Databases:
- Click “add”
- Name the database
- Add a user (remember to write down the username, password, and database name. You’ll need all of those later on).
Hot tip: It’s best to keep things simple here, use an acronym for your site, maybe “Admin” for your initial user; this is not the place to get creative.
Once that’s done, you should open phpMyAdmin, which is in the “quick links” section right above where we opened File Manager earlier. Select your new database in the column on the left, and click import. This is where we’re going to select the SQL file we snagged from our old hosting service earlier, and where I hit a common snag.
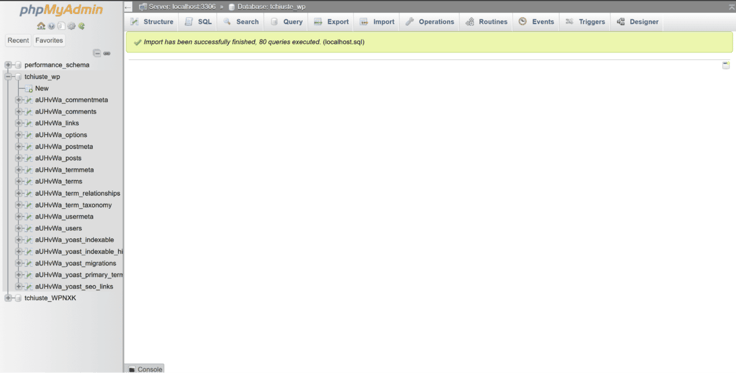
HostGator may automatically add your cPanel account username as a prefix to the database name. The exact prefix varies by account, so copy the complete database name displayed in cPanel.
It is an issue with an easy fix, though:
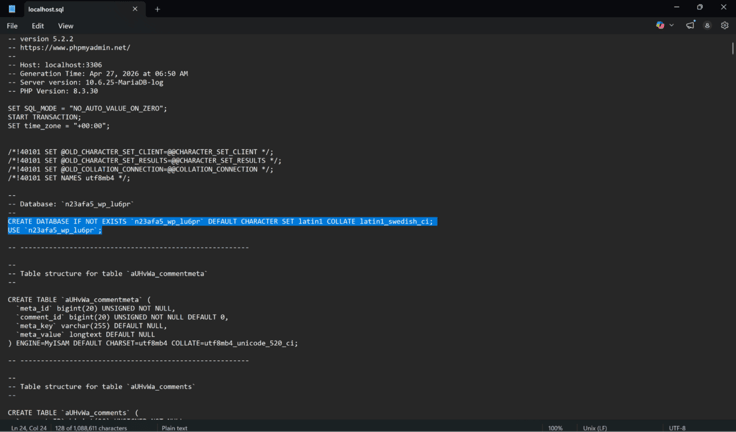
- Open the SQL file in a plain-text or code editor.
- Scroll down a few lines to the part that says “CREATE DATABASE IF NOT EXISTS.”
- Delete that line, and the one that says “USE:” right below it (I’ve highlighted them in the screenshot above, and things should look similar on your end).
Once those are gone, you should be able to import your database just fine.
You’re likely to hit another snag right after this. The database must match the settings in your wp-config file. If there’s a mismatch, you’re likely to see an “Error establishing database connection.” This is what we’re going to fix in Step 6.
Step 6: Update wp-config.php with New Database Details
For this step, we’re heading back to File Manager to update wp-config.php with the database name, username, password, and host information from your new HostGator account. These settings connect WordPress to the newly imported database.
I know I mention backing things up a lot, but this is another step where you should download a copy of the file before editing it. Mistakes here can be complicated to fix, so being able to just roll things back and try again is pretty important.
Once you’re in, update these four values using the database details from your new HostGator account:
- DB_NAME
- DB_USER
- DB_PASSWORD
- DB_HOST
DB_NAME should contain the complete database name shown in cPanel. DB_USER and DB_PASSWORD should match the credentials you created and assigned to that database. Use the DB_HOST value supplied by HostGator, which is commonly localhost.
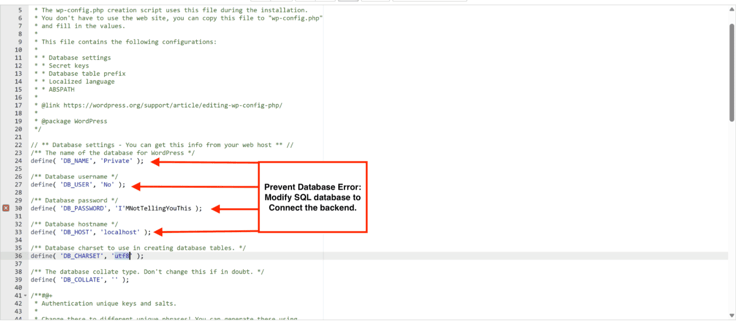
Save your changes before moving on, as forgetting to do this has the same results as skipping the step. Let’s be honest, this isn’t the most exciting step either, so make sure you do it properly, and we can move on to the fun testing parts.
Step 7: Preview Your Site on HostGator Without Going Live
Most of the work is done, so now it’s time to give the site a look over and make sure nothing broke along the way. If you want to preview your site without it actually going live, you have a couple of options.
The first involves getting a temporary URL from HostGator. You can just visit that URL and use the site as normal, before switching it out for the real one when you want to go live.
The alternative involves modifying your “hosts” file, which will trick your PC into loading the new site instead of the old one. To do this, you need to snag your new server’s IP address from cPanel, then find your hosts file in C:\Windows\System32\drivers\etc\hosts.
Open the file in Notepad or a similar editor, then add a new line at the very bottom of the file that consists of your HostGator IP, a space, and your domain name. Don’t forget! This line needs to be deleted once you finish testing.
This check should be very thorough. While the actual site transition may take time, this is the version of the site that your visitors are going to see. Which means you need to check each page, menu, form, and function. If your site has a checkout, make sure there are no errors there. Try out your forms to make sure they still work.
Images and videos might also be broken as they could be trying to pull from the old server, as opposed to the new one.
Step 8: Fix URLs and Resolve Any Migration Issues
Hopefully, no problems occurred, and you can skip this step entirely. If you did spot a problem or two, it’s time to fix them before we can finally go live with the site. We’ll also cover more troubleshooting steps later on.
SSL Security
SSL issues and mixed content (HTTP in some areas, HTTPS in others) are pretty common when migrating a site. Browsers will flag your page as “not secure” in some cases, and it can break the site’s formatting in others. HostGator’s “AutoSSL” is pretty good at preventing this, but if it doesn’t fully propagate, or if hardcoded HTTP links are present in your site’s code, you will probably get this issue.
The fix is fairly simple. A number of apps can fix your site’s SSL, and I’d recommend the Really Simple Security (aka Really Simple SSL) plugin for this exact purpose. Run that, it will make all assets route correctly, and we’re ready to move on.
Missing Images and the 404 Error
If images or other assets are missing, or clicking things is giving you a .404 error, try this simple fix first:
- Go to “settings”
- Then click “permalinks”
- Click “save changes.”
This refreshes WordPress’s rewrite rules and may regenerate the .htaccess file, which can resolve some 404 errors. It will not fix missing files or incorrect URLs.
A changed folder structure can cause things like broken images. You should clear out any caching programs you’re using to force WordPress to recalculate the server paths. If only one or two images are broken, it may just be quicker to re-upload them than mess around trying to find the exact cause.
Step 9: Update DNS to Point Your Domain to HostGator
Okay, now that everything is in place on the new hosting service, it’s time to point your domain towards the new site. This is something you may have done with the old site, and it isn’t the most complicated thing in the world. But it’s also something you need to get right.
An error will break the connection between the domain and either of your sites, resulting in downtime while you fix things, so follow these steps:
- Log in to your domain registrar: You may have gotten a domain included with your hosting service, or you may have purchased one elsewhere. Either way, you need to find out where it is and log in. If it did come through your old hosting service, and you’re struggling to find the correct place to log in, customer service should be able to point you in the right direction.
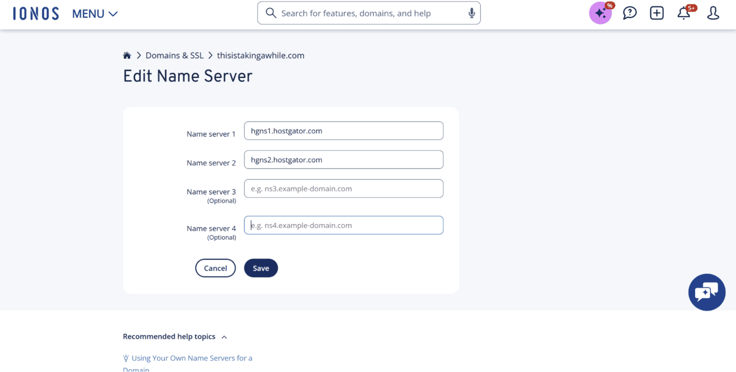
- Replace Nameservers: Once you’re logged in, you’re going to need to replace your old host’s name servers with HostGator’s. As for how you find them, I spotted mine in the “Quick Connect” section of the site settings page, though they should also be present in cPanel, and in any welcome emails you received. For the record, mine were hgns1.hostgator.com and hgns2.hostgator.com, but double-check yours just in case.
- Save and wait: Once the nameservers are replaced, save any changes. DNS Changes will propagate, so they aren’t immediate, and generally take up to 24 hours (or 48 if IONOS is to be believed).
But that time frame shouldn’t be an issue because of how we’ve set things up. This is where the “no downtime” side of things comes in. DNS propagation can take time. Sometimes you get lucky, and a site is up in a few minutes; sometimes everything takes a day to work itself out.
However, if you go about things the way we’ve done them here, you shouldn’t experience any downtime. This is because the old site is still active while the new one is propagating, so if a visitor isn’t pulling from the new host, they’ll still have the old site to load from.
Step 10: Monitor Your Site During DNS Propagation
Step 9 is very brief, so it may be hard to believe any shift has taken place. Plus, if you did the previous steps correctly, then the old and new sites should be pretty much identical. But you can and should still check that the move has worked.
A DNS checker tool like the one found at dnschecker.org is capable of telling you where it’s pulling your site from. I checked right after completing step 9, and it confirmed the move was pretty much instant. Which was a bit of a pain because now I don’t have a comparison image to show you. But on the bright side, it shows that a shift can be extremely quick.
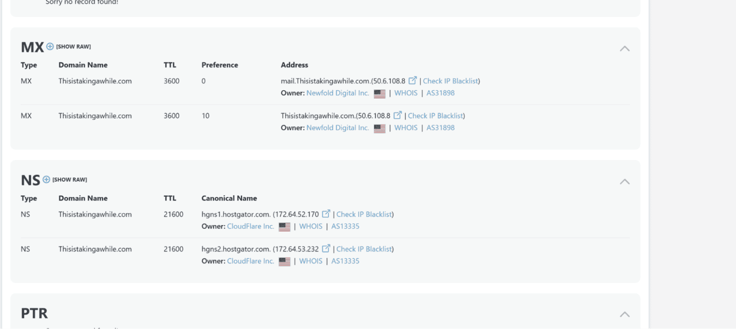
You should also try to visit the site from multiple devices and different networks. You don’t really need to go visit a coffee shop or McDonald’s for this. Just take your phone off WiFi, and its data connection counts as a different network. Maybe hit the site on a laptop and tablet too, and use multiple browsers if you’re feeling thorough: Chrome, Safari, and Microsoft Edge.
The reason for this is twofold. It allows you to check you didn’t accidentally break the mobile site, somehow. And it makes sure your browser cache isn’t covering up any other errors. Keep an eye on both uptime and performance for the next day or two. Again, any issues caused by a site migration should surface soon after DNS propagation completes.
While the whole DNS propagation process was basically instant for me, a 24-48 hour wait is to be expected. So if you spot the old version of the site is still being used, don’t immediately panic and think you’ve done something wrong. It can take a day or even two, so give it 48 hours before you start troubleshooting potential issues.
Step 11: Confirm Everything Is Fully Live on HostGator
If something has gone wrong during the migration process, it’s best to find the error now rather than later. The longer you put this off, the harder it is to tell if something unrelated, like a future plugin or a hiccup in the migration process, caused a future error.
Ensure no vital site functions were damaged in the move. Go through your site with a fine-tooth comb. Make sure every button, link, form, and function works. Pay extra attention to vital functions.
If you run a store, make sure your checkout is still working properly.
Have a business email? Add or update any required TXT, CNAME, or A records as instructed by your new email host. Make sure it’s still easy for people to log in, as this could also be affected by a hosting shift. It’s good to check that the media is still loading properly, too.
HostGator will have a different IP address than your previous host. Make sure the site loads consistently from the new server. You can do this with an IP check. You can find your HostGator IP by logging into cPanel and looking for the “shared IP address” on the right-hand sidebar. Then pop your domain name into DNSchecker.org to see if the IP matches.
Troubleshoot: Common WordPress Migration Issues
If you followed all of the steps carefully, things should go pretty smoothly. However, there are still a few things that can go wrong. Here are some of the most common errors, along with how to fix them.
Old Site is Loading
Your site may still seem to show the old version, or be pulling from the old host. This is because DNS propagation can take a little while. This issue should resolve itself within 24 hours, so keep an eye on things for a day before digging deeper. We covered this back in Step 10.
White Screen
A white screen error is usually caused by a plugin or PHP incompatibility. If you forgot to update or remove something in step one, this could be the outcome. You should disable all your plugins and reactivate them one at a time to see which one causes the issue. Then you can either update or remove the offending plugin.
Database Connection Error
A database connection error usually indicates an error in the wp-config file. Go back to step 6, where we updated the wp-config file to match the .sql file. Double-check all of the details were entered correctly, as even a small typo here could cause the site to break.
Broken Images
If images are missing or broken, then there may be an issue with the site’s file paths, the backup you used may have had issues, or the upload could be incomplete. It could also be a problem with the site paths. Go through and check all of the images individually, and re-upload them where necessary. Repeating step 8 can also help find and resolve these issues.
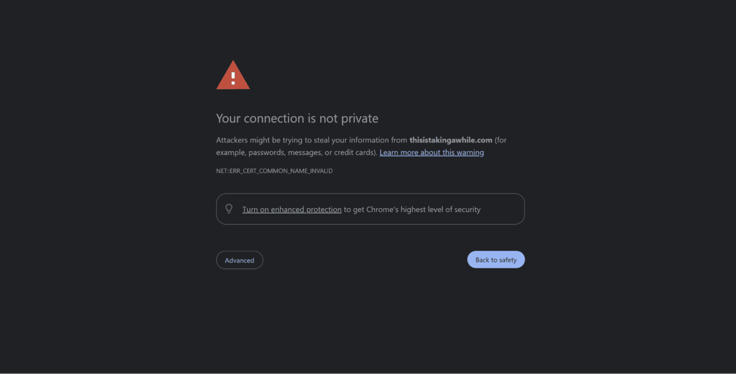
SSL Certificate
Frequent SSL warnings indicate an issue with the security certificate, and are usually because it hasn’t been installed yet. Installing an SSL certificate should solve your problems here.
Other Common Mistakes To Avoid
Hopefully, this guide is making things look easy, but migrating a WordPress site with no downtime is a multi-step process, and with multiple steps, mistakes are always possible. Here are a few common slip-ups you should look out for.
Nameservers
Changing nameservers too early is an easy mistake to make. Unfortunately, the consequences of this are site downtime, which defeats the purpose of this guide a bit. So be sure to follow the instructions in Step 9 closely.
Site Backup
Skipping a full backup has no direct consequences. A lack of a backup file sitting somewhere will not interrupt the process. Conversely, it also has the biggest consequences if something else goes wrong and the migration fails. You could lose the entire site. If there’s one step to follow closely, it’s number three. Do not forget to back up your site before attempting to migrate it.
403 and 404 Errors
As we’ve discussed, it’s possible to get a 403 forbidden or 404 error during testing. This usually means files are in the wrong place, so pay close attention during Step 4. Make sure everything is where it needs to be.
Not Testing
Not testing before going live is another common error, especially if you’re rushing to get things done. Testing exposes previous errors and other issues. That 404 or 403 error we just mentioned? You’re better off seeing that privately so you can fix things, instead of having visitors wonder why your site is broken. So please don’t skip step 7.
Wp-config
Step 6 is pretty easy to overlook, but if you don’t update your wp-config details, then your site will attempt to connect to your old host’s database instead of yours. This results in the connection being blocked and a resulting database error.
Move Your WordPress Site With Confidence and Zero Downtime
So there we have it, if you prepare accordingly, follow the steps, test things as you go along, and take your time migrating a WordPress site to HostGator isn’t particularly difficult. Remember how daunting it all looked when we first started?
The good news is we have a bunch of WordPress and hosting guides at HostingAdvice, so feel free to pop back any time your site needs a bit of work, or if you’re looking for a new provider to shift to. You can use our smart tool HostHelper™ to instantly access accurate, expert-backed answers drawn from thousands of in-depth guides and reviews.
Be sure to give our social media a follow, too! It’s full of useful tips and short videos for entrepreneurs, web devs, and all your tech tips.
HostingAdvice.com is a free online resource that offers valuable content and comparison services to users. To keep this resource 100% free, we receive compensation from many of the offers listed on the site. Along with key review factors, this compensation may impact how and where products appear across the site (including, for example, the order in which they appear). HostingAdvice.com does not include the entire universe of available offers. Editorial opinions expressed on the site are strictly our own and are not provided, endorsed, or approved by advertisers.
Our site is committed to publishing independent, accurate content guided by strict editorial guidelines. Before articles and reviews are published on our site, they undergo a thorough review process performed by a team of independent editors and subject-matter experts to ensure the content’s accuracy, timeliness, and impartiality. Our editorial team is separate and independent of our site’s advertisers, and the opinions they express on our site are their own. To read more about our team members and their editorial backgrounds, please visit our site’s About page.