

Writer: Jack Wallen


Editor: Britain Simons


Reviewer: Cristian Lopez

Unless you’ve been living off the grid or were buried under a mountain of memes and doomscrolling, you know what WordPress is.
If you happen to have missed out on technology trends for a while, know that WordPress is the most widely used platform on the web. According to Kinsta, WordPress powers 43% of the world’s websites and 67% of the world’s CMS tools.
There are two main reasons why WordPress is so popular: It’s incredibly easy to use, and… It can be used for nearly anything, thanks to an extensive array of plugins.
With very little technical ability, you could set up a site for your business that even includes e-commerce. When you combine WordPress with a high-performing host, you get a powerhouse platform that can serve your needs and/or the needs of your clients and customers.
Liquid Web is well-known as a high-performance self-managed or fully managed hosting service. Its benefits include 100% uptime, very fast LCP (Largest Contentful Paint) at 1.541 seconds on an unoptimized WordPress installation, fast response time (approximately 83.77 ms), a WordPress performance score of 8.4 (via WordPress hosting benchmarks), outstanding load handling, and a guaranteed 59-second response time for live chat and phone support, and 59-minute response time for helpdesk tickets.
In other words, the WordPress Liquid Web combination is capable of delivering best-in-class reliability, speed, and support. But, how difficult is it to install WordPress on a Liquid Web account? Are you going to have to open your go-to AI and spend some time vibe coding, or is it more of a point-and-click affair? Fortunately, we’ve laid out the best way!
-
Navigate This Article:
Step 1: Log into the Liquid Web Dashboard and Configure Your Server
We’re going to cover two options. To Liquid Web’s credit, they do make their service highly customizable to your needs — at an additional cost (option one). But, with a little command line know-how, there is a better way for an already provisioned server (option two) to install WordPress.
Important note: Liquid Web and NEXCESS are basically the same thing. Both underlying product portals are fully integrated, from the same company. Liquid Web acquired NEXCESS in 2019, and the services were integrated in 2025. We may use them interchangeably.
Liquid Web VPS Hosting
Option One: cPanel Point-and-Click
At an additional monthly cost, Liquid Web offers the option to install WordPress via cPanel after purchasing a Cloud VPS server. From https://portal.liquidweb.com you can select Home > under “Create something new” > select Create a Cloud VPS.
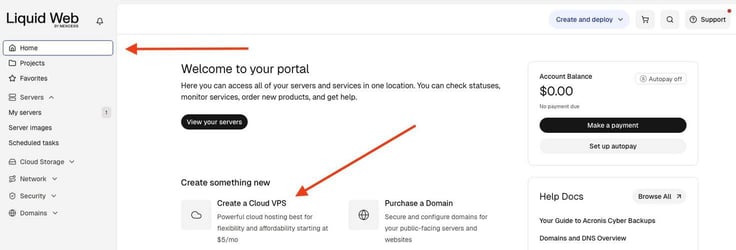
Here you can customize it to your needs. A self-managed VPS is free, but you will be responsible for “server maintenance, monitoring, updates, and making any necessary adjustments.” As of writing this, a Core managed option “handles OS patches, security updates, web server management, and monitoring”, but adds an additional cost. Stick with free for now.
For software, here are your options: AlmaLinux, Debian, Rocky Linux, Ubuntu, and Windows Server. Our Cloud VPS is configured to AlmaLinux.
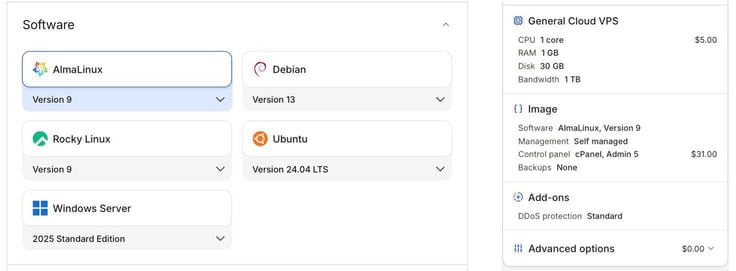
For an additional monthly cost, you can select the cPanel option under Control Panel, and a Hardware option. If you choose to go this route, the cost can definitely stack up, but a basic setup can be competitive with other market offerings. cPanel will enable a more point-and-click install of WordPress.
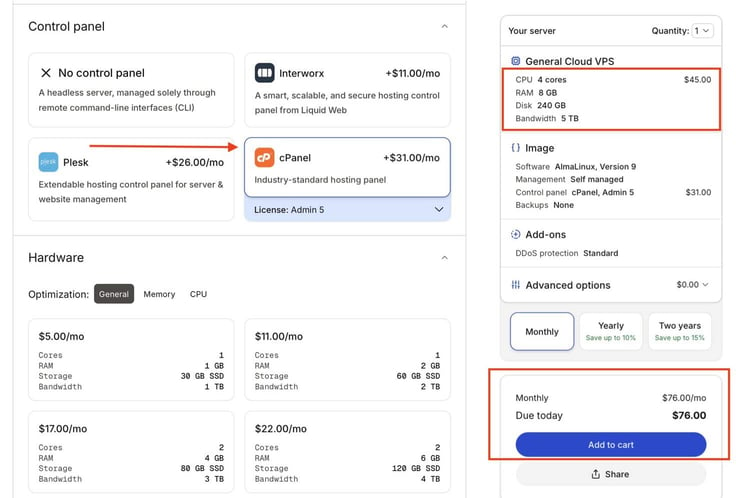
From the cPanel homepage, you will be guided through the WordPress install. Click the WordPress icon and follow the steps under the integrated Softaculous Apps Installer. From there, skip to “Step 9” to configure WordPress.
If you’re a bit more tech-savvy, we can bypass the more expensive monthly cPanel cost. That leads us to option two!
Option Two: Manual CLI
I’m going to walk you through the process of installing WordPress on LiquidWeb with a more affordable configuration, installing WordPress from the command line (CLI). It’s not as intimidating as it might sound, but some familiarity with command line will be helpful.
I’ll include our configuration details below. If you’re finishing up the initial setup, we chose InterWorx for a simple control panel.
After securing your Liquid Web VPS account, you’ll then want to log in to your dashboard (which is done via the URL https://portal.nexcess.com) so you can access the server for which you’ve been assigned. Once you’ve done that, click on My Servers in the left sidebar.
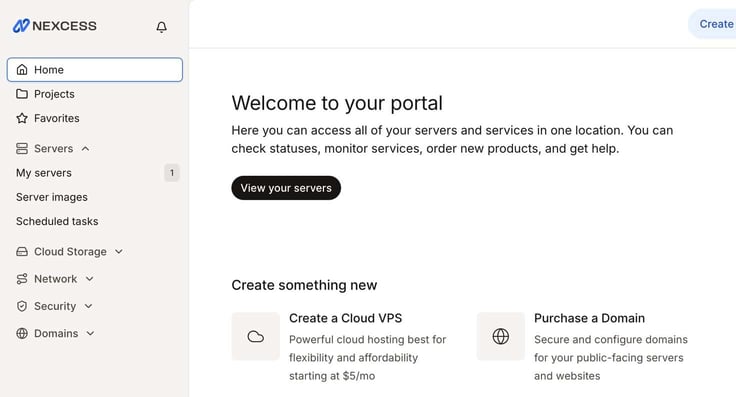
You can also simply click “View your servers” in the center of the page. On the resulting page, you’ll see a list of the servers associated with your account.
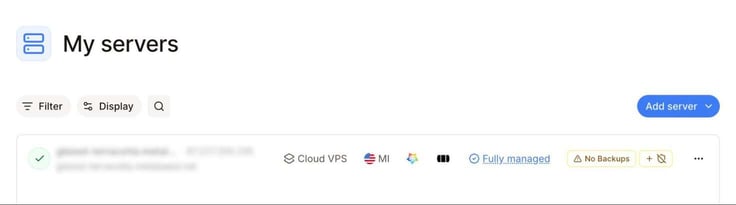
Click on the server listing, and you’ll be presented with all of the details you need to access your server.
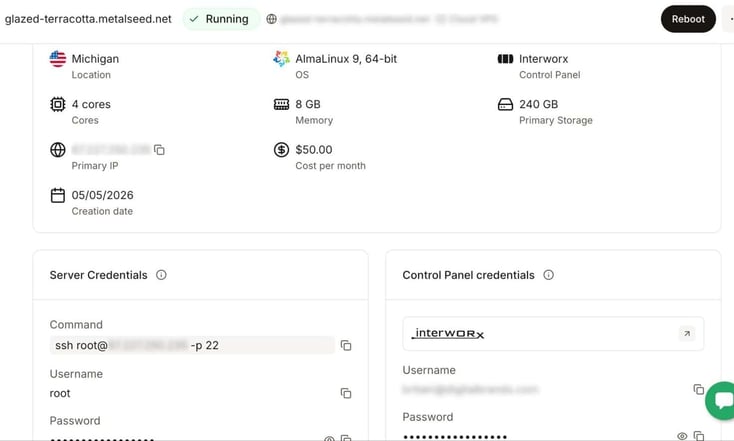
As you can see, we chose:
- Self-managed VPS
- AlmaLinux software
- Interworx Control Panel
- 4 cores, 8 GB Memory, and 240 GB Primary Storage (stick with single core for now)
Keep in mind that we chose an upgraded Hardware option, which significantly raises the cost. The base single-core option is more than enough for most basic websites, and a fraction of the cost. You can always scale your site as hardware demands increase.
There’s one important thing you must understand. Depending on the type of server installed (such as Ubuntu or AlmaLinux), the process will differ. I’m going to demonstrate the installation on an AlmaLinux instance, so if you have an Ubuntu server, you’ll need to alter the installation process accordingly.
Step 2: Log in to Your Server via SSH
This will be the first command you’ll run for the process.
Under Command, you’ll see something like:
ssh root@IP_ADDRESS
Where IP_ADDRESS is the IP address assigned to your server, which will look like 12.234.5.67.
To use that command, you must have a desktop computer that has Secure Shell installed. If you’re using Linux or macOS, it will already be there, out of the box.
If you’re using Windows, follow these simple steps:
- Open the Start menu and search for “Manage optional features.”
- If you don’t see OpenSSH Client listed, click “Add a feature.”
- In the resulting window, type “OpenSSH Client.”
- Click the checkbox for OpenSSH Client, then click Install.
SSH is now ready to use on Windows.
You’ll also need to take note of the password for the root account. I would highly recommend that you enter that password into your Password Manager. Do not write it down on a piece of paper or save it in a standard file on your computer. You do not want anyone else gaining access to your server.
Run the SSH command as shown above and, when prompted to accept the fingerprint, type “y.” Finally, type the user password. Upon successful authentication, you’ll find yourself at the command line prompt for your server, which will look something like:
[root@glazed-terracotta ~]#
You are now ready to start installing WordPress from the command line.
Step 3: Download the Necessary WordPress Files
Before we begin, take note that if you receive a permission denied error when running any of the commands below, you’ll need to run them using sudo, which gives you admin access.
So the command to install the database server would be:
sudo dnf install mariadb -y.
The first thing to do is download the WordPress installer files. This will be a zipped file that you will then extract into a particular directory in a bit.
To download the necessary files, issue the command:
wget https://wordpress.org/latest.zip
The above command will save the file latest.zip in your current working directory.
Move that file into what is called the document root of the web server.
The document root simply means the root directory used by the web server, which in many cases will be /var/www/html.
To move the file, issue the command:
mv latest.zip /var/www/html/
Change into that directory with:
cd /var/www/html
Next, extract the zip file with the command:
unzip latest.zip
The above command creates a new directory, called wordpress, that includes all of the files needed for the installation and running of WordPress.
What you need to do now is move all of the files within that directory to the document root with the command:
sudo mv wordpress/* ./
Change the group ownership of the new directory with:
chown -R apache:apache /var/www/html/
Step 4: Create the Database
Your instance should already have the MariaDB database server installed.
To access the MySQL console, run the command:
(by typing it and hitting Enter on your keyboard)
mysql
The prompt should now look like this:
MariaDB [(none)]>
Yes, the command to access the MariaDB console is MySQL because MariaDB is based on MySQL.
If you get an error that the MySQL command isn’t found, you’ll need to install the database server with the command:
sudo dnf install mariadb-server mariadb -y
Once installed, start and enable the server with:
systemctl enable –now mariadb
We’ll create a database named wordpressdb with the command:
CREATE DATABASE wordpressdb;
Next, you’ll create a database user (we’ll call it wordpress_user).
Give that user a secure, unique password with the command:
CREATE USER ‘wordpress_user’@’localhost‘ IDENTIFIED BY ‘your_secure_password’;
Where your_secure_password is the strong, unique password I mentioned earlier.
Apply the changes and exit the database console with the following two commands:
FLUSH PRIVILEGES;
exit
Congratulations, you’ve just created your first database from the command line.
Step 5: Prepare the Web Server
On the off chance that the Apache web server isn’t installed, you can do so with the command:
dnf install httpd -y
Enable the server with:
systemctl enable –now httpd
You’ll also need to open the firewall to allow incoming traffic access to the site, which is done with the commands:
firewall-cmd –permanent –zone=public –add-service=http
firewall-cmd –permanent –zone=public –add-service=https
systemctl reload firewalld
WordPress requires a few PHP extensions/apps to be installed, which can be accomplished with the following commands:
dnf install epel-release -y
dnf install https://rpms.remirepo.net/enterprise/remi-release-9.rpm
dnf update
dnf module reset php
dnf module enable php:remi-9
dnf install psudo dnf install php php-curl php-bcmath php-gd php-soap php-zip php-mbstring php-mysqlnd php-xml php-intl php-zip -y
The above commands enable a special repository that allows you to install the required version of PHP.
Step 6: Configure SELinux
SELinux stands for Security-Enhanced Linux, and serves as a powerful security layer on AlmaLinux (and other Fedora-based distributions).
You have to make SELinux “aware” of the new installation with the following commands:
chcon -t httpd_sys_rw_content_t /var/www/html/ -R
restorecon -Rv /var/www/html/
Step 7: Configure Apache
Next, you need to create an Apache configuration file, so the web server knows where the WordPress files are located.
Before you do that, install the nano text editor with:
dnf install nano -y
To create the file, issue the command:
nano /etc/httpd/conf.d/wordpress.conf
In that file, paste the following, making sure to substitute your information (such as email address and domain) where necessary:
<em><VirtualHost *:80></em>
ServerAdmin webmaster@your-domain.com
ServerName your-domain.com
ServerAlias www.your-domain.com
DocumentRoot /var/www/html<em><Directory /var/www/html></em>
Options FollowSymlinks
AllowOverride All
Require all granted<em></Directory></em>
ErrorLog /var/log/httpd/your-domain.com_error.log
CustomLog /var/log/httpd/your-domain.com_access.log combined<em></VirtualHost></em>
Save and close the file with the keyboard shortcut:
Ctrl+x
Type “y” when prompted, and hit Enter on your keyboard.
Restart the Apache server with:
systemctl restart httpd
Step 8: Configure WordPress to Connect to the Database
You now have to run a few commands to instruct WordPress to connect to the database. Remember to change the information (such as the database user password) to match the settings you used when creating the database.
Copy the configuration file with:
cp /var/www/html/wp-config-sample.php /var/www/html/wp-config.php
Open the configuration file with:
nano /var/www/html/wp-config.php
Within the configuration file, change the pisces in bold to match the details used when creating the database:
define( ‘DB_NAME’, ‘database_name_here‘ );
define( ‘DB_USER’, ‘username_here‘ );
define( ‘DB_PASSWORD’, ‘password_here’ );
Save and close the file with Ctrl+x.
Step 9: Log In to Your New WordPress Site
You are now ready to log in to your new WordPress site and complete the installation. To do that, point your browser to http://yourdomain.com/wp-admin (where yourdomain.com is your actual domain).
You will be greeted with the WordPress setup wizard. The first page just requires that you select a language. The second and final page requires that you fill in some details.
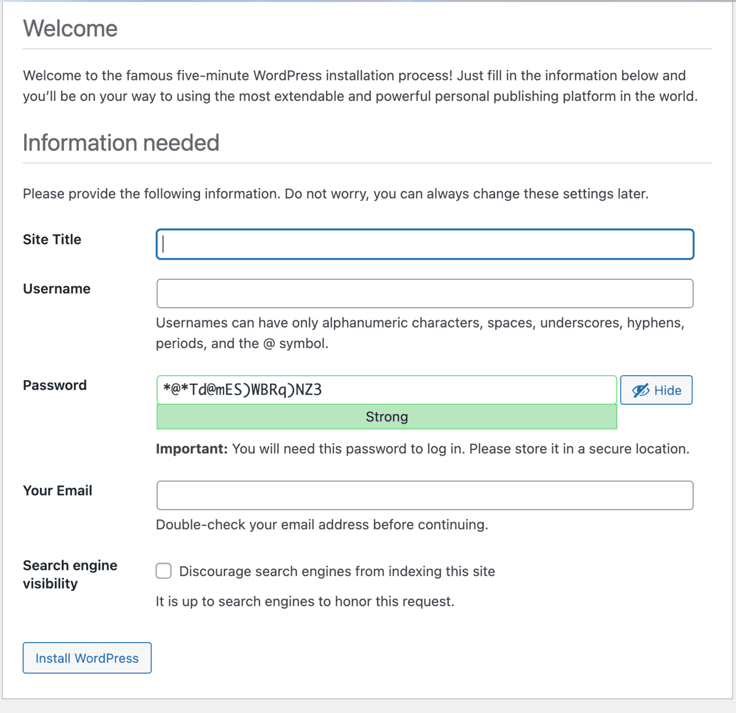
Type in the necessary information, click Install WordPress, and when the installation finishes, you can log in and start building your site.
Keep This In Mind
Many hosting sites offer a simple point-and-click version of this installation, such as Bluehost and Hostinger. A far easier method, with competitive options to the “Option One” for cPanel on Liquid Web/ NEXCESS above.
With my LiquidWeb Cloud VPN hosting account, there was no GUI option. That was not initially planned. You may run into the same issue, or choose to save on the monthly cost. You can, however, purchase a plan and/or add-on that allows you to install WordPress from within Softaculous built into cPanel (which is faster and easier).
But if you go with the Cloud VPN account on Liquid Web, you’ll be required to run the installation manual via CLI. You can re-image an already provisioned server, but that’s basically starting from scratch.
Either way, you’ll wind up with a full-blown WordPress site that is ready to serve your business! Thank you for reading this how-to guide. If you have any further questions, check out our new HostHelperTM tool or leave a comment on social!