



Writer: Jack Wallen


Editor: Britain Simons


Reviewer: Cristian Lopez

For the longest time, I remember every website started with http://. Back then, the internet was the Wild West, where sites were insecure, and no one ever thought that their little digital home would be hacked, especially small businesses, blogs, and niche-specific eCommerce brands.
Beyond payment gateways, security was an afterthought. Hacked? Why would anyone want to hack my site, where I blog about cats? Eventually, everyone migrated from Geocities (remember that in the late 90s, I certainly do) and started hopping onto bigger and more complex sites. Around 2017, Chrome led the way to warn users that HTTP “Connection is Not Secure.”
HTTPS had existed for years, but browser warnings helped make secure connections an expectation rather than an optional upgrade. So, what’s the big deal?
HTTPS encrypts data transmitted between a browser and a website, helping protect it from interception or tampering. It also signals that your site takes visitor security seriously. Below, I’ll show you how to force HTTPS using an .htaccess redirect.
-
Navigate This Article:
Step 1: Confirm Your Website Already Has a Valid SSL Certificate
Before working with the .htaccess file or adding any redirect rules, confirm that your website’s SSL certificate is active and valid.
A one-click HTTPS redirect is the simplest option and requires no coding, so use your hosting provider’s built-in tool when one is available. If you’re using an Apache or LiteSpeed server, the .htaccess method offers more manual control and flexibility.
Without a valid SSL certificate, you could face the following issues:
- The “Your connection is not private” warning: Some browsers will show it, and some will allow you to continue. Note, this will lead to a high bounce rate and deter your customers.
- Exposed private data and payment information: On the rare occasion that I want to snag a too-good-to-be-true deal, and the site still uses HTTP, I immediately leave and try to find the item elsewhere. That’s because all information sent over HTTP is in plain text, with zero protection. A neon sign for hackers.
- Poor SEO and search visibility: An invalid certificate or improperly configured HTTPS redirects can make your site harder for visitors and search engines to access.
Nearly every time I set up a server in my home lab (for testing various server OS’s, services, or apps), I will deploy them without SSL. I can get away with that because the site will often only be up for the duration of the testing (not accessible by the general public). With no SSL certificate, I’ll get a warning that the connection isn’t private.
Method 1: Visual Check
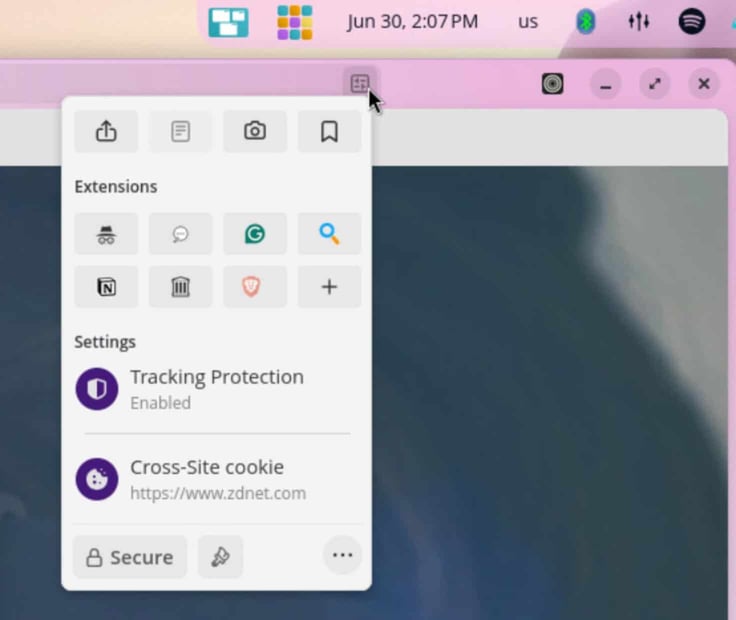
To confirm that your site has a valid SSL certificate, visit its HTTPS address and make sure your browser does not display a security warning. You can also open the browser’s site controls to view connection and certificate details.
Method 2: Use a Free Tool
Another method of testing is by using a free service, such as NSLookup’s SSL-checker. For this, all you have to do is type the URL for the site, and it will let you know if the certificate is valid. If the site certificate is invalid, you’ll get a warning.
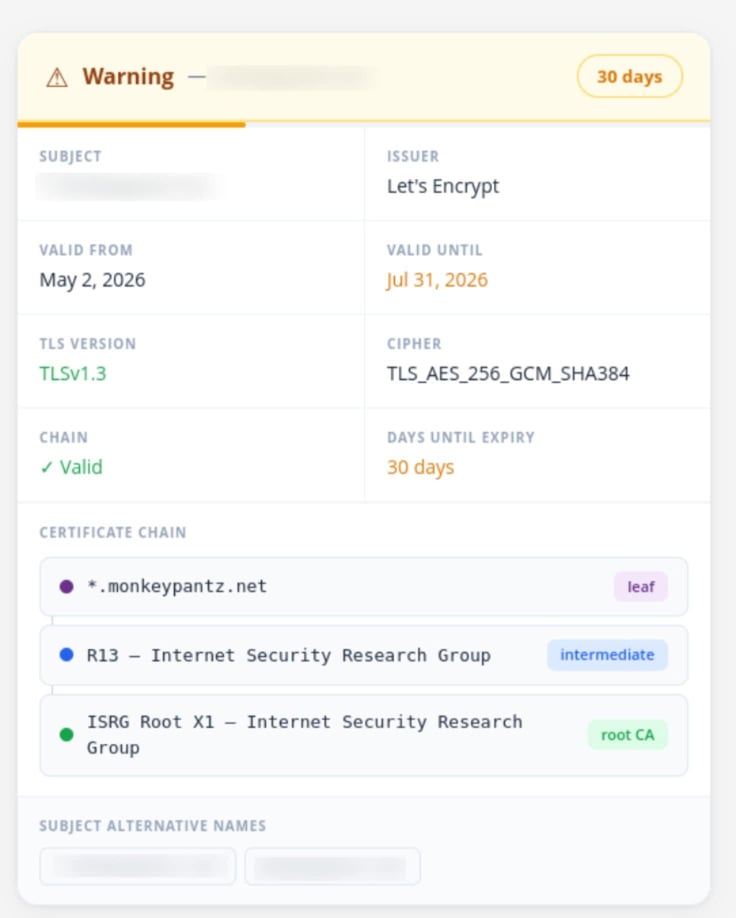
Purchasing an SSL certificate doesn’t necessarily mean it is already installed and active. Confirm that the certificate has been issued and properly installed before forcing HTTPS, or browsers may display security warnings.
Step 2: Access Your Website Files and Locate the .htaccess File
There are a couple of ways you can manage your .htaccess files:
- Via the command line
- Your hosting provider’s GUI.
Personally, I much prefer going the command line route, because it’s easier for me (but then I’ve been using the command line for decades). If you go the command line route, you’ll work with it on your local machine (creating the .htaccess file) and then upload it to your site’s document root (the base directory housing your website, which is using public_html).
A command to upload the file to a remote server using the scp command (from SSH) would look something like this:
scp file user@remote_host:/directory
Where file is the name of the file to be transferred, user is the remote user name, remote_host is the IP address or domain of the remote server, and directory is the directory that will house the file on the remote machine. For many, the command line option might pose a bit too much of a challenge.
To that end, you could use an FTP or SFTP client, which is a GUI tool. Let me show you how this is done with both options.
First, via your hosting provider’s web-based GUI. What you need to do is access the site’s file manager. For example, on Hostinger, I had to navigate to the website I’ll be working with, click to expand the Files section, and then click File Manager.
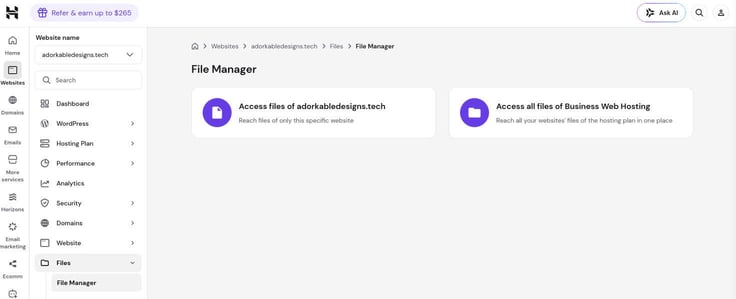
If you don’t find the Files section, make sure you’re trying to locate it via cPanel (or, in the case of Hostinger, hPanel).
Because .htaccess starts with a period, many operating systems and file managers treat it as a hidden file. You may need to enable the option to show hidden files before you can find it. If you double-click the .htaccess file, you can open it to see the contents. In some cases, you can edit the file from within your hosting provider’s file manager; otherwise, you can download the file, edit it, and then upload it (still using the hosting provider’s tool).
FTP or SFTP Client
If you don’t have access to a GUI on your hosting provider, you can most likely work with an .htaccess file via an FTP or SFTP client. FTP is the File Transfer Protocol, and SFTP is the Secure File Transfer Protocol. Most modern FTP clients can use SFTP, so we’ll stick with that.
One of the better FTP clients is FileZilla, which is free to use. You can install FileZilla on Linux, macOS, or Windows. With FileZilla, you’ll enter the address of your host (which will be listed in the confirmation email you were sent by your provider, starting with sftp://), the username, and the password.
Note: You might also have to add a custom port number (if your provider uses a non-standard one).
Once connected, you can then move files to or from your server. If you’ve created an .htaccess file, make sure you’re in the server’s document root and upload it. If you need to download the .htaccess file for modification, pull it from the server to your desktop. Once you’ve done that, you edit the file and then re-upload it to your server.
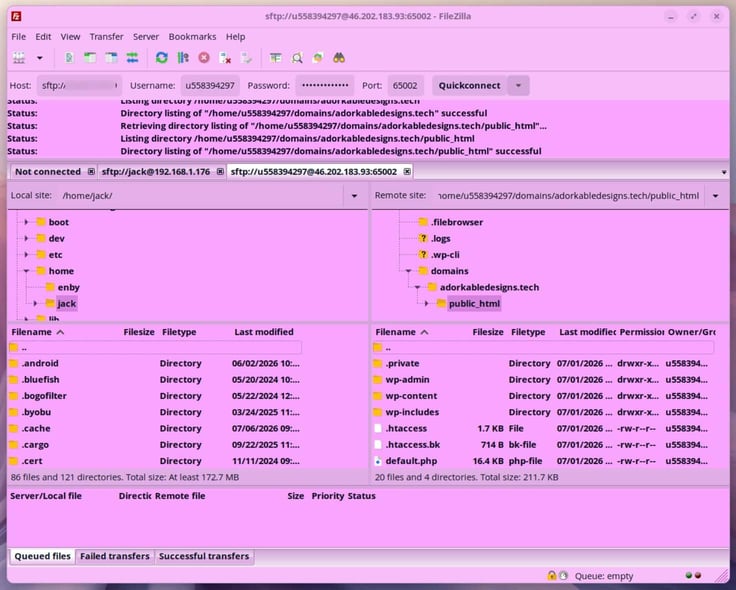
Remember, you should always use SFTP over FTP because it’s more secure.
If you find you cannot access your site using an FTP client, you’ll need to enable the feature in your account. For example, on Hostinger, enabling the feature is found in Websites > Advanced > SSH Access.
Make sure to change the password for your default user and then enable SSH by clicking Enable under SSH Status.
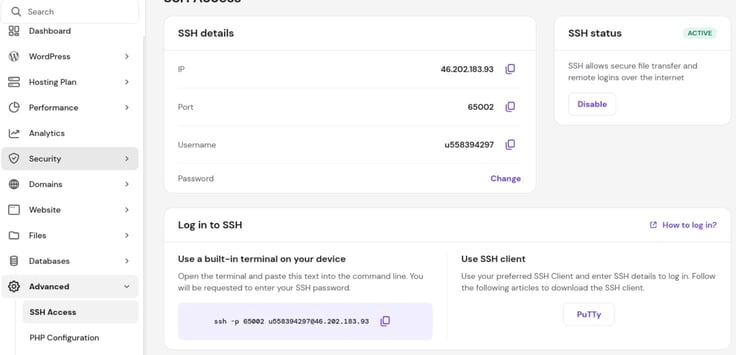
Before you do anything to your .htaccess file, make sure to take this one crucial step.
Step 3: Back Up Your Existing .htaccess File Before Editing
Before you make any changes to the .htaccess file, you’ll want to back up the existing file, so you know you have a copy of one that works.
Years ago, I overlooked this step, edited an .htaccess file without realizing I’d made a mistake, overwrote the existing file, and wound up with a site that didn’t work. It took me a while to troubleshoot that problem; all the while, no one could access my site.
It’s important to understand that even the smallest error in an .htaccess file can cause a website to be inaccessible. Even the difference between ‘ (single quote) and ` (back tick) can wreak havoc. If your site is associated with your business, every second of downtime could mean lost revenue.
To back up your .htaccess file, either use your host’s web-based GUI or your FTP client, navigate to the location of the .htaccess file (remember, that’s called the document root), select the file, and download it.
Once you’ve downloaded the file, make a copy of it and then place it in a safe location, such as a directory called backups or on a USB flash drive.
Step 4: Add the HTTPS Redirect Rules to .htaccess
One of the most popular uses of the .htaccess file is for redirection. What that means is someone points their web browser to, say, http://example.com, and you want to redirect that to https://example.com. That’s an HTTPS redirect. What we’re doing here is directing the browser from the insecure site to the secure site.
To do this, we need to open the .htaccess file that we downloaded for editing. How you do this will depend on your operating system, but most likely, if you double-click the file, it will open in whatever app is set as the default.
Important: You want to make sure that you do not open the file in your office suite, because it must be saved without formatting and without a file extension. In other words, the file needs to be a plain text file, without the .txt filename extension.
Now that you have the .htaccess file open for editing, let’s make sure it’s set up for a redirect.
Here’s what that file will look like:
RewriteEngine On
RewriteCond %{HTTPS} off
RewriteRule ^(.*)$ https://%{HTTP_HOST}%{REQUEST_URI} [L,R=301]
What does it all mean? Let’s break it down:
- RewriteEngine On – this line enables the Apache mod_rewrite module, so redirects are possible.
- RewriteCond %{HTTPS} off – this checks to see if HTTPS is not being used, so that it will only apply to HTTP connection requests.
- RewriteRule ^(.*)$ https://%{HTTP_HOST}%{REQUEST_URI} – this is what performs the actual redirect and does so with the help of the regular expression ^(.*) so that it matches the entire requesting URL path, https://%{HTTP_HOST}%{REQUEST_URI} constructs the new URL that will be used for the redirection, and [L,R=301] sets the flags L (which indicates it’s the last rule to be processed) and R=301 performs a permanent redirect to the new URL.
It is important that you place redirect rules carefully to avoid conflicts with other rewrite directives. I’ve accidentally placed rules improperly and wound up with an infinite redirect loop.
Once you’ve taken care of the above, save the file. Then, send it back (via your FTP client or the hosting provider’s tool) to the same directory on your server that it was found (probably the document root).
Step 5: Test That HTTP Redirects to HTTPS Correctly
Now that the .htaccess file is in place, it’s time to test it out. Since we created an HTTP redirect rule, the test is simple. Open your browser and point it to http://example.com (where example.com is the domain for your site).
If your browser is automatically redirected to https://example.com, then your .htaccess file is working exactly as it should. You should also make sure to test http://www.example.com (again, where example.com is [yourdomain].com) to make sure the redirect rule is picking up www and non-www versions of the URL.
Follow all links on your site to make sure the redirect rule doesn’t break anything.
Step 6: Update Internal Links and Site URLs to HTTPS
Now that the redirect is working, you’ll want to take the extra time to hard-code all links on your site to ensure they point to the HTTPS version and not the HTTP version. You do this to ensure that those pages are always directed to the HTTPS version (to eliminate the risk of those pages accidentally accessing the insecure version).
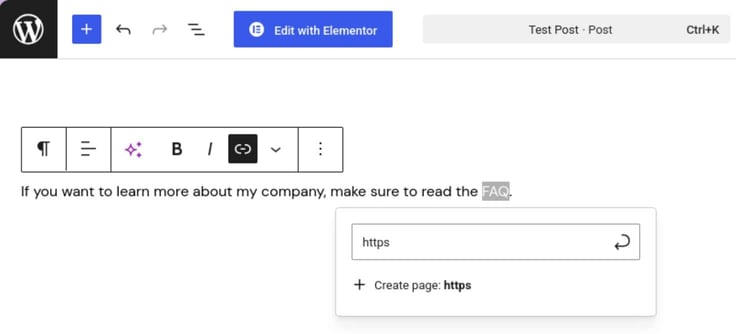
You should also check for images, scripts, stylesheets, fonts, and other resources that still load over HTTP. These can trigger mixed-content warnings or be blocked by the browser.
Step 7: Verify Your HTTPS Configuration
Make sure you go through every link on your site to ensure that they all point to the HTTPS version. Confirm that the address begins with https:// and that the browser does not display a certificate or security warning. You can also open the browser’s site controls to view connection details.
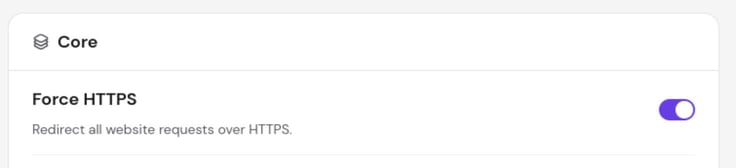
Some hosting providers automatically force HTTPS or offer a built-in redirect tool. For example, Hostinger provides a Force HTTPS setting, shown below. Check whether your provider has already enabled a redirect before adding one manually through .htaccess, as using both methods could create conflicts.
Troubleshoot: Common HTTPS Redirect Problems
You might run into issues when creating HTTPS redirects.
Here are some common issues and how to resolve them:
- Redirect loop: This is when HTTP continues to redirect to HTTPS, but it then loops back to HTTP and never reaches the proper page. This is most often caused by a conflict between .htaccess redirect rules and either CMS or hosting provider settings. If your CMS or host automatically redirects HTTP to HTTPS, you won’t need to set up HTTPS redirect rules with .htaccess.
- HTTP not redirecting to HTTPS: The redirect rule may be misplaced or incorrectly configured, mod_rewrite may not be enabled, or the server may not allow .htaccess overrides.
- SSL warnings: The certificate may be expired, improperly installed, issued for the wrong hostname, or missing part of its certificate chain.
- Website errors after editing the .htaccess file: This may mean you have a syntax mistake or conflicting directives in the file.
Your Website Now Automatically Uses HTTPS
By forcing HTTPS redirects, you ensure that every visitor who comes to your site is using the secure version of each page and avoiding the security issues that go along with HTTP.
I would highly recommend that you do periodic testing to make sure that your redirects are working. You might find yourself in a situation where your service provider or an update to your CMS could conflict with your .htaccess redirect rules, causing problems. By regularly testing your site, you can rest assured that everything is working as expected.
Thank you so much for taking the time to read this piece on the .htaccess file. To learn more about this Apache feature, check out the official documentation and also check with your hosting provider to see what they suggest.
If you need further guidance, you can easily explore our library of guides with our smart tool HostHelper™. You can instantly access accurate, expert-backed answers drawn from thousands of in-depth how-to articles and reviews.