


Writer: Andrew Wandola


Editor: Britain Simons


Reviewer: Cristian Lopez

February 2019. I’m sitting at SeaTac Airport, excited for my flight to Zanzibar. Suddenly, an email notification pops up on my phone’s screen. A client wants a quick website update. “Easy money,” I’m thinking. My tight beer budget for the trip just got CPR!
I log in to WordPress, make the change… and almost immediately, the entire website’s layout breaks. Everything seems out of place. Then it hits me: I didn’t create a backup.
My beer budget for the trip is back on life support. And what’s supposed to be a relaxing vacation is now just another work session thousands of miles away from home.
Backups protect your WordPress site from plugin conflicts, failed updates, accidental changes, and even security incidents. And if you’re using WP Engine, I’ll explain where to find its backup tools, verify automatic backup points, and restore your website.
-
Navigate This Article:
Step 1: Log In to the WP Engine User Portal
First things first, grab your account if you don’t have one yet!
WP Engine WordPress Hosting
Next, log in to your WP Engine user portal using your account credentials. Then go to Sites and select the website whose backups you want to review.
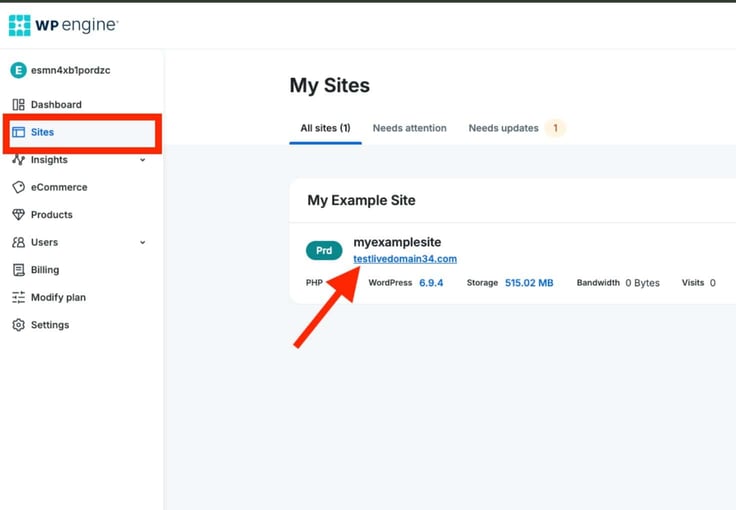
Now, pause for a second. Let’s quickly discuss what you’re seeing here. WP Engine offers three different environments:
Production (Prd)
This is your live website. It’s what your visitors actually see and use. And it’s also the environment I’ll be working from in this tutorial.
Staging (Stg)
Staging is more of a practice field. A duplicate of your main site. It’s a sandbox where you experiment without risking your live website. A few weeks ago, I walked you through how to set up a staging environment on WP Engine.
You might want to check that out later for perspective, or watch this YouTube short for a quick walkthrough, and if you’re not following, be sure to subscribe for new articles and tech tips.
Development (Dev)
Developers use this environment for deeper testing or larger development projects before they even reach staging.
Now that we’re only interested in backups for the live website, click on Prd.
On the left side, you’ll see Backups. Go ahead and click on it.
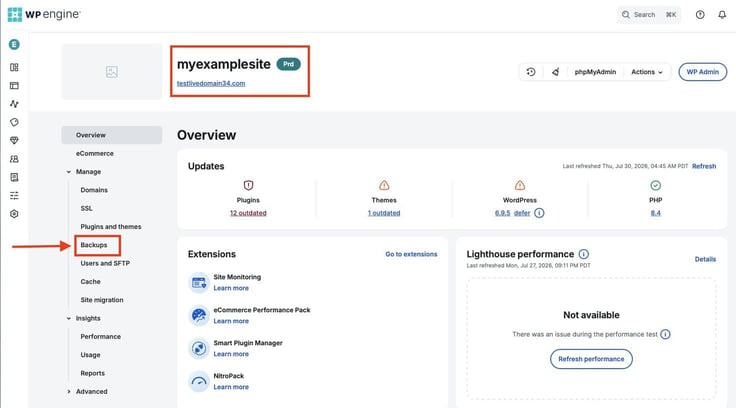
Pro tip: There’s no need to set or schedule automatic backups with WP Engine. Instead, it backs up your site daily by default.
Step 2: Review Your Automatic Backup Points
The Backups page displays the restore points available for your selected environment. WP Engine creates a backup automatically each day, so you should see recent checkpoints listed here without having to configure a schedule.
Check the date and status of the latest backup to confirm that WP Engine has successfully created a recent restore point. Remember that Production, Staging, and Development have separate backup lists, so make sure you’re viewing the correct environment.
You can also download a backup for offline storage. Open the three-dot menu beside the backup you want and select Prepare ZIP. Choose whether you want a full or partial backup, enter an email address for the completion notification, and click Prepare ZIP. Once the file is ready, return to the Backups page and click Download ZIP.
Not related, but thumbs up to WP Engine for keeping everything organized. I’ve reviewed countless web hosting providers, and one thing I dislike is having to navigate endless menus to find backups.
Step 3: Understand What WP Engine Backups Include
WP Engine’s daily automatic backups mean you’ve got plenty of options to choose from when you want to restore your website to an earlier version.
How I wish my client’s web hosting provider had that option years ago; I wouldn’t have spent the better part of my vacation trying to fix a broken website. A simple click would’ve saved me the trouble.
Also, a few things to keep in mind about WP Engine:
- It securely stores every backup in Amazon S3, so you don’t need third-party backup plugins.
- Your backups are encrypted both in transit and at rest to keep your website data secure.
- It keeps up to 30 days of backup history. That’s plenty of restore points if something goes wrong.
- You get real-time backup progress and status notifications that keep you informed.
- Backups include WordPress core files, themes, plugins, and the database.
- It excludes temporary files (cache, versioning files, etc.), stock files (samples and templates), log files, and obsolete software.
In the next section, you’ll learn how to restore a backup with WP Engine.
Step 4: Restore a Backup
On the Backups page, locate the backup you want to restore. Open the three-dot menu beside it and select Restore.
WP Engine will ask you whether you’d like to restore your backup with a database.
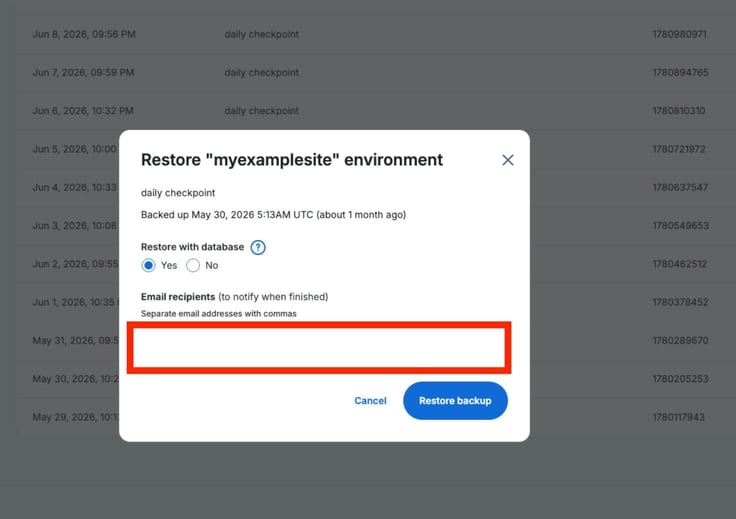
Here’s basically what it means:
Yes: Restores both your website files and the database, including pages, posts, settings, users, comments, and other site data. Choose this if you want to fully roll your site back to the selected backup.
No: Restores only your website files while leaving the current database untouched. This works best if you only need to recover files, such as themes or plugins, without touching your site’s content or recent data.
Choose whether to include the database based on what you need to recover. If you’re unsure, contact WP Engine support before proceeding. Restoring a backup overwrites your existing files with those from the selected restore point, so confirm that you’ve selected the correct backup before continuing.
Enter your notification email address, then click Restore.
Here’s what showed up in my email just a few minutes ago:
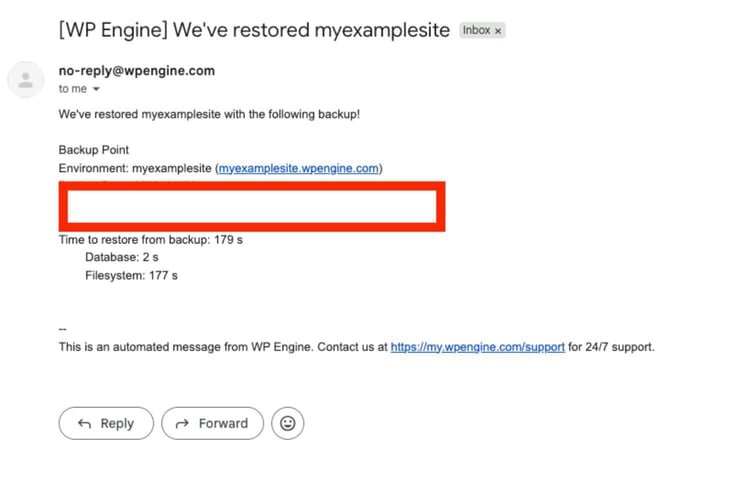
I also noticed something pretty cool while testing WP Engine’s restore feature.
Right before restoring my website, WP Engine quietly created one last backup of my current site. It’s called a pre-restoration checkpoint.
At first, I wasn’t sure why it was doing that (and what it was all about).
Then it all made sense.
Imagine restoring your website only to realize you picked the wrong backup. Maybe it was older than you thought, or it didn’t include some recent changes you actually wanted to keep.
Now imagine not having a backup of your current site. We’ve learned the hard way. You’d be cooked!
The cool thing about WP Engine is that it solves that problem automatically. Before it rolls your website back, it first saves your existing version as a brand-new restore point. That way, if you change your mind, you can simply restore the site to exactly where you started.
I’m a huge fan of little details like this, especially when it comes to web hosting. It’s one of those features you think you don’t need until you do.
Troubleshooting Backup Issues
Most backups work just fine. But don’t for a moment think that managing or restoring a backup is always stress-free.
It’s not.
Every now and then, I’ve run into situations that have tempted me to pull out one of my dreadlocks out of frustration. Knowing what to expect and how to deal with it keeps you ahead of the game. Now let’s look at a few issues I’ve encountered in the past and how to solve them.
Missing Backup Points
Don’t freak out if you don’t see recent backups. It’s usually because you’re not viewing the correct environment. I once spent hours trying to locate a backup only to find that I was viewing the staging environment instead of production.
All I needed to do was click on Prd to switch to Production and locate the correct backup!
Create Backup Option Unavailable
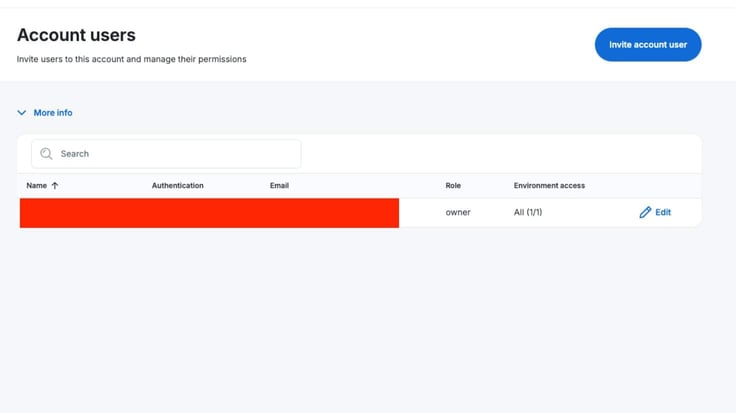
If you see this error, you likely don’t have permissions to perform this action. The best way to handle it is to verify your account permissions or contact WP Engine support.
For example, the only reason I’m able to share these screenshots with you is that my WP Engine role is set to ‘Owner.’ See the screenshot below?
Restore Taking Longer Than Expected
I wouldn’t panic if this happened. That’s because larger websites naturally take longer to restore. It could be a file size issue, not a you (or WP Engine) problem.
Whatever you do, please resist the temptation to interrupt the process. The only time you may need to intervene is when WP Engine specifically indicates something has failed.
For this specific issue, patience is usually the best troubleshooting tool. If it’s a large site with many files, themes, plugins, or pages, you could be looking at several hours or more for a complete restore. They’ll send you an email notification once it’s complete.
Website Still Looks Broken
Start by refreshing the page in a private browsing window to determine whether your browser is displaying an older cached version. If the problem remains, clear any caching plugin and CDN caches, then purge your site’s WP Engine cache before assuming the restore failed.
I’ve seen perfectly restored websites continue displaying old cached pages.
Older Backups Missing
WP Engine keeps backups for about 30 days, so it’s expected that older restore points will eventually expire. In other words, don’t expect every backup you’ve ever created to remain forever.
Note: I always recommend creating manual backups before a major project since they’re usually much easier to identify while they’re still available. You can create a clearly labeled backup by opening the Backups page, clicking Create backup, adding a description and notification email, and selecting Create.
Your WP Engine Backups Are Ready
Before I draw the curtains and end the show, I hope you’ve learned everything you need to start backing up your WP sites.
And you know what’s weird? Over the years, I’ve learned that websites rarely break when you expect them to. It’s usually five minutes before a client meeting, right before a product launch, or just when you’re about to clock out for the day.
In such situations, winging it won’t save you. Automatic backups will.
Thank you for taking the time to follow along with this guide. I hope it gives you a little more confidence the next time you’re updating your WordPress website with WP Engine.
If you found this tutorial helpful, be sure to explore our growing collection of WordPress hosting guides right here at HostingAdvice.com. Use our smart tool HostHelperTM to find exactly what you need. And, be sure you’re following us on social media. Don’t miss out on our entertaining business tips, website guides, and more!
HostingAdvice.com is a free online resource that offers valuable content and comparison services to users. To keep this resource 100% free, we receive compensation from many of the offers listed on the site. Along with key review factors, this compensation may impact how and where products appear across the site (including, for example, the order in which they appear). HostingAdvice.com does not include the entire universe of available offers. Editorial opinions expressed on the site are strictly our own and are not provided, endorsed, or approved by advertisers.
Our site is committed to publishing independent, accurate content guided by strict editorial guidelines. Before articles and reviews are published on our site, they undergo a thorough review process performed by a team of independent editors and subject-matter experts to ensure the content’s accuracy, timeliness, and impartiality. Our editorial team is separate and independent of our site’s advertisers, and the opinions they express on our site are their own. To read more about our team members and their editorial backgrounds, please visit our site’s About page.