Guides

Studies 
Studies
Our studies cover a range of trending topics and deliver original, reliable data you can't get anywhere else on the web.
From ultra-cheap shared plans to high-end managed WordPress, VPS, and dedicated servers, DreamHost delivers standout performance and intuitive tools — but its AI features and support wait times still have room to improve.
By: Christina Lewis
Editor: Lillian Castro
Reviewer: Christian de Looper
Disclosure: When you sign up through links on our site, we often earn referral fees from partners. For more information, see our ad disclosure and review policy.
I tested DreamHost for the better part of a month and found that its massive range of hosting services is user-friendly and extremely feature-rich.
Of all its plans, the DreamPress impressed me the most. Its managed WordPress plans made it super easy to get started with WordPress, and I didn’t need to lift a finger to manage them.
My only complaint about DreamHost is the bugginess of some of its AI features. The AI content generator and site builder gave me some trouble, but customer support was there to help me work around it.
Let’s get into the first plan I tested.
DreamHost has every kind of hosting you need, from cheap shared hosting to managed dedicated servers.
DreamHost’s managed WordPress offering, DreamPress, steals the show. It’s extremely performant and easy to use — perfect for people who want something high-end with a reasonable price tag.
But DreamHost’s AI tools are unreliable and buggy, and the long live chat wait times can turn simple tasks into time-consuming frustrations.
The other day I walked into a convenience store on my way to the boat ramp (I like to water ski on weekends), and they had a deal advertising two canned sodas for $2.50.
When I saw that DreamHost’s cheapest plan starts at just $2.89, I thought, “Dang, that’s basically the same price as my two cans of Sprite.” And not to throw any shade at my favorite soft drink, but I have a feeling DreamHost’s plans are going to do a lot more for me than my lemon lime fizzy drink.
After reviewing everything DreamHost included in its cheap plans, signing up, building a site, and thoroughly testing it, I found that I was getting a ton of value for my money. Here’s a rundown of my experience testing it.
If this is your first time buying a web hosting plan, DreamHost makes things really simple for you. The first thing I noticed was that it offers three cheap (i.e., shared) hosting plans: Web Hosting Launch, Web Hosting Growth, and Web Hosting Scale.
They were all pretty distinct in pricing and resources, so it wasn’t too hard to narrow down a choice based on my desired budget and needs. And I didn’t feel overwhelmed with the number of choices I had.
The names of the plans clued me in to what they were about, but I took a closer look at what came with each plan to see exactly what I was getting.
Web Hosting Launch came with all the essentials, including:
All of these features sounded really premium to me, and I loved that DreamHost included unlimited free SSL certificates and domain privacy protection (which usually costs at least $5-$10 more).
I checked out what else I could get if I upgraded to Web Hosting Growth, and I was even more impressed. For just $1.10 extra per month, I got double the resources in:
On top of that, it came with free malware scans and pre-installed SSL certificates. So far, all I could think was that these cheap hosting plans didn’t feel cheap.
As far as pricing goes, DreamHost also has some really nice introductory discounts. I was stunned that it offered a discount on monthly plans, too. That’s almost unheard of. Most of the time, you need to commit to at least a year upfront to get any significant savings.
Currently, here are the deals you can take advantage of:
| Plan Term | Launch | Growth | Scale |
|---|---|---|---|
| Monthly | First 3 months at $4.99/month, then $11.99/month | First 3 months at $5.95/month, then $13.99/mo | First 3 months at $12.99/month, then $27.99/month |
| Yearly | First year at $2.89/month, then $10.99/month | First year at $3.99/month, then $12.99/month | First year at $9.99/month, then $25.99/month |
| 4-year | First 4 years at $1.99/month, then $7.99/month | First 4 years at $3.49/month, then $8.99/month | First 4 years at $7.99/month, then $19.99/month |
See what I mean? The new customer discounts are excellent. The renewal pricing is definitely higher, but it doesn’t have as much of a jump as hosts like SiteGround. Plus, I think the renewal price is still pretty affordable for what you get.
You might be thinking, “Okay, sure, the discounts are great. But is this the best deal I can get?” I was thinking the same thing myself, so I did some research to find out what other hosts were charging for similar plans. Here’s what I found:
| Host | Plan | Introductory Price | Renewal Price |
|---|---|---|---|
| DreamHost | Growth | $3.99/month | $12.99/month |
| hosting.com | Pro | $6.99/month | $22.99/month |
| Scalahosting | Advanced | $9.95/month | $16.95/month |
| IONOS | Plus | $1/month | $14/month |
DreamHost has one of the lowest intro rates of any host and has the actual lowest renewal pricing. When I considered the balance of price and features, it was really easy for me to choose the Growth plan.
Once I chose the Growth plan, I was ready to sign up. I clicked on the Sign Up Now button under the plan I wanted.
The next page asked me to choose a domain name, although I could also skip this step for now and revisit it later. It looked like this:

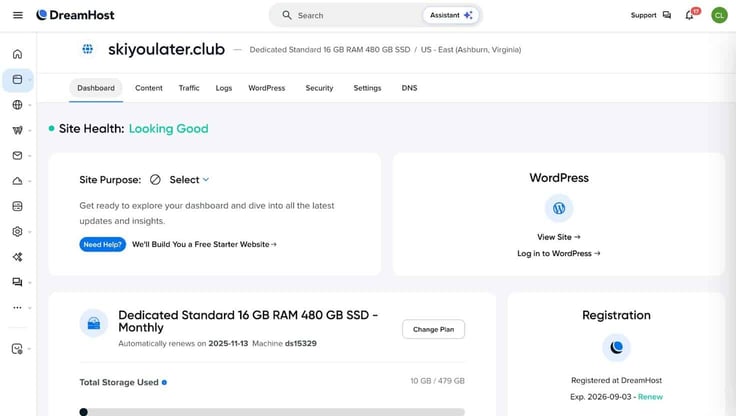
I had water skiing on my mind, so I chose the domain name SkiYouLater.club.
On the same page, I was able to change my plan’s duration to monthly, yearly, or 3 years. The longer you sign up for, the cheaper the plan will be. But since I was just testing DreamHost out, I went with the one-year plan at $3.99 a month.
On the last page, I entered my credit card and billing information and created an account. I did notice a sly upsell in the form of DreamShield protection.
I hovered over the info icon and it said “Daily scans of your site to identify and flag malicious code, out-of-date software, permission errors, and more.” Sounds useful, but I decided to skip it this time around.
The box is automatically checked, so if you don’t want it, you need to uncheck it.

My total price for a year of unlimited hosting and domain registration came to just $47.88, saving me $120. I couldn’t believe how much I saved on my annual plan.
If you’re on the fence about whether to commit, just do it. The amount you can save far outweighs the risk of getting locked in for the year (besides, DreamHost has a 30-day money-back guarantee if you change your mind).
Once my purchase was completed, I got an email with some helpful info for getting started.

I started by logging in to my control panel, which looked like this. It was a little busy, so it took me a minute or two to get the lay of the land.

After poking around a bit, I figured out that I needed to click on “Websites” then “Manage websites,” which took me to my list of hosting plans.

From here, I could see and manage all of my plans in one place. I clicked on “Add Website” at the top to get started. Everything began to feel really intuitive. I had four options to get started: Install WordPress, Outsource to DreamHost, Upload Website, or Migrate.
Since I didn’t have a site yet, I chose to install WordPress.

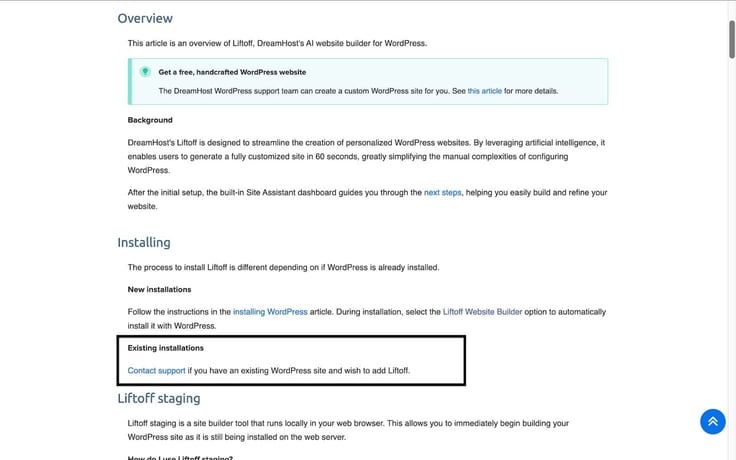
Then, I was presented with another choice. I could go forward with a traditional WordPress installation, or I could use DreamHost’s website builder, Liftoff. Since I plan to review the site builder in more detail later on, I chose to use plain ‘ol WordPress this time.
Next, it asked me to select a purpose for my site. I could choose from:
I thought it made the most sense to choose “Blog,” since I’m making a website about water skiing.
After choosing my site’s purpose, DreamHost presented me with a small group of plugins I could choose to add to the experience. I chose a few that stood out to me, including a starter template and image optimizer plugin.
Then I was ready to officially install WordPress. Installation itself only took a few minutes, and when it was finished, I was back on the “Websites” tab on my hosting dashboard.
From there, DreamHost lets you sign into your WordPress dashboard to choose a theme, customize your site, add content — the works.
If you’re like me, you’ve built more WordPress sites than you can count. I didn’t document every step I took within WordPress (since it’s the same for every host), but I will share that everything went smoothly, and I was happy with the outcome of my site.

Once I was finished, I hit “Publish” and was all set!
DreamHost includes several features to help make your site faster, including SSDs, unmetered bandwidth, and global data centers. Still, I wanted to put my site to the test to see how fast it would load.
I used GTmetrix’s performance test to find out, and DreamHost passed with flying colors.

My site scored a performance grade “A”, giving me a lot of confidence that its performance optimizations aren’t just for show.
My site also felt pretty responsive to clicks and scrolls. Pages loaded quickly, and I never had to think twice about lag.
I would absolutely recommend DreamHost’s cheap hosting service to beginners who want something cheap and easy to use.
DreamHost has an awesome price-to-value ratio, competing head-to-head with IONOS. I loved how affordable my plan was and that I had the option to use WordPress or the Liftoff site builder to make my site.
The star of the show for me was the Growth plan, which came with a ton of features for a really reasonable price. If you’re on the hunt for a web host that gives you room to grow for a low price, DreamHost is worth your attention.
DreamHost gives you two ways to WordPress: a typical shared server with WordPress optimizations or its managed service called DreamPress. Since I already reviewed its shared hosting plans in detail, I chose to focus on DreamPress.
My first thought when I looked at DreamHost’s WordPress plans was that I loved the clever name. DreamHost put its best foot forward with its website, too — the design is clean, easy to understand, and presents everything nicely.
Here are the standard WordPress plans available:
And here are the DreamPress plans; I reviewed the first one. You’ll need to click on “High-Performance WordPress Hosting” to see these plans:
There are six total DreamPress plans to choose from. Each tier had features appealing to a different kind of customer. I could choose from DreamPress 1, 2, 3, 5, 10, or 20.
DreamPress wasn’t managed WordPress hosting built on shared servers like with some other hosting companies’ plans. It provides an isolated and redundant environment for top-notch performance and security.
Looking at what features I got with each plan, it was clear to me that this was more than your average WordPress plan. At a minimum, each package came with:
I couldn’t even list all of them, but these were the features that stood out the most to me. Some of my favorites from within this bunch were the AI site builder and built-in traffic analytics. I couldn’t wait to log into my dashboard to see how they worked.
Upgrading from the standard DreamPress plan to one of the more advanced plans got me more SSD storage, extra backups, and priority support. Otherwise, they were more or less the same.
The other significant difference between the plans was pricing. DreamPress starts at $19.99 for new customers if you sign up for a yearlong plan, while the two highest tiers, DreamPress 10 and 20, go for $65.99 and $107.99 a month, respectively.
The DreamPress 20 plan was a bit of a sticker shock to me, but it did offer twice as much storage and monthly visitor support as the next highest tier, DreamPress 10.
It seems like pricing is all over the board for managed WordPress hosting. Looking at what I’d pay for a similar plan from other hosts, I thought it was actually quite reasonable.
Take WP Engine, for example. Its largest plan, Scale, only supported 400,000 monthly visitors and was more than double the price of DreamHost’s DreamPress 20 plan. On the other hand, Cloudways was cheaper overall but didn’t come with any user-friendly features like AI site builders or built-in analytics.
| Host | Plan | Introductory Price | Renewal Price |
|---|---|---|---|
| DreamHost | DreamPress 20 | $77.99/month | $107.99/month |
| Cloudways | DigitalOcean Large | $99/month | $99/month |
| Liquid Web | Builder Elevate | $153.33/month | $184/month |
| WP Engine | Scale | $242/month | $290/month |
My main takeaway was that it’s probably best to look at what add-ons and resources you need and decide if you’re okay with paying what DreamHost charges.
I decided to go with DreamPress 5, which landed right in the middle of the pack. I think testing the happy medium of the DreamPress platform will help me determine its true value in both price and performance terms.
Next, I was ready to sign up for my plan. I scrolled to the plan I wanted and clicked “Sign Up Now.”
I could go into every detail of the signup process again, but it was exactly the same as signing up for cheap hosting. If you want to check out the steps I went through, you can jump to that section of my review here.
I’ll skip to the good part. My total came to $362.88 for one year of DreamPress 5, including a free domain name and the AI site builder. For an individual, that’s probably overkill. But for a business, I think the price is well-justified by all the premium features it includes.
Don’t forget that if you’re on a tighter budget, you can always choose the entry-level DreamPress plan, which costs just $182.88 for the year — much more affordable for your average Joe. And it still supports about 25,000 visitors a month.
Equipped with my pro-grade, managed WordPress plan, I was more than ready to get started building my site. I logged into my hosting dashboard and scrolled down the home page to find all my plans.
From there, I found my managed WordPress plan, DreamPress 5, and clicked “Manage.”
I could see my WordPress site was technically already up and running — but just a bare-bones version with no content or styling. Not having to install WordPress saved me a couple of minutes, so I was able to jump right in to styling my site.
I clicked “Log in to WordPress.”

Once I was in my WordPress dashboard, I could see that DreamHost had already installed some essential plugins, like Google Analytics, Jetpack, Nginx Helper, and WPForms Lite. There was virtually no setup for me to do, which I really appreciated.

Since WordPress is the same everywhere you go, I didn’t fully document my site-building process. But to summarize: I chose my theme, added some content to customize my site, and hit “Publish.”
Everything worked as I expected it to, and I can’t really ask for more.
After publishing my site, I wanted to explore some of the site management tools in my dashboard. There were a few things that caught my eye when I first logged in, like the Content, Traffic, and Logs tabs.
My first stop was “Content,” where I found some pretty fun tools. The main standout I noticed was the AI Content Builder.

I clicked “Access” and was prompted to set up my business profile to use the AI content features. I answered a few questions about my business and my goals.
Each step has a useful button for generating ideas, so if you need a little help, DreamHost offers it.
After answering all the questions, I was ready to use the AI content generator. I clicked “Get Writing” to start.

The next page provided me with a few more prompts to understand what I wanted to write about. I answered a few questions and clicked “Generate.” It took some time to load, but the generator offered a decent piece of copy in about two minutes.
Next, I explored the Traffic tab. This area was pretty cool. Several other hosts have their own take on traffic monitoring and management, but DreamHost has the best layout I’ve seen.

I liked how easy it was to customize the date range for my reports, and that bot traffic was separate from visitor traffic. The charts also made it extremely easy to visualize trends.
Finally, I spent some time exploring the Logs, WordPress, Security, and Settings tabs. Through these pages, I could:
I thought the dashboard was extremely useful and streamlined for managing my site.
My last step before giving the DreamPress plan my seal of approval was to put its performance to the test. I copied my site URL and pasted it into the GTmetrix performance tester and was met with exceptional results.

My site scored an “A” grade with a 99% performance and 95% structure rating. Not only that, but my Largest Contentful Paint came in at an ultra-fast 830 milliseconds — well below the recommended 1200 milliseconds.
Having this report gave me confidence that my site was fast and responsive, so I wouldn’t need to worry about performance problems.
Of all the WordPress services I’ve tested, DreamHost made getting started the easiest. I didn’t even have to lift a finger to install WordPress or essential plugins, which is a huge advantage for anyone who isn’t very familiar with WordPress.
Once I got the lay of the land, the dashboard was easy to use. I loved the Traffic tab, which showed me visitor trends with custom date ranges. The price is a bit on the higher end, but it offers great value.
I would strongly recommend DreamPress to anyone seeking a high-performance, managed WordPress solution.
The AI website builder is generally my favorite part of reviewing web hosts. There’s something uniquely fun about flexing your creative muscles in a more hands-off way. As long as I can describe what I want, the AI can build it for me.
DreamHost’s version of an AI site builder is called the Liftoff Website Builder. It says it’s the fastest way to get your website online, and I got the chance to test that claim. Here’s what happened.
If you’re not familiar with web hosting and site builders, it’s pretty common for hosts to include their site builder for free when you purchase web hosting — and that’s exactly how DreamHost does it.
Since I had already chosen a web hosting plan that came with Liftoff when I reviewed its cheap service, I didn’t need to go through the motions of choosing a plan and signing up again.
Instead, I just started from scratch with the same plan.
My first step was signing into my dashboard, where I could manage my shared hosting plan that I previously signed up for. I didn’t immediately see a way to get started with Liftoff, so I did a little research.
Through the DreamHost knowledge base, I learned that since I had already installed WordPress on my cheap plan, I may need to contact support for help installing Liftoff.
If you’re signing up as a new customer, you’ll be given the chance to choose Liftoff from the get-go, so don’t worry if this process seems a little backward.
I sent customer support a message and was greeted by the virtual assistant, which gave me some detailed instructions on how to install the site builder.
First, I uninstalled my existing WordPress installation. This deletes your site, so be careful to back up your site if you don’t want to lose any data. Once the page refreshed, I was free to reinstall WordPress and select Liftoff as my site-building method of choice — easy peasy.
I clicked “Install WordPress” on the page above, then was given the option to use Liftoff or a custom installation.
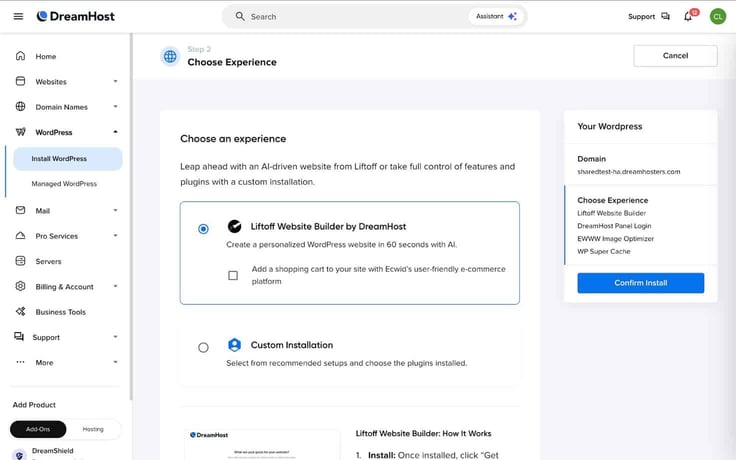
I checked the box labeled “Liftoff Website Builder by DreamHost” and then clicked the blue “Confirm Install” button on the right. It took a few minutes to finish the installation, and then I was ready to start building.
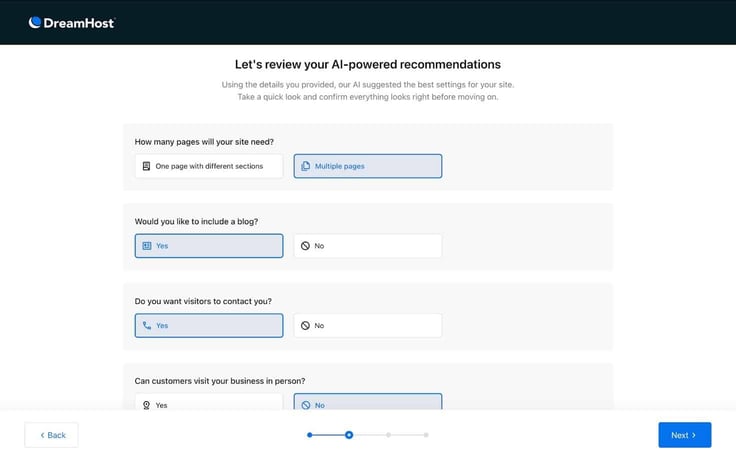
DreamHost claims its site builder can give you a website in less than 60 seconds, which is a pretty bold claim. I was interested to see if it was really that fast. I started by filling out my website’s title, its description, and selecting a tone.

Afterward, I clicked “Next.” On the following page, I reviewed several AI-powered recommendations, which I could tweak to my liking. The site builder suggested things like a multi-page site with a blog, contact information, and no product listings — all of these made perfect sense.
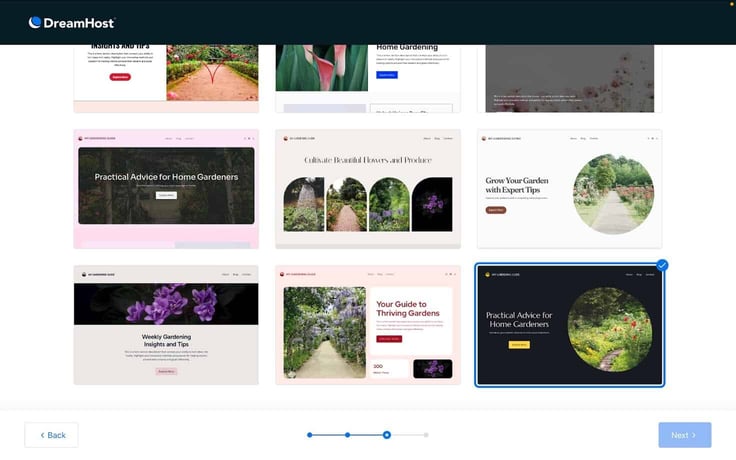
After about 10-15 seconds of loading, the AI builder showed me 18 different designs to choose from, and they all looked great. Each one had a professional, polished look and feel.
I also liked that they weren’t just copies of the same thing with small differences. Each one could stand on its own as a unique design.
Unfortunately, this is where I ran into an issue. After selecting my design and trying to click “Next,” nothing happened. I tried going through the Liftoff site builder from scratch three separate times, and the result was the same each time.
No matter what I did, I couldn’t get past this screen to the next step in the site-building process. As you can see in the screenshot above, the “Next” button looked inactive and nothing happened when I tried clicking on it.
Considering the site builder was a crucial part of the experience, this was a big letdown. My only option was to contact customer support. The wait time said 31 minutes, which would be one of the longest live chat wait times I’ve experienced in my time reviewing web hosts.
As predicted, Daniel hopped into the chat roughly 30 minutes later to help me out.

He escalated the issue to the technical support team, who began investigating while he assisted me. While I waited, Daniel was able to complete the site setup process from his end, sending me screenshots and asking for my preferences along the way.
Thankfully, it only required a couple more steps.
Just before ending our conversation, Daniel reported that my issue couldn’t be replicated on other devices, so he suggested it was a caching issue with my browser. So, hopefully this issue is isolated to my experience.
In the end, I was left with a beautiful website. It took more like 60 minutes than 60 seconds because of the technical issues, but it was worth the wait.

With my technical issues out of the way, I was eager to explore more of the editing features to customize my website.
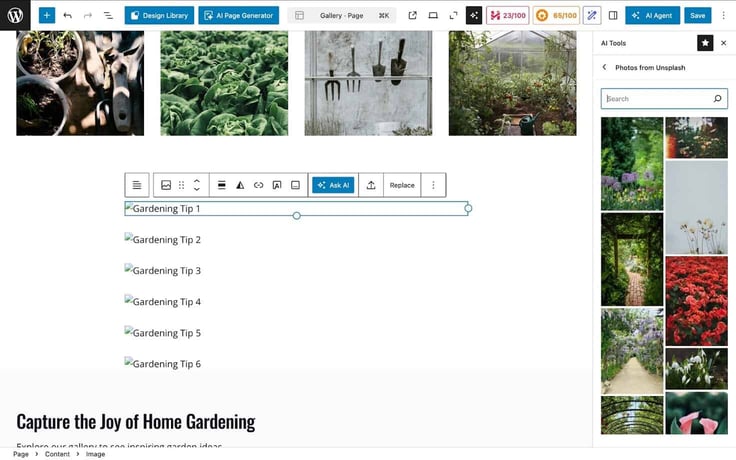
From the menu at the top, I saw that I could use the AI Agent for help with making changes to my site. I gave it a simple request to test it out by asking for help creating a blog post. It gave me step-by-step instructions for creating a dedicated page for my blogs and how to add my first one.

From there, making changes to my site was the same as any WordPress site — with the added help of AI tools. Each page of my site had an AI content generator on the right where I could request blog titles, headings, body copy, and images.
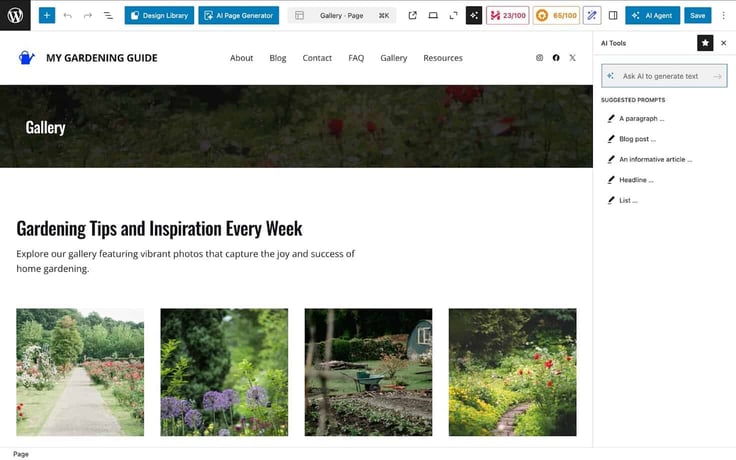
This was by far the most fluid and functional part of the AI site-building experience. I gave it a prompt to add more images to my gallery, and it allowed me to select where the images should appear and whether I wanted AI-generated images or stock photos.
I liked that the AI site builder created the building blocks and that I was able to further customize through WordPress. It felt familiar, saving me the time and headache of learning a new site builder interface.
If you have experience using WordPress but don’t want to start from scratch, this is the best of both worlds.
Finally, I was ready to check my site’s performance. The AI site builder created quite a few pages for me, so I was curious how well the site would perform. I pasted the URL into the GTmetrix performance checker, and here were the results:
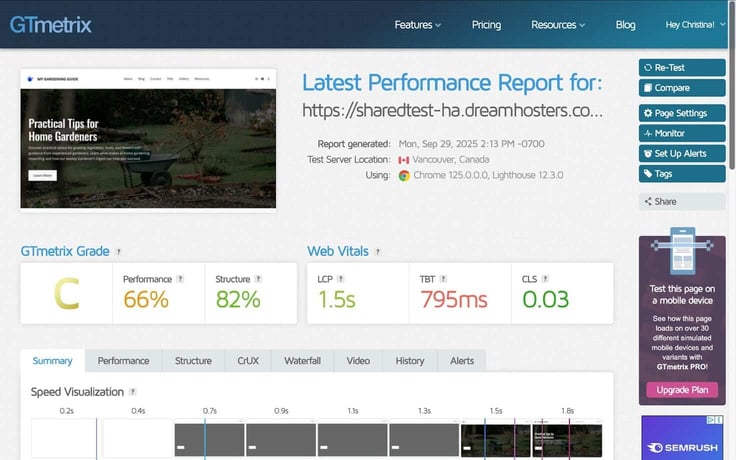
In academics, a “C” is often considered average. But in terms of typical performance grades, this is actually pretty poor. IONOS, InMotion, Hostinger, Scalahosting, and nearly every other web hosting provider besides Network Solutions beat DreamHost.
The total blocking time was the worst offender at 795 milliseconds — it should be 150 or less.
I dove a little deeper into the report, which listed the LCP as one of the biggest contributing factors to poor performance. I tried removing the large hero image and had a much better result.

I’d say these vitals were much more acceptable. So, keep in mind that if you use the Liftoff site builder, you probably don’t want a large hero image on your homepage.
My experience with the site builder left a lot to be desired. I wanted to like it. It had a bunch of interesting AI tools, and I loved the final look and feel of my site.
However, between the obstacles I faced just building my site, the slow customer support, and the poor performance grade, I think there are better options out there for your money.
I had a much better experience using the IONOS and hosting.com site builders. These alternatives are definitely worth your money.
After wrapping up my website builder tests, I was more than ready to try out a more performant solution: VPS hosting. VPS hosting is the next step up in terms of speed and reliability.
It’s a nice middle ground between shared hosting and dedicated hosting, where I can get a lot of value for my money. I signed up for one of the top-tier VPS plans and took it for a spin. Here’s how it went.
I started by checking out the DreamHost VPS landing page, which features four plans: VPS Business, VPS Professional, VPS Enterprise, and VPS Premier.
I noticed that DreamHost lets me change the billing period from monthly to annual to three years, which changes the pricing, too. The longer my plan, the more money I can save in monthly costs.
Each plan comes with base features, including:
The main difference between each plan is how much RAM, storage, and CPUs are included. The smallest plan, VPS Business, starts at 2 GB RAM, 2vCPUs, and 60 GB NVMe storage, while the largest plan, VPS Premier, includes 12 GB RAM, 6 vCPUs, and 360 GB NVMe storage.
I love seeing such a wide range because I know I can find something that works for my needs and my budget. I wasn’t in the mood to hold back, so I chose the VPS Premier plan, which starts at $60 a month for a three-year contract. If you’re thinking that’s out of your budget, don’t sweat it.
DreamHost also has VPS Business, which has a low starting price of $10 a month when you pay for three years upfront.
I thought it would be worthwhile to compare DreamHost’s VPS pricing to other hosts. Here’s what I found:
| Host | Plan | Intro Pricing | Renewal Pricing |
|---|---|---|---|
| DreamHost | VPS Premier | $60/month | $114.99/month |
| InterServer | 11 Slices | $33/month | $33/month |
| hosting.com | Managed Linux VPS M | $45.50/month | $90.99/month |
| Kamatera | 12 GB RAM, 6 vCPUs, 350 GB storage | $0/month (for 1 month) | $139/month |
| Liquid Web | Professional VPS | $35.14/month | $156/month |
Compared to other plans of similar sizes, DreamHost’s VPS Premium plan was right in the middle of the pack.
I liked that it offered a nice introductory discount, which could save me a significant amount of money over a long-term contract. Feeling pretty confident about my decision, I clicked “Sign Up Now” to start the checkout process.
Once I clicked the sign-up button, I was prompted to choose a domain name. I had a few options here. I could either:
At this time, I decided I wanted to choose my domain later, so that’s what I selected.
I could also change my billing cycle on this page to monthly, yearly, or three-year billing options. Since I was happy with my steep discount on the three-year plan, that’s what I stuck with.

The next page asked me to fill out my billing information and my address, then finalize my purchase. I appreciated how quick and painless the checkout process was — it took me no more than three minutes from start to finish.
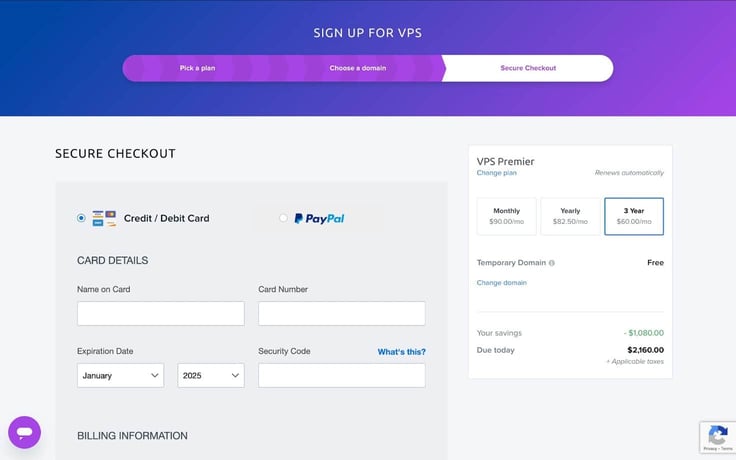
In total, I paid $2,160 for three years of VPS Premier. The best part? I saved $1,080 by committing to a long-term plan.
DreamHost offers managed VPS hosting, meaning it’s quick and painless to get started. I appreciate that I don’t need to use the command line to install scripts or server management software myself.
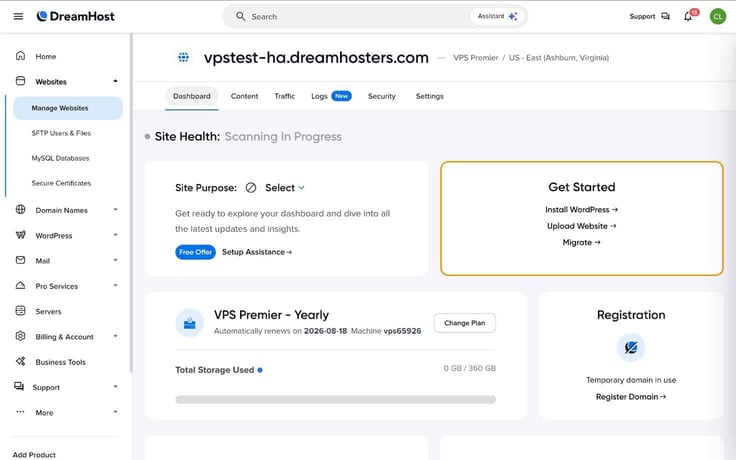
My first step was signing into my dashboard, which I had used previously when testing the cheap, WordPress, and website builder plans.
Once I signed in, I found my VPS plan here:

I clicked “Manage” to get started, and saw that I had the option to install WordPress. Unless you have existing site files or want to build something from scratch, I highly recommend going this route.
WordPress installation was as easy as any other host. And unlike 90% of VPS hosting plans, it also gave me the option of using a website builder. Interested in giving the Liftoff builder another try, I decided I would use it again.
I logged into my new WordPress dashboard and clicked “Site Assistant” at the top. From there, DreamHost gave me a Site Guide that included a list of my next steps.
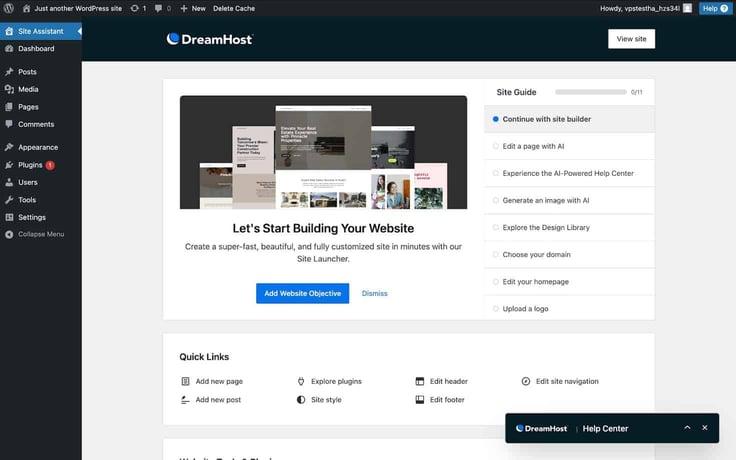
I won’t cover the whole site-building process again, since I already covered it in the Website Builder review. But I am super happy to report I had no technical issues this time.
Once my site was up and running, I wanted to check out what other server management features I had access to. I went back into the dashboard to get the lay of the land.
I was pleasantly surprised to see the VPS management tools were exactly the same as my shared hosting plan. I had several tabs to click through, each of them allowing me to control different things:
I really appreciate that DreamHost removes the technical barriers of VPS hosting, so even people with limited skills can take advantage of the power and performance boost.
There’s another section of the dashboard called “Servers” where I can make slightly more granular changes to my VPS.

By clicking “Manage,” I was redirected to a page where I could switch from Apache to Nginx or set up a proxy server.

Overall, I thought the server management tools gave me the perfect balance of control and support. Since I paid for a managed plan, I didn’t have to worry about configuring my server from scratch, managing updates, or dealing with security issues.
This level of support made my VPS feel more like a shared hosting plan, which is great for people with little time or technical skills.
So far, I have been pretty impressed with my VPS Premier plan. However, my review wouldn’t be complete without testing its speed. I pasted my website’s URL into the GTmetrix performance checker, and wow.

It’s rare to receive a 100% performance grade, but the VPS Premier plan succeeded. I was also very impressed with the other Web Vitals, which came in well under the recommended times. Clicking around my site, everything was responsive and smooth, too.
The performance of my VPS is rock solid, which makes me feel really confident that my site can handle anything.
DreamHost’s VPS hosting service was fantastic. Between the managed support, intuitive control panel, and awesome performance, there’s not much room for improvement.
I loved how managing my VPS felt like managing a shared hosting plan. Everything was easy to find, and I had several simple ways of getting my website up and running.
In terms of pricing, it fell right in the middle of the pack. With how positive my experience was, I’d say DreamHost’s VPS is definitely worth your money.
The final stop in my DreamHost tour was its dedicated hosting plans. These servers represent the best you can get. They’re high-performing, secure, and extremely stable for high-traffic apps.
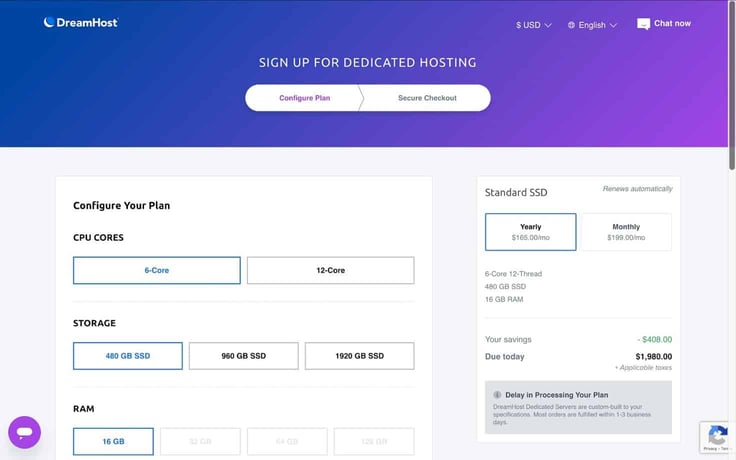
I signed up for the standard fully managed 6-core server for a month and tested its setup and performance. Here’s what I found.
First off, I like how DreamHost made it really easy to choose a plan. It didn’t offer as much variety as hosts like Kamatera or IONOS, but it delivered nine simple options with varying resources.
At a minimum, each server comes with a set of basic features, which includes:
I really appreciate how many dev-friendly features are included, like full shell and root access, and unique IP addresses.
Combining these dev-friendly features with fully managed support makes for a pretty rock-solid hosting plan.
When it came time to compare plans, I noticed the main difference between each one is the amount of cores, threads, RAM, and storage each one comes with. And obviously, the more resources you choose, the higher the price.
I had my eye on the smallest standard plan that came with six cores, 12 threads, 16 gigabytes of RAM, and 480 gigabytes of SSD storage. It was plenty enough for my tests and had the cheapest monthly price tag of $199.
If I wanted to save a little money, I could also buy a year upfront for $165.00 a month — saving me about 17%.
When I compared DreamHost’s dedicated server pricing to that of its competitors, DreamHost was right in the middle of the pack.
| Host | Plan | Intro Pricing | Renewal Pricing |
|---|---|---|---|
| DreamHost | Standard 6-core 12-thread | $165.00/month | $199/month |
| InMotion | Aspire | $35.00/month | $49.99/month |
| Liquid Web | Intel Xeon E-2134 | $55.50/month | $88.00/month |
| Bluehost | Standard NVMe 32 | $144.19/month | $195.32/month |
| HostArmada | Low Orbit | $114.95/month | $229.90/month |
For the price, I think DreamHost offers a lot of value compared to competitors. It gives you a ton of control over your server while still offering fully managed support.
If budget is your top priority, you should probably consider InMotion or Liquid Web instead of DreamHost. But if you are more concerned with features and value, DreamHost’s dedicated servers are an awesome choice.
Happy with my plan, I was ready to check out.
I scrolled back up to the top of the page to make sure I selected the right number of cores, storage, and memory. Everything looked good, so I clicked on the Sign Up Now button.

On the next page, I was able to confirm all the same details, including my billing cycle (either yearly or monthly). I saw that buying a year upfront would save me more than $400.
However, since I’m just buying this server to test it out, I just went with the monthly billing option.
I clicked “Continue,” which took me to the secure checkout page.

From here, I filled out my credit card info and billing information. If you’re new to DreamHost, you’ll also have to create an account here. However, since I had already signed up for other plans, all I needed to do was sign in.
After finalizing my purchase, I got a notice in my dashboard that my server would be provisioned in about one business day.
As I mentioned earlier, DreamHost offers fully managed server setup and management with its dedicated plan. So that means I didn’t have to worry about configuring my server. It was already up and running by the time I reached the dashboard, which I greatly appreciated.
To access my dedicated server, I clicked on “Servers” on the DreamHost dashboard’s sidebar. Here is how the Servers page looked:
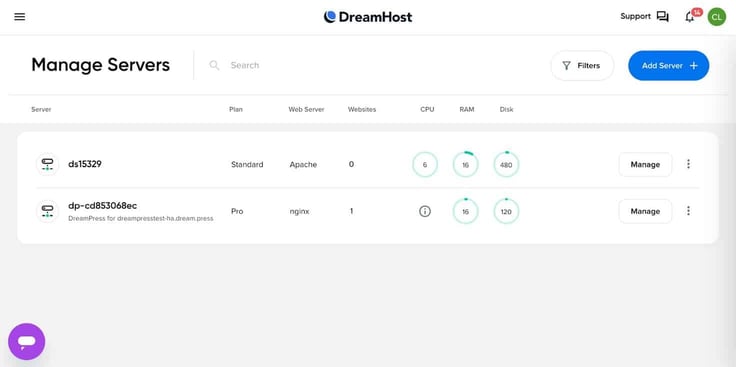
As you can see, the only other server on that page was from my DreamPress plan. My shared and VPS plans were listed under the Websites tab. Clicking on the “Manage” button took me to the server overview page for my plan.
On that page, I could find:
At this point, I didn’t have a domain name for my dedicated server. But thankfully, DreamHost offers free migration, so I could easily transfer my existing domain and website files from my shared plan to my dedicated server plan — no guesswork or extra fees necessary. Better yet, the switch happened in under two minutes.
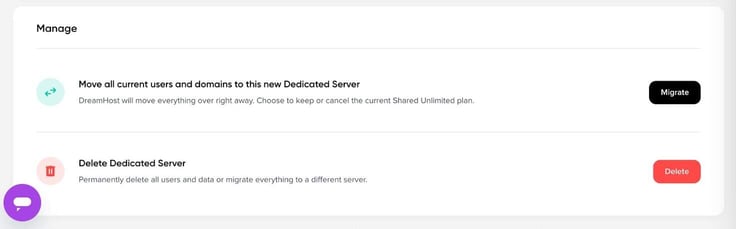
If you don’t have an existing site, no worries. Stick around and I’ll show you how to create a website with your dedicated server plan from scratch swiftly.
To start up the website creation process, I returned to the Websites tab of the DreamHost dashboard. Once there, I clicked on “Add website” at the top of the page. The next page asked me to enter either a new or an existing domain name. DreamHost also had the option of choosing a free subdomain at this point.
Since I already had a domain name, skiyoulater.club, hanging around, I typed that in and that took me straight to the next step — choosing a website setup option. DreamHost has these four options for creating a website:
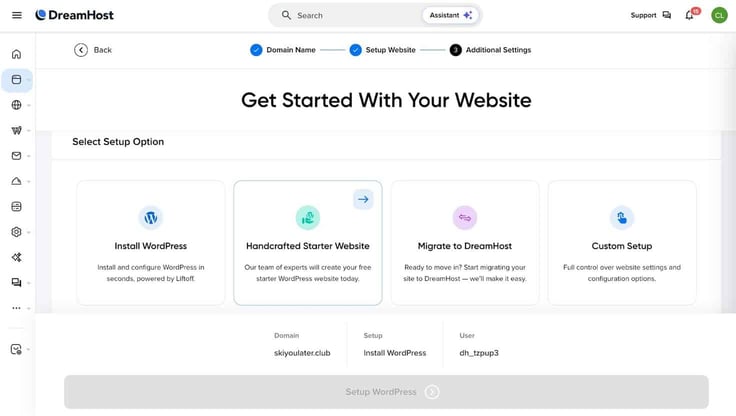
I chose to install WordPress. Then to finalize the process, DreamHost asked me which server I wanted to use to power the site and what SFTP user I wanted to use to access my website files. I clicked on the dedicated server option and DreamHost generated a new SFTP user for me.
Now all I had to do was click on the “Setup WordPress” button toward the bottom of the page. Once I did that, I was brought to a confirmation page. Here I had the option to either build my website with DreamHost’s Liftoff Website Builder or custom-build it using WordPress’s site editor.
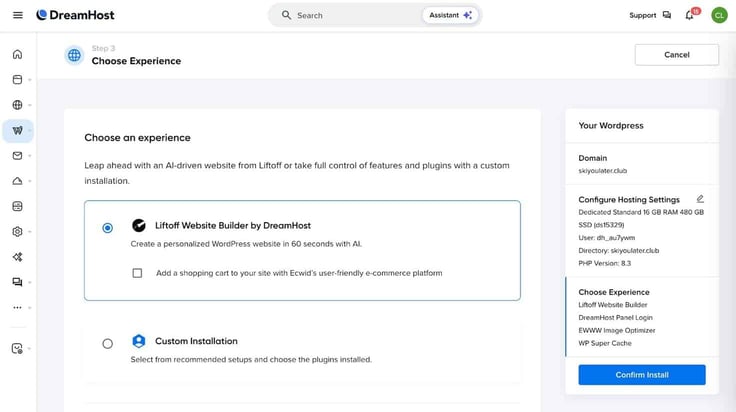
The DreamHost website builder features an AI experience, so I opted for that and added an eCommerce shopping cart to it. I confirmed the installation and waited for it to load up. The WordPress installation took approximately six minutes to complete.
Once that was done, I could access my website details by clicking on “Manage” under the domain name on the Websites tab. If you want to learn how to use DreamHost’s site builder, you can check out the website builder portion of the review here to get a detailed explanation of the process.
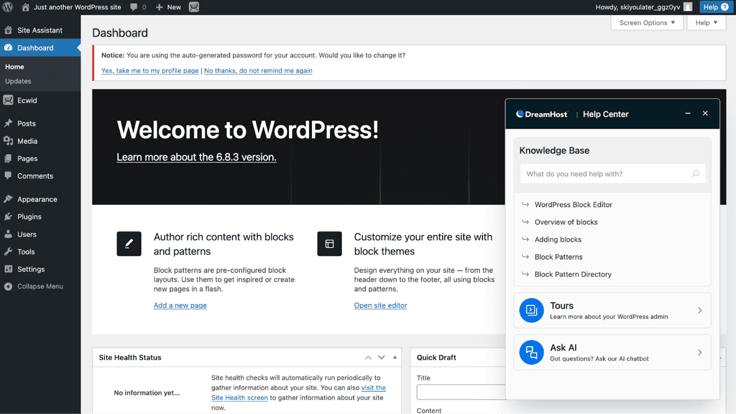
Another interesting tidbit of the DreamHost platform is that it also provides a nifty knowledge base/help center that follows you through the WordPress dashboard. So if you opt to use the WordPress site editor instead of DreamHost’s AI builder, you can easily find assistance along your web-building journey.
With DreamHost, you get the best of both worlds when it comes to server management, meaning you get a fully managed service and the option to self-manage your server.
That’s a huge plus, in my opinion, because it opens up dedicated hosting to every kind of user, from small business owners with little tech experience to tech-savvy developers. And those who have more expertise can control everything from the central motherboard, aka DreamHost’s server dashboard.
Through the server dashboard, you can make granular changes within your environment:
I can also access the command line and delve deeper into self-management by disabling the DreamHost team’s web server management and automated updates.
For more surface-level control, I can head to the websites tab of DreamHost’s dashboard panel to manage and track a variety of tasks and metrics, including these:
DreamHost offers an easy-to-navigate management system that can help save so much time when managing your hosting environment. To me, the dashboard is one of the most important aspects of a hosting plan because it’s your center of command, so DreamHost having such a streamlined setup is a huge bonus.
Now for the moment of truth. Just how fast are DreamHost’s dedicated servers? DreamHost impressed me with some strong outings when I tested the performance of its other plans. So to be honest, I’m expecting nothing less than excellence from its dedicated hosting — the highest tier of hosting.
And let’s just say, I wasn’t disappointed in the slightest:
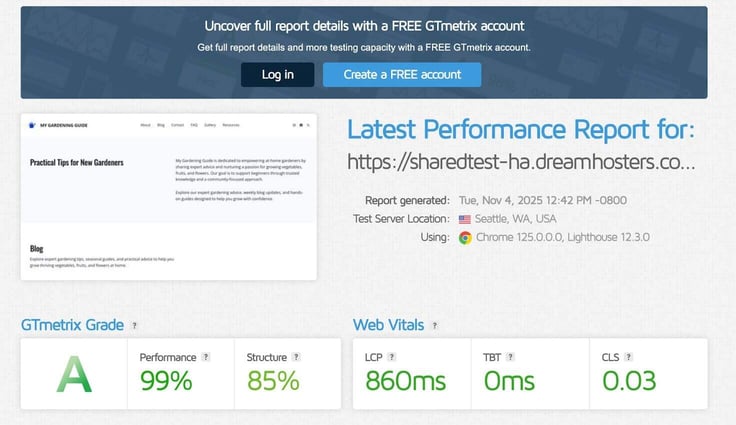
Its dedicated plan’s performance was right up there with its VPS plan’s speed, with the LCP clocking in at 860 milliseconds. While this is quite impressive, I must share this disclaimer: My site wasn’t the most content-heavy nor did it attract a ton of traffic. So keep in mind that these performance numbers may vary for a fully mature website and online business.
But overall, these test results are promising.
The answer is absolutely. While it is a bit pricier than some competitors, DreamHost knocks it out of the park on performance, ease of use, support, and value. It gives you control, a boatload of features, and flexibility, so you can do hosting your way, either self-managed or with support.
It’s not every day you find a web host that can make managing a dedicated server seamless and simple. For this reason, I highly recommend DreamHost’s dedicated hosting service to anyone seeking enhanced performance and reliable server management support.
I had several interactions with DreamHost’s customer support while I was reviewing it, and I can confidently say its representatives were extremely helpful.
When I had trouble with the AI site builder, one of the reps went through the process of building my site on their end. They sent me screenshots of each step and asked for my preferences throughout, which I thought went above and beyond.

My only quip was that it took a while to get an initial response (about 30 minutes). Compared to other hosts’ live chats, that’s pretty slow.
However, I try my best to judge support based on whether or not my issue was resolved, and I’m happy to say it was.
DreamHost also has a massive knowledge base of tutorials and articles, so if you prefer a more DIY approach to tech support, that option also exists.
Before we dive into the details of each plan, it’s worth zooming out on where DreamHost really shines and where it falls short. Overall, I was impressed by how easy it was to get started, how much value you get for the price, and how consistently fast my sites performed across multiple hosting tiers.
That said, a few key areas held it back from being perfect — namely, the buggy AI tools and longer-than-average wait times for live chat.
Here’s a quick look at the biggest pros and cons I found while testing DreamHost.
To sum up, I was thoroughly impressed by DreamHost’s dedication to making its platform as accessible as possible for users. I didn’t find myself tripping over plan details or getting lost on the platform once. The web host did an excellent job at making everything clear and providing assistance every step of the way.
Its dashboard was comprehensive and intuitive, the performance was superb, and the pricing was reasonable. The only areas I would point out for improvement were the support wait times and the consistency of its AI tools. Aside from that, I would definitely recommend DreamHost for its ease of use, intuitive interface, and inarguable value for all audiences.

HostingAdvice.com is a free online resource that offers valuable content and comparison services to users. To keep this resource 100% free for users, we receive advertising compensation from the hosts listed on this page. Along with key review factors, this compensation may impact how and where hosts appear on the page (including, for example, the order in which they appear). HostingAdvice.com does not include listings for all web hosts.
Our site is committed to publishing independent, accurate content guided by strict editorial guidelines. Before articles and reviews are published on our site, they undergo a thorough review process performed by a team of independent editors and subject-matter experts to ensure the content’s accuracy, timeliness, and impartiality. Our editorial team is separate and independent of our site’s advertisers, and the opinions they express on our site are their own. To read more about our team members and their editorial backgrounds, please visit our site’s About page.


