Guides

Studies 
Studies
Our studies cover a range of trending topics and deliver original, reliable data you can't get anywhere else on the web.
AccuWeb offers budget-friendly hosting with decent performance, but support gaps and technical friction could be dealbreakers for beginners.
By: Jack Wallen
Editor: Lillian Castro
Reviewer: Christian de Looper
Disclosure: When you sign up through links on our site, we often earn referral fees from partners. For more information, see our ad disclosure and review policy.
I’ve been using various hosting services for decades, and I’ve always found common denominators that connect them all. For example, most hosting sites work with cPanel. Why? Because cPanel is the de facto standard tool for building and managing websites.
cPanel is also fairly user-friendly. You don’t have to have admin-level skills to use it, as it’s mostly a point-and-click affair. Yes, there are certain aspects of cPanel that require a bit more knowledge than the average bear, but for the most part, anyone can deploy a website with cPanel (and the tools therein).
So, when I set out to test AccuWebHosting, I was glad to see that they stuck with the standards on the Cheap Hosting plan. As for the Windows VPS plan, that’s another story altogether (more on that later).
But how well does it fare compared to other hosting services I’ve tried? Let’s dive in and find out.
The Cheap Plan makes deploying a new website very easy, and it’s about as low as you can go price-wise without being free.
The cPanel/Softaculous combination is the best way to deploy websites.
Performance of the Cheap Plan is quite good.
Support has a lot to be desired.
The first thing that struck me when I first started my journey with AccuWebHosting was the starting price of just $1.99 a month. That’s unheard of, so I immediately decided to see what such a cheap plan entailed.
That plan is labeled as Cheap Web Hosting, and it includes the following:
The only thing that concerns me is the 500 MB of RAM, which really isn’t enough to run a site that gets even moderate traffic. However, there are two other budget plans that increase the RAM and other options.
GoSolo++ ($2.49/month) gives you:
Premium++ ($3.99/month) gives you:
For my money, the best option is the Premium++ plan because it gives you plenty of resources and free domain registration. Each plan also includes other features (such as LitSpeed Webserver, LSCache Plugin, and CloudLinux OS), which you can read about in this price/feature comparison.
And then you have the fact that you get 22+ years of web hosting experience, less than 11 minutes for support ticket request time, 1 million+ deployed/managed websites, and 100k+ VPS deployed/managed.
It all comes together to create an impressive package, especially given the price.
But how was the experience? Let’s get into it.
This is simple: Go to the plan/pricing matrix and click Add To Cart for the Cheap Web Hosting option (or whichever plan you choose).
The next step is to either register a new domain, transfer a domain, or use an existing domain.

Once you’ve taken care of that, click Continue, and you can then add ID protection for your domain ($8/year) and then check out.
You’ll receive an email with the account details. In that sign-up confirmation email, you should see an address that will take you to your cPanel instance, along with your login credentials. Go ahead and log in to cPanel and prepare to build!
Now we get to the good stuff… building your site. Before I dive into this, I want to first address an issue that popped up and remains unsolved.
My first attempt to build a site with AccuWebHosting was a WordPress site. Everything went according to plan. I was able to build the site via Softaculous as I’ve always done. Once the site was up, I went to access the WordPress admin panel and received a 404 error (site could not be reached). I dug around and realized it was a DNS issue. That’s where things started to fall apart.
With DNS, you should be able to log into cPanel, go to Domains > Modify the Zones, and point the domain to the proper DNS servers. When I checked, the domain was already pointing to the proper DNS servers, and yet the site wasn’t accessible.
I started a chat with support, only to find out real-time chat wasn’t available for the budget plan. The support specialist I was chatting with then gave me the email address for support. I sent off an email, and 20 minutes later was told my plan was “self-supporting”… so no help was to be found.
What does this mean? If your tech skills are limited, I would avoid the budget plan. Simple as that.
That’s also where AccuWeb starts to lose ground to budget-friendly competitors like IONOS. IONOS also competes aggressively on price, but it does a better job packaging entry-level hosting with the kind of support and recovery features that make life easier for beginners.
With that said, let me show what I was able to do to keep things moving forward.
From cPanel > Domains, there’s a box labeled “Additional Resources.” In that box, click Create A Site With Site Publisher.
You’ll then be presented with a list of templates to use. Keep in mind that these are fairly basic templates, so you’re not going to be creating anything complex.

Locate the template that you want and click on it. A new page will appear, where you must customize the site. Once you’ve taken care of that, scroll to the bottom and click Publish. After the site is published, you’ll see five links:

If you click the Manage my website’s files link, it’ll take you to the directory containing all the website’s files. From there, you can upload your own site or add to the current site. This is a very manual approach to building sites, so it’s not nearly as easy as using Softaculous to deploy a WordPress site.
Now, should you manage to get your DNS issues resolved (which will be easy if you purchase a domain from AccuWebHosting), here are the steps for publishing a WordPress site:
First, go back to the cPanel main page. Scroll down to the Software section, where you’ll see two important links: WordPress Manager by Softaculous and Softaculous Web Installer.
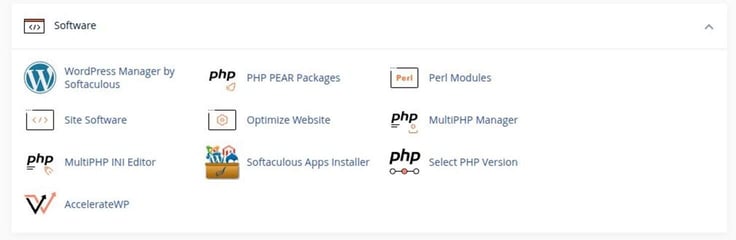
Since I’m going to walk you through building a WordPress site, click WordPress Manager by Softaculous.
The resulting pop-up lets you to select from several important plugins, including SoftWP, CookieAdmin, Backuply, SpeedyCache, SiteSEO, Loginizer, Pagelayer, GoSMTP, and FileOrganizer. One thing to keep in mind is that some of those plugins are marked as Pro (which you’ll find on the site configuration page), but they are automatically set to be installed.
Click the green Install WordPress button and you’ll find yourself on the site configuration page pictured here:
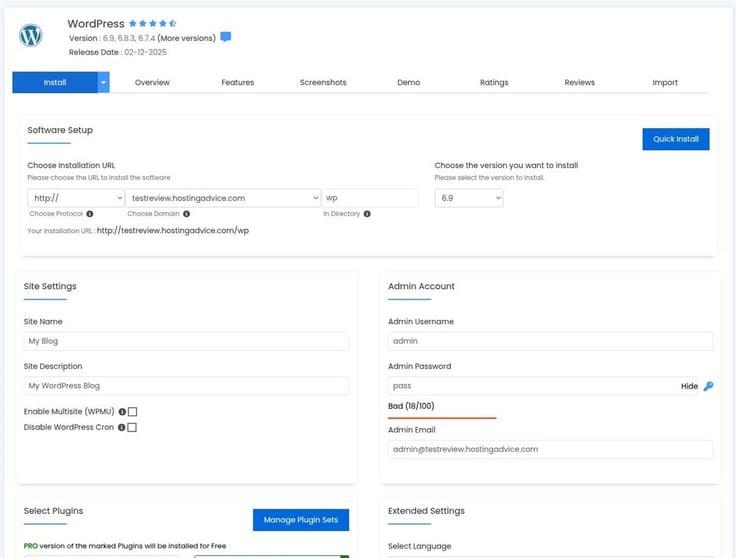
All you have to do is fill out the information and click Install (at the bottom).
One thing to keep in mind is that you must choose your installation URL, which will be the domain you purchased during account creation. Also, make sure you enter a valid email address for “Email installation details to:” so you will receive a copy of the configuration.
Click Install to begin the process. It’ll take 3-4 minutes for the installation to complete.
When the installation is completed, you’ll be greeted with the Congratulations page, where you’ll see two URLS:
Click the Admin URL and you’ll find yourself on the WordPress login page, where you’ll use the admin credentials you created during the site configuration. If you are presented with an error page, you’ll want to give the domain time to propagate (which can take up to 24 hours).
Congratulations, you just deployed your first WordPress site with AccuWebHosting.
To check how the new site performed, I used GTMetrix. The numbers from the tests are pretty impressive.

As you can see, the site scored fairly well. Keep in mind, however, that the site I was able to deploy was quite basic, so it’s bound to perform far better than a more complex site. Testing a single-page website offers little relevant information.
But I can say this: After building the simple site, I timed how quickly the page would render with several browsers and the average was 1.12 seconds. I then tested a more complex site, which rendered in 1.73 seconds.
If the most basic page renders in the same time as a far more complicated site, that does not speak too highly of AccuWebHosting’s budget plan.
Would I recommend AccuWebHosting’s budget plan? If the DNS issue can be solved, absolutely. If the DNS issue cannot be resolved, there’s no way I would recommend the budget plan to anyone.
Let’s see how well the next step up fares.
The VPS Plan is a different beast altogether. Where the budget plan gives you access to cPanel and Softaculous, the VPS Plan requires you to use a remote viewer to access a Windows Server instance.
What does that mean?
You need to have a solid understanding of Windows Server if you want to deploy and manage a website, which is not a viable option for anyone who is not technically proficient.
In other words, I would not recommend this plan to anyone who cannot manage Windows Server. With the necessary skills, you could wind up spending more time than you’d like just navigating the server and its tools. Although you might think that Windows 11 is easy to use, Windows Server is not a user-friendly operating system.
If you’re looking at AccuWeb’s Windows VPS primarily for flexibility, Kamatera is the more natural comparison. It offers the same general appeal of a customizable VPS environment, but it’s easier to recommend to readers who may want more scaling flexibility or a managed option instead of doing everything themselves.
If you don’t have a solid understanding of Windows Server, sign up for the Budget Plan and be done with it.
As a long-time Linux user, getting a website published with Windows Server was going to be a challenge. Hopefully, it’s one that I’m up to.
Signing up for the Windows VPS plan is simple. All I had to do was head over to the plan page and click View VPS Plans.
On the resulting page, select the plan you want to use, which ranges from the following:
After deciding on my plan, I clicked Add To Cart, checked out the summary, and proceeded with payment.

One caveat I ran into. After changing my mind about the plan, I backed out and then couldn’t find the shopping cart. When I added the plan I wanted, I discovered both plans were in the cart, so I had to remember to delete the original; otherwise, I’d have paid for both.
Another issue I ran into was that the Accuweb Hosting site was very slow during checkout. I verified that it wasn’t my computer by visiting other sites. The issue was indeed Accuweb’s website.
Once I successfully purchased the plan, I had to wait for the instructions on how to access my new Windows Server instance. Again, this requires a bit of tech know-how.
The first thing I had to do was access the Windows Server instance. To do this, I had to use an RDP client. If you’re unfamiliar with RDP, it stands for Remote Desktop Protocol, which allows you to log in to a desktop or server as if you were logging in locally.

After logging in, I was presented with the Windows Server desktop.
Let me demonstrate the process of deploying a WordPress site via Windows Server on the Accuweb Hosting VPS plan.
The first thing I had to do was install the IIS Server. This process is not easy.
To do that, I had to open the Windows Server Manager and click Manage in the upper-right corner.
From the resulting drop-down, I clicked Add Roles and Features and then clicked Next to begin the wizard. The remaining steps for this are:
The installation will take anywhere between 5 and 10 minutes. When the installation is complete, click Close to close the server manager.
Now that the web server is installed, it’s time to add the rest of the pieces.
Next, we have to install MySQL. To do this, download the MySQL installer for Windows from the official site. You’ll also need to download and install Visual Studio Code, and you can find the installer on the official site.
Once the downloads have completed (my download took nearly 30 minutes), open the file manager, navigate to the Downloads directory, and double-click the .msi file for VS Code, walk through the setup wizard, and then do the same for MySQL.
The installation of both is straightforward, so all I had to do was click through the wizard to complete the task.
Next, you have to install PHP, which is a bit tricky (sensing a theme here?). The important part of this installation is installing the correct version.
Before you lose your mind, let me give you a bit of advice. You can opt to install a pre-packaged WAMP (Windows Apache MySQL PHP) server by way of WAMPSERVER. Before you download that and run the installer, make sure you first install the Microsoft VC packages, found on the WampServer download site.
With this option, it’s just a point-and-click process, and you’re done. You’ll get all the bits and pieces you need to install WordPress, without having to deal with the mess above. The only confusing part is ensuring you get the proper VC packages installed. You have to make sure to install both the x86 and x64 packages.
Now that you have your WAMP server installed, make sure to start it by clicking the Start menu and navigating to WampServer64, and clicking WampServer64. That will start the server. You should then be able to open a web browser and point it to http://localhost. That will reveal the WAMP Server welcome page.

Now, download WordPress from the official site, extract the file (by right-clicking it in the file manager) into the Downloads folder. With the file extracted, you ned to move the newly-created folder to C:\wamp64\www.
You can rename the folder to whatever you like, or you can extract it into the “document root,” which (in Windows Server) is C:\wamp64\www.
So instead of having C:\wamp64\www\wordpress, all of the contents of the WordPress folder would live in C:\wamp64\www. I wouldn’t recommend extracting the WordPress file into the document root, as you’ll want to be able to access the WampServer welcome page to create your database.
You will then be presented with the WordPress installation wizard, which is fairly straightforward.
However, there’s still one important step you must take… creating your database. You cannot use WordPress without one, and that’s why we installed MySQL (via WampServer).
Go back to the WampServer welcome page (http://localhost), where you’ll see a link for phpMyAdmin. Click that link, and you should find yourself on the phpMyAdmin page. Log in with the user root and a blank password. On the resulting page, click New in the left sidebar.

Next, go to New > User Accounts and click Add user account. This will create a new account with access to the new database.

I named my user “wordpress,” gave it a strong password, and made sure to check the boxes for “Create database with the same name and grant all privileges” and “Grant all privileges on wildcard name.” Scroll down and check the box for Global privileges.

Finally, scroll to the bottom and click Go.
Now, it’s time to go back to the WordPress installation wizard.
The reason you had to go back and create the database is that WordPress requires a database. When you reach the database portion of the installation, fill in the details with the database name, username, and password. You can leave the host and Table Prefix as is. Click Submit when finished.

On the next page, click Run the installation. You will then be asked to fill out information about your site, such as the Site Title, Admin Username, Admin Password, Admin Email, and click Install WordPress.

Your site should install fairly quickly, and you’re done. If you go to http://SERVER/NAME (Where SERVER is the IP address or domain of your site and NAME is what you renamed the WordPress directory), you should see your new site ready to be customized.

And there you go! You have a running WordPress instance installed on Windows Server via the AccuWeb VPS Hosting plan.
This is where things fell apart for me. After getting everything up and running, I went to test my newly deployed site, only to find that GTmetrix couldn’t access it. I dropped every firewall on Windows Server to no avail. No matter what I did, I could not run the necessary tests.
That led me back to customer support, which I’d had to use prior to testing the Windows VPS account. What I found was that the AccuWebHosting support is seriously lacking. When there were DNS issues (which I ran into with both account types), support was unable to help because they claimed the domain was purchased from a different service.
The odd thing about this was that I couldn’t access the site via domain or IP address, which makes it clear that it’s not strictly a DNS issue. Even so, support was unable to help.
Of all the web hosting services I’ve used over the years, AccuWebHosting ranked at the very bottom.
Through my weeks of testing the service, there were some notable advantages and disadvantages of the host compared to other services I’ve used:
After dealing with AccuWebHosting for a few weeks, my conclusion is this: If you have a good deal of tech skills, AccuWebHosting isn’t a bad service. However, it’s not an overly good service either.
Although the Cheap Plan makes it easy to deploy a WordPress (or other) site, and even performs well, the Windows VPS plan is far too problematic, especially for those without a good deal of Windows Server skills.
AccuWeb can work if you’re comfortable solving problems on your own, but readers who want low-cost shared hosting with stronger safety nets may find IONOS easier to live with, while those shopping for a more flexible Windows VPS setup should also look at Kamatera.
I’ve used a lot of web hosting services over the years, and would probably rank AccuWebHosting near the bottom of the pack. It’s not terrible, and it’s not without its benefits, but for those looking for a service that makes it easy to use and can help you grow your site, this is not the place to be.

HostingAdvice.com is a free online resource that offers valuable content and comparison services to users. To keep this resource 100% free for users, we receive advertising compensation from the hosts listed on this page. Along with key review factors, this compensation may impact how and where hosts appear on the page (including, for example, the order in which they appear). HostingAdvice.com does not include listings for all web hosts.
Our site is committed to publishing independent, accurate content guided by strict editorial guidelines. Before articles and reviews are published on our site, they undergo a thorough review process performed by a team of independent editors and subject-matter experts to ensure the content’s accuracy, timeliness, and impartiality. Our editorial team is separate and independent of our site’s advertisers, and the opinions they express on our site are their own. To read more about our team members and their editorial backgrounds, please visit our site’s About page.


