

I once built a website for a local high school that required separate WordPress dashboards for each department. That’s because the science department would need its own website and users, separate from the math and social studies departments. But the school administration still wanted to manage all these sites from one dashboard.
That’s where WordPress Multisite came into play.
I like to think of WordPress Multisite as the corporate office that brings everything under one roof. Multisite saves me from having to install plugins over and over, and it allows me to manage all my sites from one dashboard. There’s no need for a dozen login credentials.
That’s why I love it for publishers with multiple blogs, and for organizations with multiple departments, like schools, agencies, franchise businesses, and NGOs (non-governmental organizations). If that sounds like you, follow along as I show you how to set up WordPress Multisite on Bluehost in just a few steps.

Before You Start: Subdomains, Subdirectories, and Limitations
Every Multisite installation must use subdomains (site1.example.com) or subdirectories (example.com/site1).
Your options depend primarily on the age and location of your WordPress installation:
- Newer WordPress installations: If your installation is less than a month old, you can generally choose between subdomains and subdirectories.
- Established WordPress installations: If your installation is more than a month old, WordPress typically requires you to use subdomains. This restriction helps prevent conflicts with existing permalinks.
- WordPress installed at a URL containing a path: If your WordPress URL looks like example.com/wordpress rather than example.com, you generally cannot select a subdomain-based network through the standard setup process.
If you’re converting an established site, complete a full backup before enabling Multisite. The setup process requires editing important configuration files, and changing the network structure later can be complicated.
Here are more details on how subdomains and subdirectories work:
| Structure | Example URL | Best For |
|---|---|---|
| Subdomains | site1.example.com ••• mail.[yoursite].com shop.[yoursite].com | Networks whose sites should appear distinct, established WordPress installations, and networks prepared to configure wildcard subdomains. |
| Subdirectories | example.com/site1 ••• [yoursite].com/mail/ [yoursite].com/shop/ | Newer WordPress installations, simpler setups, and networks whose sites should remain visibly connected to the main domain. |
Subdirectories are generally easier to configure because they don’t require wildcard DNS. Subdomains, however, make each network site look more independent and may be the only standard option available when converting an established WordPress installation.
For this tutorial, I’ll primarily cover subdomains, including how to configure wildcard DNS in Bluehost. I’ll also briefly explain how the setup differs if you choose subdirectories.
How to Set Up WordPress Multisite on Bluehost with a Subdomain (site1.example.com)
In this section, I’ll show you how to set up WordPress Multisite on Bluehost using subdomains, which create URLs such as site1.example.com.
Subdomains are a useful choice when you want each network site to have a distinct identity while still managing everything through one WordPress installation. They can work particularly well for organizations with separate departments, locations, publications, or services.
A subdomain-based network requires some additional configuration, including wildcard DNS. It may also be the only option WordPress offers through the standard setup process if your installation is more than a month old.
Before proceeding, though, I need to walk you through the prerequisites for setting up WordPress Multisite on Bluehost.
Bluehost Features & Pricing
Prerequisites (Do These Before Starting)
Here’s what you need before creating a Multisite network with subdomains:
- An active WordPress installation: You can’t add Multisite to a non-existent website.
- A main domain name: You should already have this paid for and ready to manage on your Bluehost dashboard.
- An active SSL certificate: Bluehost already includes an SSL. Make sure it’s enabled. Just keep in mind you may need to enable it for new subdomains later.
- Deactivated Bluehost Cloudflare integration: Your Bluehost account might already have Cloudflare active. During my setup, the integration prevented my Multisite subdomains from resolving properly, so I recommend temporarily deactivating it before starting this process.
How to deactivate Cloudflare:
In Bluehost, go to Websites and select your desired website. Click the Performance tab.
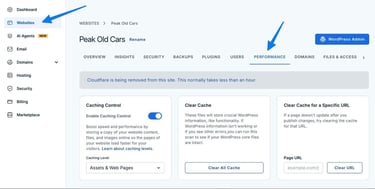
Switch the Cloudflare toggle to Off.

This may take a few minutes to register, but you can still continue with your WordPress Multisite setup in the meantime.
Note: Once your Multisite network and subdomains are working, you can reactivate Cloudflare with the appropriate wildcard DNS and SSL settings. If you encounter problems, contact Bluehost or Cloudflare support for help configuring the integration.
Step 1: Allow WordPress Multisite in Your wp-config.php File
You first need to “allow” WordPress Multisite by modifying your wp-config.php file. This doesn’t necessarily turn on Multisite, but it tells WordPress you’d like a wizard placed on the dashboard to begin installing it.
Since we’re completing this entire process through Bluehost, log in to your Bluehost dashboard, then click on the Websites tab. Find the website you want to use for the admin of your Multisite configuration. Click Manage next to that website.

Go to Files & Access. Click Manage in the File Manager box.

That opens the Bluehost File Manager, which should send you directly to the public_html section of the website you selected. If not, navigate to that folder. Inside the public_html folder, look for the wp-config.php file. Right-click on the file and select Edit.

You’ll receive a message to back up the file. We already did this, so just click the Edit button to proceed.

In the file, look for this line:
/* That’s all, stop editing! Happy publishing. */
Right before that line, paste in this bit of code:
define(‘WP_ALLOW_MULTISITE’, true);

When you’re done, click the Save Changes button. After that, click the Close button.

This unlocks what’s called the Network Setup wizard inside your WordPress dashboard. It’s a hidden feature that comes with every WordPress installation. I suggest refreshing your WordPress dashboard to ensure it takes. Then, jump to the next step to continue with the Network Setup configuration.
Step 2: Set Up Your WordPress Multisite Network
Now you can find the previously hidden Network Setup tool. In your WordPress dashboard, you’ll see a brand new tab by going to Tools > Network Setup. Click on Network Setup to proceed.

Chances are, you already have plugins installed on your WordPress website. If so, you’ll see a warning to deactivate your plugins before enabling the Network feature. Otherwise, you can’t continue. Click on the link, then walk through the process of deactivating your plugins before coming back to this page.

With your plugins deactivated, you can go back to the Network Setup page to begin adding Multisite. You’ll see a few network details to confirm:
- Subdomain installation: We opted to add Multisite to an old WordPress installation. That means we must use subdomains for this Multisite instance.
- Server Address: Multisite uses the domain name of your current website as its server address. It’s like the main hub for your entire Multisite installation.
- Network Title: Make this something that relates to your entire network.
- Network Admin Email: The email address used for accessing your entire network.
Click the Install button when you’re done.

WordPress instantly generates several code snippets for you on the next screen. Be sure to keep this page open, because you’ll need to use these codes in the next step.
Option 2: Install WordPress Multisite Using Subdirectories
At this point, you may wonder how to use subdirectories within WordPress Multisite. Even though I generally don’t recommend it, I understand there are some instances where subdirectories may work better.
If that’s the case, there are two ways to activate subdirectories:
- Your WordPress installation must generally be less than a month old to select subdirectories through the standard Network Setup screen.
- You must use subdirectories if your WordPress URL contains a path, such as example.com/wordpress, because the standard setup process does not support a subdomain-based network in that configuration.
Either way, you’ll walk through the same steps I’ve already outlined to install the Multisite wizard. When you reach the “Create a Network of WordPress Sites” page, you may see the option to choose between subdomains and subdirectories. WordPress may limit your options based on the age and URL structure of your installation.

Note: Using subdirectories also means you can skip the step where you add a wildcard DNS record.
Step 3: Update wp-config.php and .htaccess Files With Your Network Settings
To finish your Multisite installation, you must update two files: wp-config.php and .htaccess. The current screen on your WordPress dashboard shows code snippets you need to put into those files. Having said that, please take care by following my instructions below, as putting the snippets in the wrong place could break your website.
For wp-config.php:
Open wp-config.php again in Bluehost. You can do this in the Bluehost dashboard by going to the Websites tab, clicking Manage for your website, then going to Files & Access and Manage under File Manager.
Find this line, the one you added in Step 1:
define(‘WP_ALLOW_MULTISITE’, true);
You want to replace that line with the entire block of code given to you in the WordPress dashboard. So, copy the block designed for wp-config.php.

Paste it in wp-config.php to replace this line.
define(‘WP_ALLOW_MULTISITE’, true);
Right before this line:
/* That’s all, stop editing! Happy publishing. */

Click to Save Changes. Stay in the File Manager to edit the .htaccess file next.
For .htaccess:
Inside the Bluehost File Manager, you’ll want to open the .htaccess file. You’ll probably notice that you can’t find it. That’s because it’s hidden by default. To unhide the file, click on Settings in the File Manager.

Check the box to Show Hidden Files. Click Save.

You should now see the .htaccess file. Right-click the .htaccess file and select Edit.
Note: You may see some other renditions of .htaccess, like .htaccess.lock-######. Disregard these.

This one is a little trickier than the other file. You need to replace some bits of code with the code snippet provided in your WordPress dashboard.
Here’s what to look for:
<em><IfModule mod_rewrite.c></em><em></IfModule></em>
Look between those lines. Go through and delete these parts only:
RewriteEngine On
RewriteRule .* – [E=HTTP_AUTHORIZATION:%{HTTP:Authorization}]
RewriteBase /
RewriteRule ^index\.php$ – [L]
RewriteCond %{REQUEST_FILENAME} !-f
RewriteCond %{REQUEST_FILENAME} !-d
RewriteRule . /index.php [L]
Leave everything else that’s not included in what I just showed you.

Then copy the code snippet given for .htaccess inside WordPress.

Paste it between those two lines, exactly where that previous code was located. But don’t overwrite any code that was left between those lines.

Click to Save Changes and Close. You won’t need the File Manager anymore.
Step 4: Access the WordPress Multisite Admin Dashboard
You must now log out of your WordPress dashboard, then log back in. That’s the only way to put these network changes into effect. You can easily log out of your WordPress dashboard, then go back into the Bluehost dashboard and click WordPress Admin next to your site to log back in without a password.
Here’s where it starts to get exciting. You now have a Network Admin section to manage your WordPress Multisite environment. You’ll see a My Sites button at the top of your dashboard. Hover over that with your mouse. The dropdown menu reveals a list of your current sites along with a Network Admin tab.
Hover over the Network Admin tab to show all the options you have for managing your WordPress Multisite installation.

This is the control center of your WordPress Multisite operation.
Here, you can:
- Add and manage Sites
- Create and manage Users
- Install Themes
- Install Plugins
- Manage Settings
Your original site still exists. Nothing has changed there. But it’s also the primary site within your WordPress Multisite network.
Step 5: Allow New Users on Your Multisite Network
Before adding new sites to your network, go to Network Admin > Settings. You have several options to control certain settings like upload space, registration settings, and site settings, all of which you can customize as you please.
The most important setting to adjust, however, is the registration settings.
You may very well want to disable new registrations. If that’s the case, leave it set to “Registration is disabled.”
If, however, you would like to register new users on your network sites, check the box for “User accounts may be registered.” Depending on your sites, you may also want to let site admins add new users under the Add Users area.

Although every network varies, I warn against letting logged-in users register new sites. You usually don’t want random users adding new sites to your network.
Step 6: Add a New Site to Your WordPress Multisite Network
To add a new site in Multisite, go to My Sites > Network Admin > Sites > Add Site.

The Add Site page asks you to fill in multiple fields:
- Site Address: This is where you pick the URL subdomain of your new website. So, you might pick something like support (support.example.com), shop (shop.example.com), or math (math.example.com).
- Site Title: Name the site for your own reference, to find it within your WordPress admin dashboard.
- Site Language: Each site on your network could have a different language if needed.
- Admin Email: The administrator of this particular site. This could vary from the super admin of the entire network.
Click Add Site when you’re done.

Now you can go to My Sites > Network Admin > Sites to view all sites within your Multisite network. As an example, I added two sites to my network, one for support and another to run a separate shop.

When you hover over these sites, you’ll see more links to manage each one. You can go to the Dashboard for each site or click on the Visit link to view the frontend.

There’s one problem, though. You’ll most likely see an error if you click either of those links.

That’s because you still need to set up a wildcard DNS record and a subdomain in Bluehost. I’ll show you how to complete both of those in the next step.
Step 7: Add a Wildcard DNS Record and Set Up Subdomains in Bluehost
Let’s start with the wildcard DNS record, which points any subdomain we create to your main server IP:
- Go to your Bluehost dashboard
- Navigate to Domains > DNS
Note: If you have multiple domains on Bluehost, be sure to pick the right domain before going to the DNS tab.

You’ll eventually add a new record in this section. That record will point to your server’s IP address, so you need to find that.
Here’s how:
- Locate the A record with a host value of @.
- Copy the IP address associated with that record.
It’s your main server IP.

Click the Add Record button.

Here’s how you’ll fill out the new record:
- Type: Make this an A record.
- Refers To: Choose the Other Host option.
- Blank field for Other Host: Insert *.example.com, except replace it with your domain name. The asterisk before the dot generates a wildcard DNS record, which points any subdomain of your main domain to the same server.
- IP field: Paste in the IP address from your server that you copied before.
- TTL: Leave the default or make it shorter. The DNS propagates faster with a shorter time frame.
Click Add to complete the process.

You’ll see a new record in your DNS list. This record could take up to 24 hours to propagate. In my experience, it only takes a few minutes to an hour, but there’s a chance it takes longer.
Next up, you also have to add the new subdomains to cPanel so your server knows what to do with them when someone types them into their browser.
Go to Websites in Bluehost and select the right site. Under Overview, find the CPANEL button. Click on that.

Scroll down in cPanel to find the Domains section. Click “Domains” just below it.

Click to Create A New Domain.

There’s no need to type in every subdomain you plan to make. Instead, put *.example.com in the Domain field. This covers every current and future subdomain for your Multisite configuration.
Click Submit.

Again, you may have to wait a few minutes for the new domain names to propagate. But with the new DNS records and all potential subdomains added to your cPanel, you should now be able to visit your sites.
Step 8: Open and Test Your Network Sites
The final step is to click Dashboard or View for each of your network sites. The View button leads you to the frontend of each site, while the Dashboard link brings you to its own separate WordPress dashboard.

For example, I have a separate dashboard for my shop, allowing me to build a completely different website and do things like write blog posts separate from any other websites on the network.

If you see a browser message that the “https version of your site is not secure,” be sure to resolve SSL coverage before launching your website or entering any sensitive information, as this is a security risk to you and your visitors.
Your Future with WordPress Multisite
With WordPress Multisite ready to roll, you have the potential to control an entire network of sites from a single control center. I’ve implemented Multisite for schools, but it’s also a useful option for segmented organizations that still need some form of connection.
There are many organizations that benefit from a multisite, such as a police and fire department in one town. A franchised business with different managers at different locations, or even different highly specialized departments within one business, might need their own websites, but also require control under one dashboard.
Give one to your marketing team to use as a sandbox for A/B testing, marketing emails, and site funnels. They can create what they need without affecting the code on your main site.
Moving forward, you have so much potential with WordPress Multisite. You can install a plugin across 50 websites in one click. You can generate a template theme for all websites on the network. Or you might get creative with users, where people can access all of your network sites or just a few.
It’s your empire, and if any questions come up, we’re here to help. You can use our smart tool HostHelper™ to instantly access accurate, expert-backed answers drawn from thousands of in-depth guides and reviews.
Be sure to give our social media a follow, too! It’s full of useful tips and short videos for entrepreneurs, web devs, and all your tech tips. Good luck!