


I like to think of OpenClaw as a secretary that completes tasks for you but never sleeps. A regular AI like Claude or ChatGPT can answer questions: What’s the weather? Can you plan a trip for me to Barcelona?
But OpenClaw takes AI a step further.
I’ve been using OpenClaw to manage everyday tasks like scheduling on my calendar, running scripts, and clearing out my old emails.
All of that happens by giving OpenClaw orders through my phone using chat apps like WhatsApp and Telegram.
What’s great is that OpenClaw is a self-hosted platform, so you can install it on a server, like how I’ve installed mine on a cloud VPS from Kamatera, to keep it online and under your control at all times. Keep reading as I walk you through how to deploy OpenClaw on Kamatera for one of the most powerful AI assistants available.

Gather Your Accounts — What You Need to Start
Before starting this process, I recommend you get the following prerequisites:
- A Kamatera account: You can get one at Kamatera.com.
- A messaging app account: Preferably Telegram or WhatsApp (I’ll use Telegram for this tutorial).
- An AI provider with access to an API key: I’ll use Claude for this tutorial, but ChatGPT works well, too.
I also want to note that you’ll be running commands in a Terminal for this process. You’ll feel more comfortable if you have some Terminal experience, but I’ve made the process easy enough for virtually anyone to understand how to do it.
Keep in mind that you don’t have to download or install OpenClaw separately. It’s included as an app when you add a server in Kamatera.
 | ★★★★★ /5.0 |

- Deploy OpenClaw close to your users across 20+ global data centers
- Scale vCPU and RAM instantly on demand
- Full root access, completely configurable
- Only pay for the resources you actually use
- Get started with OpenClaw on Kamatera»
| Starting Price/Mo. | $6.00 |
Step 1: Make a Cloud Server on Kamatera to Host OpenClaw
Kamatera, a cloud infrastructure provider, lets you rent a server to host OpenClaw. It’s a little different from a traditional hosting company like SiteGround or Bluehost in that you get “raw” server resources to manage however you see fit.
This server route is affordable and more flexible. As you will see, it’s the perfect choice for a tool like OpenClaw when compared to a rigid interface like Bluehost. Bluehost is highly reputable, but it’s mainly designed for installing websites.
With Kamatera, you can create a VPS (Virtual Private Server) within seconds. During that process, you install OpenClaw as an app on your server.
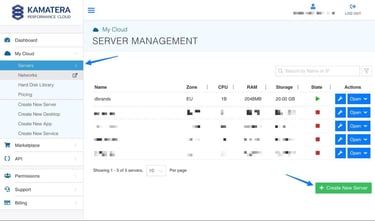
So, head to Kamatera.com and create an account. There’s a free trial for new users. Once inside the Kamatera dashboard, generate a new server by going to My Cloud > Servers, then click “Create New Server”.
Choose the zone closest to your location.

Next, under the Choose An Image section, select the Apps Images tab.

That reveals a wide range of apps you can automatically install on your Kamatera server. Scroll down the list to select the OpenClaw option.

Be sure to select the most recent version of OpenClaw before proceeding.

The next section asks you to choose your Server Specs.
I suggest using these settings: Type “B – General”, 2 Cores CPU, 4 GB RAM, and 30 GB SSD.
| Setting | Recommended Value | Notes |
|---|---|---|
| Type | B – General | Perfect for small OpenClaw workloads; upgrade when necessary |
| CPU | 2 Cores | You should be fine starting with 2 GB but you can always upgrade |
| RAM | 4 GB | OpenClaw could struggle with just 2 GB, so opt for 4 GB |
| SSD | 30 GB | Provides enough storage for OpenClaw’s files and room to grow |

Here are some other settings to consider:
- Daily Backup: Turn it on. It’s not necessary for OpenClaw to work, but it provides a solid safety net.
- Management Services: There’s no need for this right now.
- Networking: Leave the Public Internet Network set to on. This provides a public IP address for SSH later on. You can leave the Private Local Network off.
- Advanced configuration: Skip this.
- Password: Make a strong one and remember it for later. This is the password to access your server.
- Servers: Leave this set at 1.
- Name: Call your server something you’ll recognize.
- Power On Servers: Leave this on so your server starts right after you create it.
Click Create Server and walk through your payment information. As Kamatera provisions your server, it’ll create a public IP address for that server. You’ll use it later.
Step 2: Find Your New Server
In the Kamatera dashboard, go to My Cloud > Servers. This is where you’ll find your new server, named whatever you named it before. Mine is called “dbrands.”

You’ll come to this area when you need to find the server IP address.
You can also complete a variety of other tasks like adding a new hard disk, setting permissions, and changing your server password. It’s also how you’ll access your OpenClaw dashboard, which I’ll explain in the next step.
Step 3: Access Your OpenClaw Dashboard
We already created a Kamatera server with OpenClaw installed on it. So, how do you access OpenClaw to, you know, use it?
Kamatera automatically generates a URL for your OpenClaw dashboard. This way, you can manage OpenClaw directly from your browser. To access this dashboard, go to My Cloud > Servers in Kamatera. Select your server, then click on the Open button underneath the Actions column.

Under the Overview tab, you’ll find a section for Public Internet IP (WAN). This area shows your IP address and a Hostname. The Hostname is the URL for your OpenClaw dashboard. Click the Copy to Clipboard button to proceed.

Paste that URL into your browser and hit Enter. If your browser claims it’s an unsafe website, just click to continue. This will open your OpenClaw dashboard.

There’s a good chance you’ll see an error or two saying “origin not allowed.” I’ll explain how to remove this in the next step.
Step 4: Allow Your Browser to Link to the OpenClaw Gateway
The “origin not allowed” error is just a security setting that tells OpenClaw which URLs are able to use its gateway dashboard. So, we need to tell OpenClaw that your browser is safe.
Here’s where you’ll use the Terminal. Either open your Windows or Mac Terminal to connect to your server via command line. I’ll be using the Mac Terminal for this tutorial.
- For Mac, press Command+Space and type “Terminal” > return.
- For Windows, press Windows key > type “wt” > press Enter.
To begin, run this command to connect to your server:
ssh root@YOUR.IP.ADDRESS
Be sure to replace the “YOUR.IP.ADDRESS” part with your actual server IP, which can be found by going to My Cloud > Servers in Kamatera. You then select your server, click Open, and copy the IP address next to Public Internet IP (WAN).
![macOS Terminal zsh shell window showing an SSH connection command being typed as 'ssh root@113.[redacted IP]' with the last login timestamp Thu Apr 30 11:30:12 displayed above](https://www.hostingadvice.com/images/uploads/2026/05/Deploy-OpenClaw-on-Kamatera_9.jpg?width=375&height=127 "macOS Terminal zsh shell window showing an SSH connection command being typed as 'ssh root@113.[redacted IP]' with the last login timestamp Thu Apr 30 11:30:12 displayed above")
Type or paste in your password (the one you made when you created your Kamatera server), then click Enter. This should now show information about security pairing.

Run this command:
openclaw configure –section gateway

Using your arrow keys, choose that you’d like to run the gateway on a Local machine.

Scroll down with the arrow keys to the LAN (All Interfaces) option. Hit Enter to choose it.

You’ll then select the Token option.

We don’t need Tailscale, so mark that as Off and press Enter.

Choose the option to Generate/store plaintext token.

This shows your existing token. Don’t change it. Just click Enter. You’ll use this token later, so feel free to copy and save it somewhere safe.

You’ll now see a Configure Complete message. That’s good, but our process isn’t over just yet.

Restart the gateway with this command in your terminal:
systemctl –user restart openclaw-gateway
This helps ensure that the new LAN setting takes effect and we can access the gateway though your browser.
While still logged into your server in the terminal, open the OpenClaw JSON file with this command:
nano ~/.openclaw/openclaw.json
This opens up your openclaw.json file in the terminal. Find the “allowedOrigins” section. We need to add your xip.com hostname (the URL for accessing the OpenClaw dashboard) to this list.

Using the arrow keys, put the cursor right at the end of “http://127.0.0.1:port#”. Add a comma, then hit Enter to make a new line.
Add your hostname. Remember, you can find this in Kamatera by going to My Cloud > Servers. Then you select your server, click Open > Overview > Public Internet IP (WAN). Copy your xip.com hostname from there.
The JSON section should look like this when you’re done:
“allowedOrigins”: [
“http://localhost:18789”,
“http://127.0.0.1:18789”,
“https://YOUR.IP.ADDRESS.server-xip.com”
]
Note: Make sure it includes the “https://” at the beginning.
To save your changes, press CTRL + X, then Y, then Enter.
Restart your gateway with this command in the terminal:
systemctl –user restart openclaw-gateway
Now we need to find your OpenClaw Gateway Token and paste it into the OpenClaw dashboard.
To do this, run this command in your terminal:
cat /etc/update-motd.d/98-description
That reveals your dashboard URL and its token below it:
https://YOUR.IP.ADDRESS.eu-cloud-xip.com/?
token=YOUR_TOKEN_HERE

Copy that token (not including the quotation marks) and go back to the OpenClaw gateway dashboard.
Go to Overview and find the Gateway Token field. Paste the token here and click Connect.

You should now see an error that you still have to pair your device. To do that, run this command in the terminal:
openclaw devices list
What happens next is a little tricky. The terminal displays all the paired and requesting devices. You’re looking for the device with an IP address, one that probably says ”just now” under Age. Ideally, you only have one to choose from under the Request box. You can ignore everything in the Paired section.
Now, you need to copy the code listed underneath the Request column for that device.

Then put it at the end of this command, only replacing the “replace-this-entire-code-here” with the code from the Request column.
openclaw devices approve replace-this-entire-code-here
Click Enter to run the command.
You may see some errors, but that’s okay. As long as you see an Approved sign, you’re good to go.

Now jump back to your OpenClaw gateway dashboard. You should see a green OK in the Status area, along with no errors showing anymore.

OpenClaw is now fully accessible on your Kamatera server! Feel free to update the version if that’s available.
Step 5: Link Your AI Provider
OpenClaw gets its AI power by connecting to one of many AI providers like OpenAI or Claude. You only have to set this up once in the Terminal. I’ll use Claude, but show you where you can pick from many other options.
To begin, run this command in the terminal.
openclaw configure –section models
Using the arrow keys, choose to run a Local machine. In the next list, choose Model.

That delivers a long list of AI providers. I’ll go with Anthropic (Claude), but as you can see, you can select dozens of other AI providers.

For the next step, choose the Anthropic API Key as your authorization method. You’ll want to opt for the API key for most AI providers.

The API key acquisition process depends on your AI provider. OpenAI, for instance, has a separate API page to find your key. Claude has you create API keys through its console. Here, you can click Get API Key. Just make sure you’ve already purchased credits on your account.

You’ll then create a Key Name for your API key. Choose your main Workspace, then click the Create API Key button.

Copy the API key provided in the next step.
Important: It won’t ever show again, so you’ll want to store it in a safe space or transfer it over into your terminal right away.

Go back to your terminal. It should say to Enter Anthropic API Key. Paste in the key and hit Enter.

You should now see a message that says “Model Configured” with the default model it used.

Keep hitting Enter to navigate to the end of the wizard. If you see another menu, just go down to Continue and select that. The goal is to get to a point where you see “Configuration Complete.”
After that, run this command to restart your gateway:
systemctl –user restart openclaw-gateway
Step 6: Connect a Messaging App like Telegram or WhatsApp
The final piece in how to deploy OpenClaw on Kamatera is to connect a messaging app. This messaging app is how you’ll communicate with OpenClaw and your AI provider. Think of it as the frontend interface where you tell it what to do while Claude and OpenClaw work in the background to complete those tasks.
I’ll connect to Telegram for this tutorial, but you might also choose something like WhatsApp.
Begin by opening Telegram on your phone or computer. You can download the app and sign up here if you haven’t made an account yet.
You must create a bot before anything. To do so, search for the @BotFather user in the Telegram search bar. This bot simply helps you make your own personal bot for future use. Open BotFather and click Start.

BotFather provides a list of commands you might try, but the only one you really need right now is /newbot. Type that into the chat and submit it.

BotFather then asks you to choose a name for your bot. Go with anything you want. I opted for “My Assistant.”
The tricky part is creating a username. You must end your username with the word “bot.” You also must make a completely unique username for it to work. So, keep asking for usernames until you find one that’s available. Once you do, BotFather displays a success message with the link to your new bot and its token.

Copy that token.

Go back to your terminal and run this command:
openclaw configure –section channels.telegram
Choose Local, then Channels.

Under Channels, pick the Configure/link option.

The next screen shows every messaging app you can link to OpenClaw. I’ll go with Telegram, but you might choose other apps like WhatsApp or iMessage.

Scroll down to Use local plugin path using the arrow keys. Hit Enter.

Up next, pick the option to Enter Telegram bot token.

You’ll see a field to Enter Telegram bot token. Paste in that token you copied from before.

After hitting Enter, you should see a DM access warning message. This means that if anyone finds your bot they can send it messages. We don’t want that. So, you’ll fix it in the next few steps. But first, scroll down to select Finished.

Now you’ll see an option to Configure DM access policies. That’s referring to the error about how anyone can access your bot. So, choose Yes.

Select Pairing on the next step.

You’ll see some messages about how the config is overwriting JSON files to secure your bot. Once it’s done, select Continue from the list.

To finish it all off, run this command to restart the OpenClaw gateway:
systemctl –user restart openclaw-gateway
Step 7: Test Your New Telegram Bot
It’s time to test out if your Telegram bot is functioning and working with OpenClaw and Claude. Back in Telegram, click the link for your new bot.

That starts your bot.
The next message means that Telegram is communicating with OpenClaw. We just need to approve the pairing. To do so, copy that command shown at the end of the message. Including the code, paste the command into your terminal and hit Enter.

In the terminal, you should see a little message that says Approved.

Write a message to see if the bot works. Anything at all:
- What’s the weather in [your town]?
- What can you do?
- Search the internet for [insert topic].
Keep in mind that it may take a few minutes for the bot to complete its approval process through Telegram. I had to wait about six minutes before it started replying to my inquiries.

Your OpenClaw Deployment Is Ready for Use Through Telegram
Right now, anything you send through Telegram goes through OpenClaw and Claude to produce fairly standard AI responses. This is just the start with OpenClaw. The goal is to link even more apps and programs, things like your web browser, Google Calendar, your email, and cron jobs.

That way, OpenClaw becomes a true AI assistant that runs commands or schedules appointments or even cleans out your email. You’ve built the foundation, now you’re able to expand it however you want.
Final Thoughts on OpenClaw
Moving forward, I highly recommend tapping into the OpenClaw community — through places like Discord and GitHub — if you have any questions along the way. I also find the OpenClaw documentation (docs.openclaw.ai) helpful for all of your next steps.
There, you’ll discover tutorials for connecting dozens of integrations like Gmail, your calendar, and GitHub. Between the docs and the highly-engaged OpenClaw community, you’ll have everything you need to keep building on OpenClaw.
Thank you for reading this guide and trusting HostingAdvice to guide you through the process. Don’t forget to use our HostHelper™ tool to discover further reading and answer any hosting questions!
We’ll see you on social media. Give us a follow below!
HostingAdvice.com is a free online resource that offers valuable content and comparison services to users. To keep this resource 100% free, we receive compensation from many of the offers listed on the site. Along with key review factors, this compensation may impact how and where products appear across the site (including, for example, the order in which they appear). HostingAdvice.com does not include the entire universe of available offers. Editorial opinions expressed on the site are strictly our own and are not provided, endorsed, or approved by advertisers.
Our site is committed to publishing independent, accurate content guided by strict editorial guidelines. Before articles and reviews are published on our site, they undergo a thorough review process performed by a team of independent editors and subject-matter experts to ensure the content’s accuracy, timeliness, and impartiality. Our editorial team is separate and independent of our site’s advertisers, and the opinions they express on our site are their own. To read more about our team members and their editorial backgrounds, please visit our site’s About page.