
Written by: Alexandra Anderson
Edited by: Lillian Castro

Reviewed by: Christina Lewis


Learning how to host your own website sounds like a daunting task, no matter if it’s your first site or 100th. Fortunately, you have tons of options when figuring out where to house your burgeoning online presence.
Just as your choices for making a website range from using a super-simple site builder to hand coding, hosting a website can be as easy — or as difficult — as you wish. We much prefer coupling performance and security upgrades with peace of mind by finding a respected web hosting provider, but the more adventurous may opt to run a server from home.
Hosting your own website still has some serious obstacles, including dynamic IP addresses, bandwidth constraints, and electricity costs, but we can walk you through how to set up a server for Windows — or Linux-based sites. Up first, take a look at our favorite website hosting services, or skip ahead using the links below:
Why You Should Buy Web Hosting
Instead of trying to host a website locally, you can go through a web hosting provider and still have the same control of server management. A shared hosting plan is the best for beginners and those who need affordable solutions, while virtual and dedicated hosting options allocate more server resources and fine-grain control.
When you purchase a web hosting plan from a hosting service, you get oodles of features. Common perks may include unlimited bandwidth, a free website builder, 24/7 customer support, and an intuitive control panel to accomplish site administration tasks. A control panel comes in handy if you need to install WordPress, which is one of the most popular CMS platforms for websites of all kinds.
Below we’ll dive into some of our favorite web hosts so you can find a web hosting company that’s right for you.
Best Cheap (Shared) Hosting
For those looking for the easiest way to host your own website, look no further than the affordable shared hosting providers listed below. Don’t let the low prices fool you — a shared web hosting company still provides premium services with personable customer support available 24/7.
Shared computing resources mean you sacrifice a little bit of flexibility, but you should find all your software needs met with easy one-click installations and automatic SSL certificates. Take a look at our reviews of the best shared hosting plans.
1. Hostinger.com

Monthly Starting Price $2.49
- Unlimited everything, from storage to databases
- FREE site builder & WP performance upgrades
- FREE daily or weekly backups
- Custom control panel and auto-installation scripts
- SSH access & unlimited FREE SSL certificates
- Get started on Hostinger now.
CHEAP
RATING
★★★★★
Our Review
As the shared hosting market becomes increasingly saturated, unlimited storage, bandwidth, and email accounts have become surprisingly average. Hostinger, however, extends the routine, expected metrics to greater lengths — the number of websites, databases, FTP users, subdomains, and parked domains are all unrestricted for most customers. Go to full review »
| Money Back Guarantee | Disk Space | Domain Name | Setup Time |
|---|---|---|---|
| 30 days | 50 GB SSD – 200 GB SSD | FREE (1 year) | 3 minutes |
2. HostArmada.com

Monthly Starting Price $2.49
- FREE cPanel integration and Softaculous apps
- Auto daily backups and web application firewall
- Reliable and redundant cloud servers
- FREE SSL encryption and website migration
- 99.99% uptime guarantee
- Get started on HostArmada now.
CHEAP
RATING
★★★★★
Our Review

HostArmada’s cloud network spans four continents, with datacenters in Europe, the US, Asia, and Australia. Its server redundancy and website optimization features allow users to run stable and performant sites for end users across the globe while running a simplified hosting environment. Go to full review »
| Money Back Guarantee | Disk Space | Domain Name | Setup Time |
|---|---|---|---|
| 45 days | 15 GB SSD – 40 GB SSD | FREE (1 year) | 3 minutes |
3. ScalaHosting.com
Monthly Starting Price $2.95
- 1-click install for WordPress, Drupal and 400 others
- Unlimited email accounts, databases & bandwidth
- 24/7 tech support for beginners and pros alike
- 12-month or 36-month plan at $2.95 /month
- Anytime unconditional money-back guarantee
- Get started on ScalaHosting now.
CHEAP
RATING
★★★★★
Our Review
It’s tough to argue with a shared hosting service that comes with all-SSD storage and unlimited bandwidth, databases, and email accounts. ScalaHosting provides all the above and several other premium features for a very affordable price. Go to full review »
| Money Back Guarantee | Disk Space | Domain Name | Setup Time |
|---|---|---|---|
| 30 days | 10 GB SSD – 50 GB SSD | FREE (1 year) | 6 minutes |
Beginner website owners really can’t go wrong with a shared hosting plan. The value it provides for its price is a fair bargain. Plus, shared hosting accounts are also very easy to manage. Unlike unmanaged VPSes and dedicated servers, every shared host provides an easy-to-use control panel for website management.
More shared hosting providers »
Best VPS Hosting
The primary advantage of a VPS, or virtual private server, is scalability — and the fact that you can scale up resources only as you need them, making it cost-efficient, too. You get maximum flexibility whether you choose a managed service or opt to handle server configurations and maintenance yourself. Check out reviews of the VPS providers we recommend if this alternative sounds up your alley:
4. Hostinger.com
Monthly Starting Price $5.99
- Cloud-based SSD storage for speed and reliability
- Double your RAM with burst periods
- FREE dedicated IPv4 and IPv6 addresses
- Custom control panel for reboots and OS installs
- HostingAdvice readers enjoy more than 50% off
- Get started on Hostinger now.
VPS
RATING
★★★★★
Our Review
Hostinger’s laser focus on providing affordable hosting solutions shines brightest with the company’s VPS packages. The company provides six different virtual server plans, including one that costs less than $5. Go to full review »
| Setup Time | Disk Space | CPU | RAM |
|---|---|---|---|
| 6 minutes | 50 GB NVMe – 400 GB NVMe | 1 – 8 cores | 4 GB – 32 GB |
5. Kamatera.com

Monthly Starting Price $4.00
- Cloud VPS that’s more flexible and affordable
- Load balancer, firewall, and managed services
- Premium Intel CPUs with 300% more power
- Choose between monthly or hourly billing
- Sign up today for a 30-day FREE trial
- Get started on Kamatera now.
VPS
RATING
★★★★★
Our Review
Backed by cutting-edge cloud computing technology, Kamatera adds instant and limitless scalability to the VPS hosting marketplace. Each cloud or virtual server is equipped with blazing-fast SSD storage and Intel Xeon Platinum CPUs. Go to full review »
| Setup Time | Disk Space | CPU | RAM |
|---|---|---|---|
| 5 minutes | 20 GB SSD – 4 TB SSD | 1 – 32 cores | 1 GB – 128 GB |
6. A2Hosting.com

Monthly Starting Price $2.99
- Turbo server & cache options for faster page loads
- Well-built plans starting with 4GB RAM
- FREE CDN plus auto-installs with Softaculous
- Multilingual support and up to unlimited databases
- Enhanced security with and daily kernel updates
- Get started on A2 Hosting now.
VPS
RATING
★★★★★
Our Review
While A2 Hosting’s turbocharged shared hosting platform gives site owners ample room to grow, the company’s tech prowess is on full display with its portfolio of VPS options. Ranging from unmanaged, bare-metal environments to stress-free, fully managed space, A2 Hosting is sure to have the perfect option for your expanding online presence. Go to full review »
| Setup Time | Disk Space | CPU | RAM |
|---|---|---|---|
| 7 minutes | 20 GB SSD – 450 GB SSD | 1 – 10 cores | 1 GB – 32 GB |
Once you’ve outgrown the resource constraints of a shared server, it’s time to upgrade to a VPS. The best part is that many entry-level VPS plans cost roughly the same as shared servers. You can spend as little (or as much) as you want.
Best Dedicated Servers
The perks to dedicated hosting include as much RAM and processing power as you want, complete isolation so a neighboring website’s demise won’t bring down your own, and the best uptime and performance stats money can buy — and we’re not talking a boatload of money.
While dedicated servers are the priciest of the server types, they’re a dream when compared to the costs and headaches of hosting a website yourself. Below are a few top-recommended dedicated server plans:
7. InMotionHosting.com

Monthly Starting Price $69.99
- Bare-metal or managed servers available
- 1-on-1 time with a server administrator
- 99.99% uptime via Smart Routing™ technology
- Tier 1 network with redundant bandwidth
- SSH root access and DDoS protection on all servers
- Upgrade for cPanel, migration, and auto backups
- Get started on InMotion now.
DEDICATED
RATING
★★★★★
Our Review
InMotion Hosting offers amazingly fast and reliable dedicated hosting on market-leading hardware — making it an easy choice for anyone seeking a premium dedicated server host. From free SSDs to a fanatical support team, InMotion has all the bases covered for both small-scale and large-scale operations. Go to full review »
| Setup Time | Disk Space | CPU | RAM |
|---|---|---|---|
| 7 minutes | 1 TB SSD – 3.2 TB SSD | 12 – 32 cores | 192 GB DDR4 – 512 GB DDR4 |
8. IONOS.com

Monthly Starting Price $32.00
- Explore server deals to find the best rates
- High powered modern AMD and Intel processors
- Unlimited traffic and 1 Gbit/s network connectivity
- 8-minute deployment with full API control
- Auto backups, DDoS protection, and RAID-1 storage
- Get started on 1&1 IONOS now.
DEDICATED
RATING
★★★★★
Our Review
If you need blazing-fast speed, optimum uptime, top-notch flexibility, and full control over the fate of your website the dedicated servers from 1&1 IONOS have you covered. The company offers an assortment of entry-level, performance-focused, and business-class server options. Go to full review »
| Setup Time | Disk Space | CPU | RAM |
|---|---|---|---|
| 7 minutes | 480 GB SSD – 2 TB HDD | 2 – 32 cores | 12 GB – 256 GB |
9. LiquidWeb.com

Monthly Starting Price $75.00
- Linux or Windows with choice of 3 control panels
- 100% network and power uptime guarantees
- Custom configurations and instant provisioning
- Auto-migrations, backups, and real-time monitoring
- Block/object storage and load balancer add-ons
- Get started on Liquid Web now.
DEDICATED
RATING
★★★★★
Our Review
Liquid Web’s strong suit is managed dedicated server hosting. The company owns and operates five state-of-the-art datacenters in the US and Europe works tirelessly to build and maintain custom solutions for added performance and security. Go to full review »
| Setup Time | Disk Space | CPU | RAM |
|---|---|---|---|
| 8 minutes | 480 GB SSD – 960 GB SSD (+ 2 TB SATA) | 4 – 16 cores | 16 GB – 64 GB |
Even though dedicated servers are the priciest of the bunch, the amount of money you’ll save compared to hosting your own server is astounding.
More dedicated server providers »
How to Host Your Own Server
For the more adventurous tech nerds out there, and we mean that endearingly, there are few greater allures than becoming your own website host. Cut out the third-party hosting providers by following these steps.
Windows: How to Host Your Own Website Using Your PC as a WAMP Server
First, let’s try hosting a website using your personal computer with the Windows operating system. Less than one-third of all websites use Windows, meaning your hosting options tend to be a little more limited than those of Linux developers. But if ASP.NET and C are what you code in, then Windows is the way to go.
Step 1: Get Started With WAMP
To make this super easy, we’ll use a WAMP installation program (of which there are several) called WampServer. This will cover your Windows, Apache, MySQL, and PHP. You could also opt to install each package manually, but this process requires much more work and is error-prone.

First, download the 32-bit or 64-bit WAMP-binary here, follow the on-screen instructions, and launch WampServer when it’s done. (Note: There may be a port 80 conflict with your Skype software, but there’s a fix for that.)
Upon installation, a www directory will be created automatically. You’ll likely find it here: c:wampwww
From that directory, you can create subdirectories (called “projects” in WampServer), and put any HTML or PHP files inside those subdirectories. If you click on the localhost link in the WampSever menu or open your internet browser with the URL http://localhost, you should be shown the main screen of WampServer.
Step 2: Create an HTML Page and Configure MySQL
To test our WampServer, we can put an example file called “info.php” into our www-directory. Go directly to this directory by clicking “www directory” in the WampServer menu. From there, create a new file with the sample code below and save it.

Now you can browse to http://localhost/info.php to see the details of your PHP installation. You can create any HTML and PHP file structure to suit your needs.
If you click on the phpMyAdmin menu option, you can start configuring your MySQL databases (which may be needed for a CMS like WordPress). The phpMyAdmin login screen will open in a new browser window. By default, the admin username will be root, and you can leave the password field blank.
From there, you can create new MySQL databases and alter existing ones. Most software, like WordPress, will automatically set up a new database for you, though.
Step 3: Make the Site Public
By default, the Apache configuration file is set to deny any incoming HTTP connections, except in the case of someone coming from the localhost. To make your site publicly accessible, you need to change the Apache configuration file (httpd.conf). You can find and edit this file by going to the WampServer menu, clicking Apache, and selecting httpd.conf. Find these few lines of code:

In the screenshot above, you would replace line 2 with “Order Allow,Deny” and change line 3 to “Allow from all.”
Restart all WampServer services by clicking “Restart All Services” in the menu. The site should now be accessible from beyond your localhost. Confirm there isn’t a PC firewall blocking web requests. You may need to set up port-forwarding on your internet router as well.
Step 4: Using a Domain Name
To use a domain name with your WAMP installation, we’ll need to configure some files first. Let’s assume that our example.com domain has an A record in your DNS with the IP address 100.100.100.100.
First, we need to add the following line to the C:Windowssystem32driversetchosts file:
100.100.100.100 exampleNext, we need to edit the httpd.conf file again (accessible via the WampServer menu) to add a virtual host. Once that file is open, look for “Virtual hosts,” and uncomment the line after it, which should be this:
# Virtual hosts
Include conf/extra/httpd-vhosts.conf
Now, we need to manually add a file in “C:wampbinapacheApache-VERSIONconfextra” (VERSION is your Apache version). Create a file in Notepad, or your text editor of choice. Add the following code, and save the file in that Apache directory.

Click “Restart All Services” in the WampServer menu to activate these changes. Confirm your site is accessible via its domain name. Voila!
Linux: How to Host Your Own Website on a Linux Machine
Let’s now cover how to set up Apache, MySQL, and PHP on a Linux system. LAMP stacks are the most common Linux hosting configuration but don’t be afraid to play with NGINX or LiteSpeed webservers.
Step 1: Install Your Software Using the Terminal
To start our LAMP software install, type the following in the terminal:
sudo apt install apache2 mysql-server php libapache2-mod-php7.0
During the installation process, you will be asked to enter (and re-enter) a password for the MySQL root user. Technically, it’s not necessary (as it should have been done upon installation), but just to be sure, we will restart the Apache webserver.
sudo /etc/init.d/apache2 restartAny time you change the global configuration of Apache, you need to execute the command below, unless you do the configuration using local .htaccess files.
Step 2: Check PHP
To confirm your PHP server works and see what PHP modules are currently available, you can place a test PHP file in the webserver root directory (/var/www/html/):
sudo echo "" > /var/www/html/info.phpWe can now visit that PHP page by browsing to http://localhost/info.php.
You should see the currently running PHP version, current configuration, and currently installed modules. Note that you can later install other PHP modules using the Ubuntu package manager, as some PHP applications might require that. To determine which extra modules are available, search within the graphical package manager, or simply use the command line:
apt search php | grep moduleStep 3: Check MySQL
As most content management systems, including WordPress, Joomla, and Drupal, use MySQL databases, we should also confirm our installation worked and the software is fully updated. To see if your MySQL installation is working, type “service mysql status” into the terminal.
If you don’t see that the MySQL Community Server started, you can type “sudo service mysql restart” to restart the MySQL server. From here, we can use the MySQL command-line client to manage databases.
For this, we need to use the admin credentials we typed earlier when MySQL was installed. Reach the login prompt by entering:
$ mysql -u root -pThe CMS will often automatically create the database for you, but sometimes you need to do something to the database manually. PHPMyAdmin is a friendly database management tool most web experts will recommend.
Finally, configure the /etc/phpmyadmin/config.inc.php file using the steps described here.
Step 4: Configure DNS
To use your own domain for your local web server, you’ll need to configure Apache to accept web requests for your domain. First, make sure your domain’s DNS has an A record (which points to a specific IP address) for your domain name, e.g., www.example.com. Your DNS hosting provider will have online tools to correctly set up these DNS records.
Once that is done, we’ll use the dig tool. To request the A record for www.example.com, type:
$ dig www.example.com A
;; ANSWER SECTION:
www.example.com. 86400 IN A 100.100.100.100
AUTHORITY SECTION:
example.com. 86398 IN NS a.iana-servers.net.
example.com. 86398 IN NS b.iana-servers.net.
You can use this tool to direct a URL, such as http://www.example.com, to the server with an IP address you specify.
Step 5: Configure Apache
Now, we need to tell Apache to accept web requests for our name www.example.com and from what directory to serve content when we get those requests. To do that, we’ll set up a directory for our example.com domain.

Create an example index.html file before setting some filesystem permissions using the code above.
To see the page, the last step is to set up a Virtual Host file for Apache for our domain.
sudo cp /etc/apache2/sites-available/000-default.conf /etc/apache2/sites-available/example.com.conf

sudo nano /etc/apache2/sites-available/example.com.conf
Now edit the file to look like this (the optional comments are not shown here):
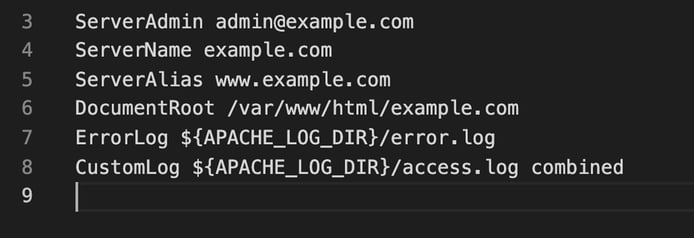
Next, reload Apache for the changes to take effect:
sudo a2ensite example.com.conf

sudo service apache2 reload
Edit your local /etc/hosts file by adding a line with your IP address and domain name. Be sure to change the “100.100.100.100” to match the IP address of your domain:
100.100.100.100 example.com
We can now visit your self-hosted site by going to http://www.example.com.
Why We Say Hosting a Website Yourself is a Bad Idea
So we’ve covered that it’s doable — but just because you can do something doesn’t mean you should. Let’s look at the pros and cons of dabbling in a DIY web hosting service.
The Upside
The upshot: Setting up your own website and its hosting is not just a highly educational experience but it’s rather fun to execute. It’s a geeky project, sure, but if you’re reading this, you probably fall into the category of folks who would call that fun.
Once you’ve done it, you will have the power to make any system changes you desire. A lot of folks have gone from learning to host a site locally to tackling more complex programming, web design, and online commerce. The experience is the biggest draw.
The Downsides
Unfortunately, there are still quite significant downsides to self-hosting your website:
- You’ll experience slow connections compared to professional hosts. Your ISP upload speed is likely much slower than your download speed, so serving content to your website visitors will be very slow, too.
- You have to deal with an ever-changing (dynamic) IP address. Though there are DNS configuration tools to help with this somewhat, this can potentially cause problems at any time.
- It costs a lot of electricity and you’ll run into power outages often.
- You’re responsible for hardware and software maintenance.
So you can see why we highly encourage investing in a quality web host for your site or application. And we have you covered there, too. Take a look at the types of hosting available to see what hosting options are out there and within your budget.
Learning How to Host a Website From Home Is Fun But Impractical
Although we covered the steps to setting up a good website hosting system on both Windows and Linux, I’d like to remind everyone that self-hosting is ultimately not practical for any serious project. While we can hope this will become more feasible in the future, it’s not the case as of late.
Hosting your own website is akin to those who can build their own PC or reassemble an engine. Those achievements are quite possible for seasoned pros and perhaps even highly motivated beginners — but the end results often can’t stack up in the long run with the commercially built counterparts. The hosting providers we featured at the beginning of the article have been in the industry for decades and simply know how to host websites at scale.
Fun fact: There are folks working on distributed content-serving ideas. Projects like IPFS could allow people to create decentralized content hosting networks — eventually. The internet keeps surprising us, so who knows what the future of hosting holds! Follow us to follow the industry and all its twists and turns.
HostingAdvice.com is a free online resource that offers valuable content and comparison services to users. To keep this resource 100% free, we receive compensation from many of the offers listed on the site. Along with key review factors, this compensation may impact how and where products appear across the site (including, for example, the order in which they appear). HostingAdvice.com does not include the entire universe of available offers. Editorial opinions expressed on the site are strictly our own and are not provided, endorsed, or approved by advertisers.
Our site is committed to publishing independent, accurate content guided by strict editorial guidelines. Before articles and reviews are published on our site, they undergo a thorough review process performed by a team of independent editors and subject-matter experts to ensure the content’s accuracy, timeliness, and impartiality. Our editorial team is separate and independent of our site’s advertisers, and the opinions they express on our site are their own. To read more about our team members and their editorial backgrounds, please visit our site’s About page.


")
